Back to Parent

Outcome


Intention & Goal

When we have detailed close-up work to do at a mirror, existing lighting is not enough or the user can't get to the mirror close enough to see the details (on their face, in their mouth etc.) that they need a vanity mirror. However, many vanity mirrors don't provide enough coherent lighting either.

What if there was an interactive ambient vanity mirror that responded to the visual needs of the user with real-time lighting adaption?

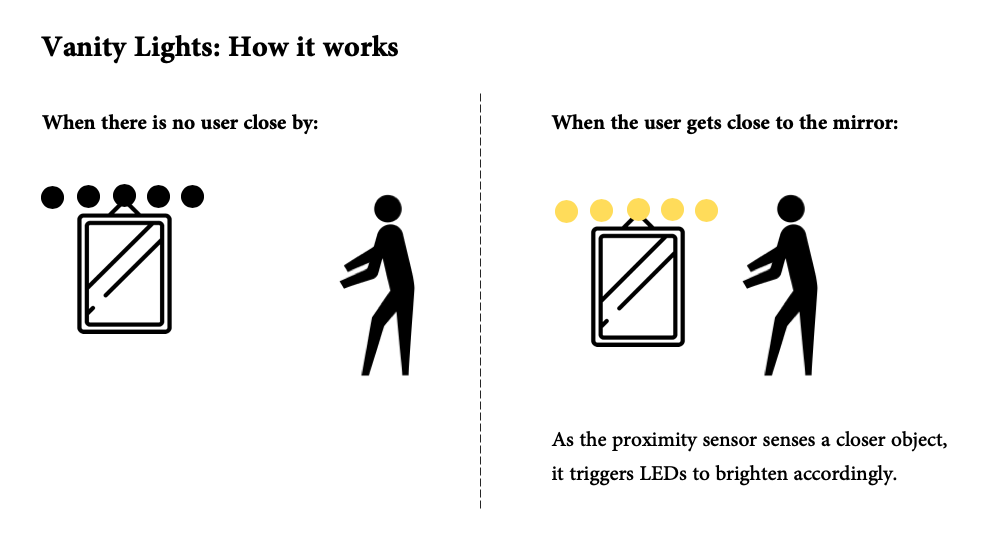
Vanity Lights is a mirror that comes with embedded lighting, which increases brightness as the user gets closer to the mirror and dims out as the user gets away. When user gets closer to the mirror, Vanity Lights will sense that user needs to see details/has a detailed work with mirror, so it provides with more lighting without the user having to make any adjustments meanwhile. When the user gets away from it, the mirror understands that it is not being used anymore, so the light fades out.

Vanity Lights is also an energy-saving, sustainable object that makes sure only enough lighting is consumed at the optimum level brightness and no electricity consumed when the mirror is not being used. Say bye to forgetting the lights on with Vanity Mirror!


Use cases include putting on make-up, doing oral care, plucking eyebrows, putting on contact lenses etc.

Screen shot 2019 03 13 at 9.41.55 am
Show Advanced Options

Programming

Step 1: Learning how to use proximity sensors and LEDs

Step 2: Choosing the type of proximity sensor that would work the most accurately with less programming burden as well as the proximity range that would be relevant to my intention

SHARP IR Sensor (GP2Y0A21YK0F)

Step 3: Choosing LEDs that would give the necessary lighting setting that would respond the need of the user

Neopixel strip surrounding the mirror (14 LEDs)

Step 4: Integration - making proximity sensor talk to LEDs through the code

Analog reading and mapping out the distance to LED brightness values

Step 5: Lasercutting acrylic mirror and box to cover the sensor and breadboard


Prototype Video

Show Advanced Options

List of Components

1. Breadboard

2. SHARP GP2Y0A21YK0F IR sensor (distance range: 10cm - 80cm)

3. Neopixel LED strip

4. Acrylic mirror (8x8)

Reflection

Challenges: 

First of all, I had a big challenge with the coding for the integration of the sensor value with the LED output. I tried a couple of different ways of coding.

Secondly, the IR proximity sensor was reading values consistently. As an object got closer to the sensor, the sensor would have a consistent, gradual change in the analog read values, but the values would reverse halfway. The sensor value would increase and at some point start decreasing again although the object would get closer. 

Next Steps:

1. Fix the code: sensor value input. Changing the sensor may be required.

2. Laser cut acrylic mirror for a more aesthetic prototype

3. Laser cut plywood to cover up the circuits and the sensor

4. Can explore different proximity sensor to scale the use case

Drop files here or click to select

You can upload files of up to 20MB using this form.