
49-713 Designing for the Internet of Things
· 26 members
A hands-on introductory course exploring the Internet of Things and connected product experiences.
Found in Connected Cuisine
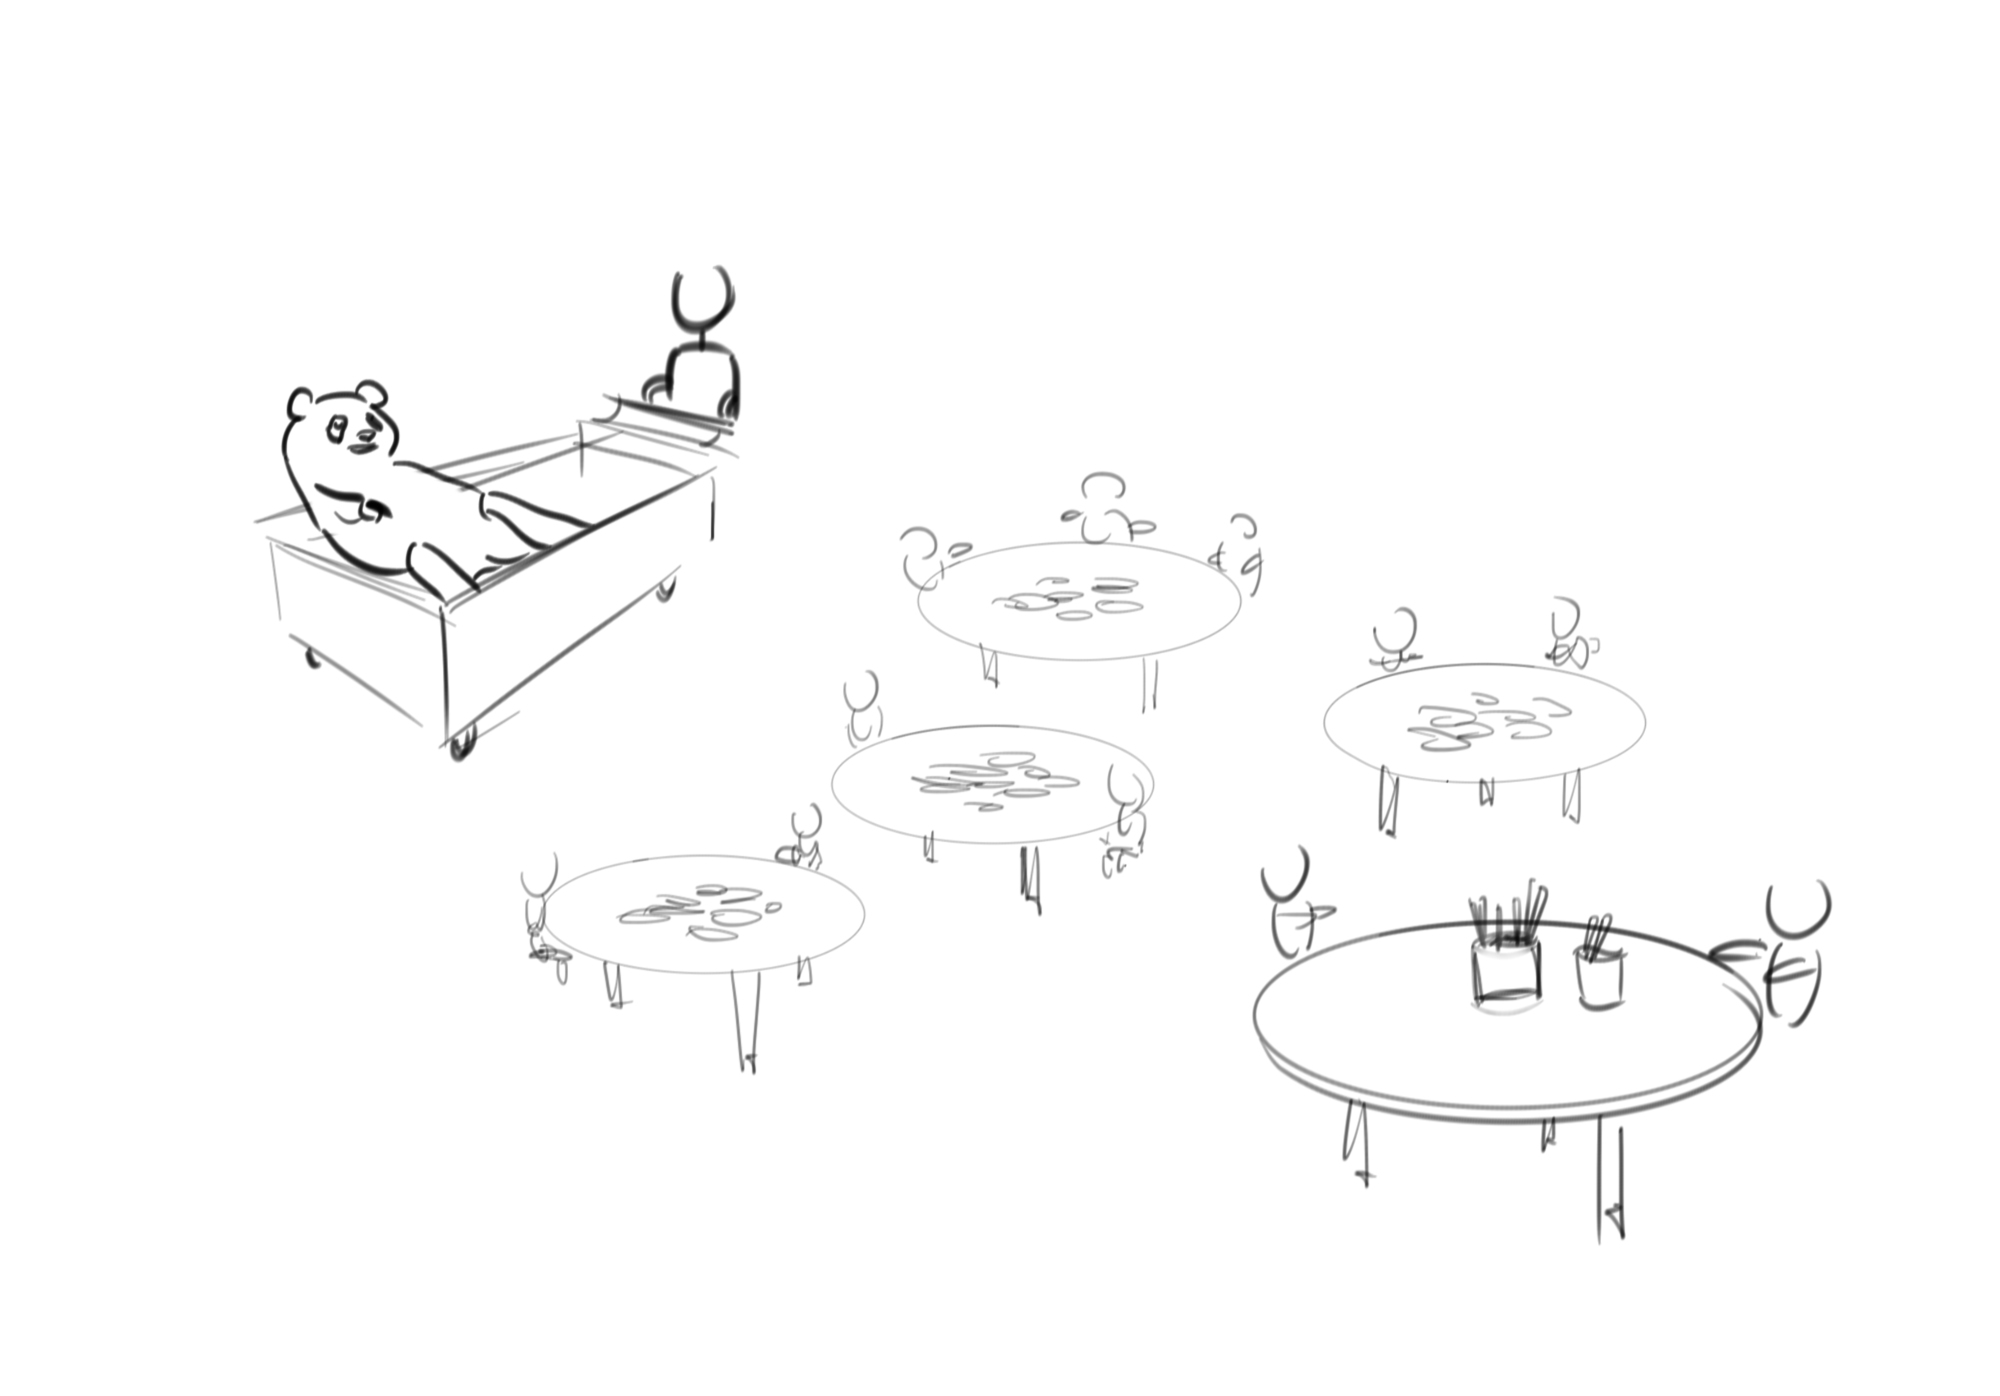
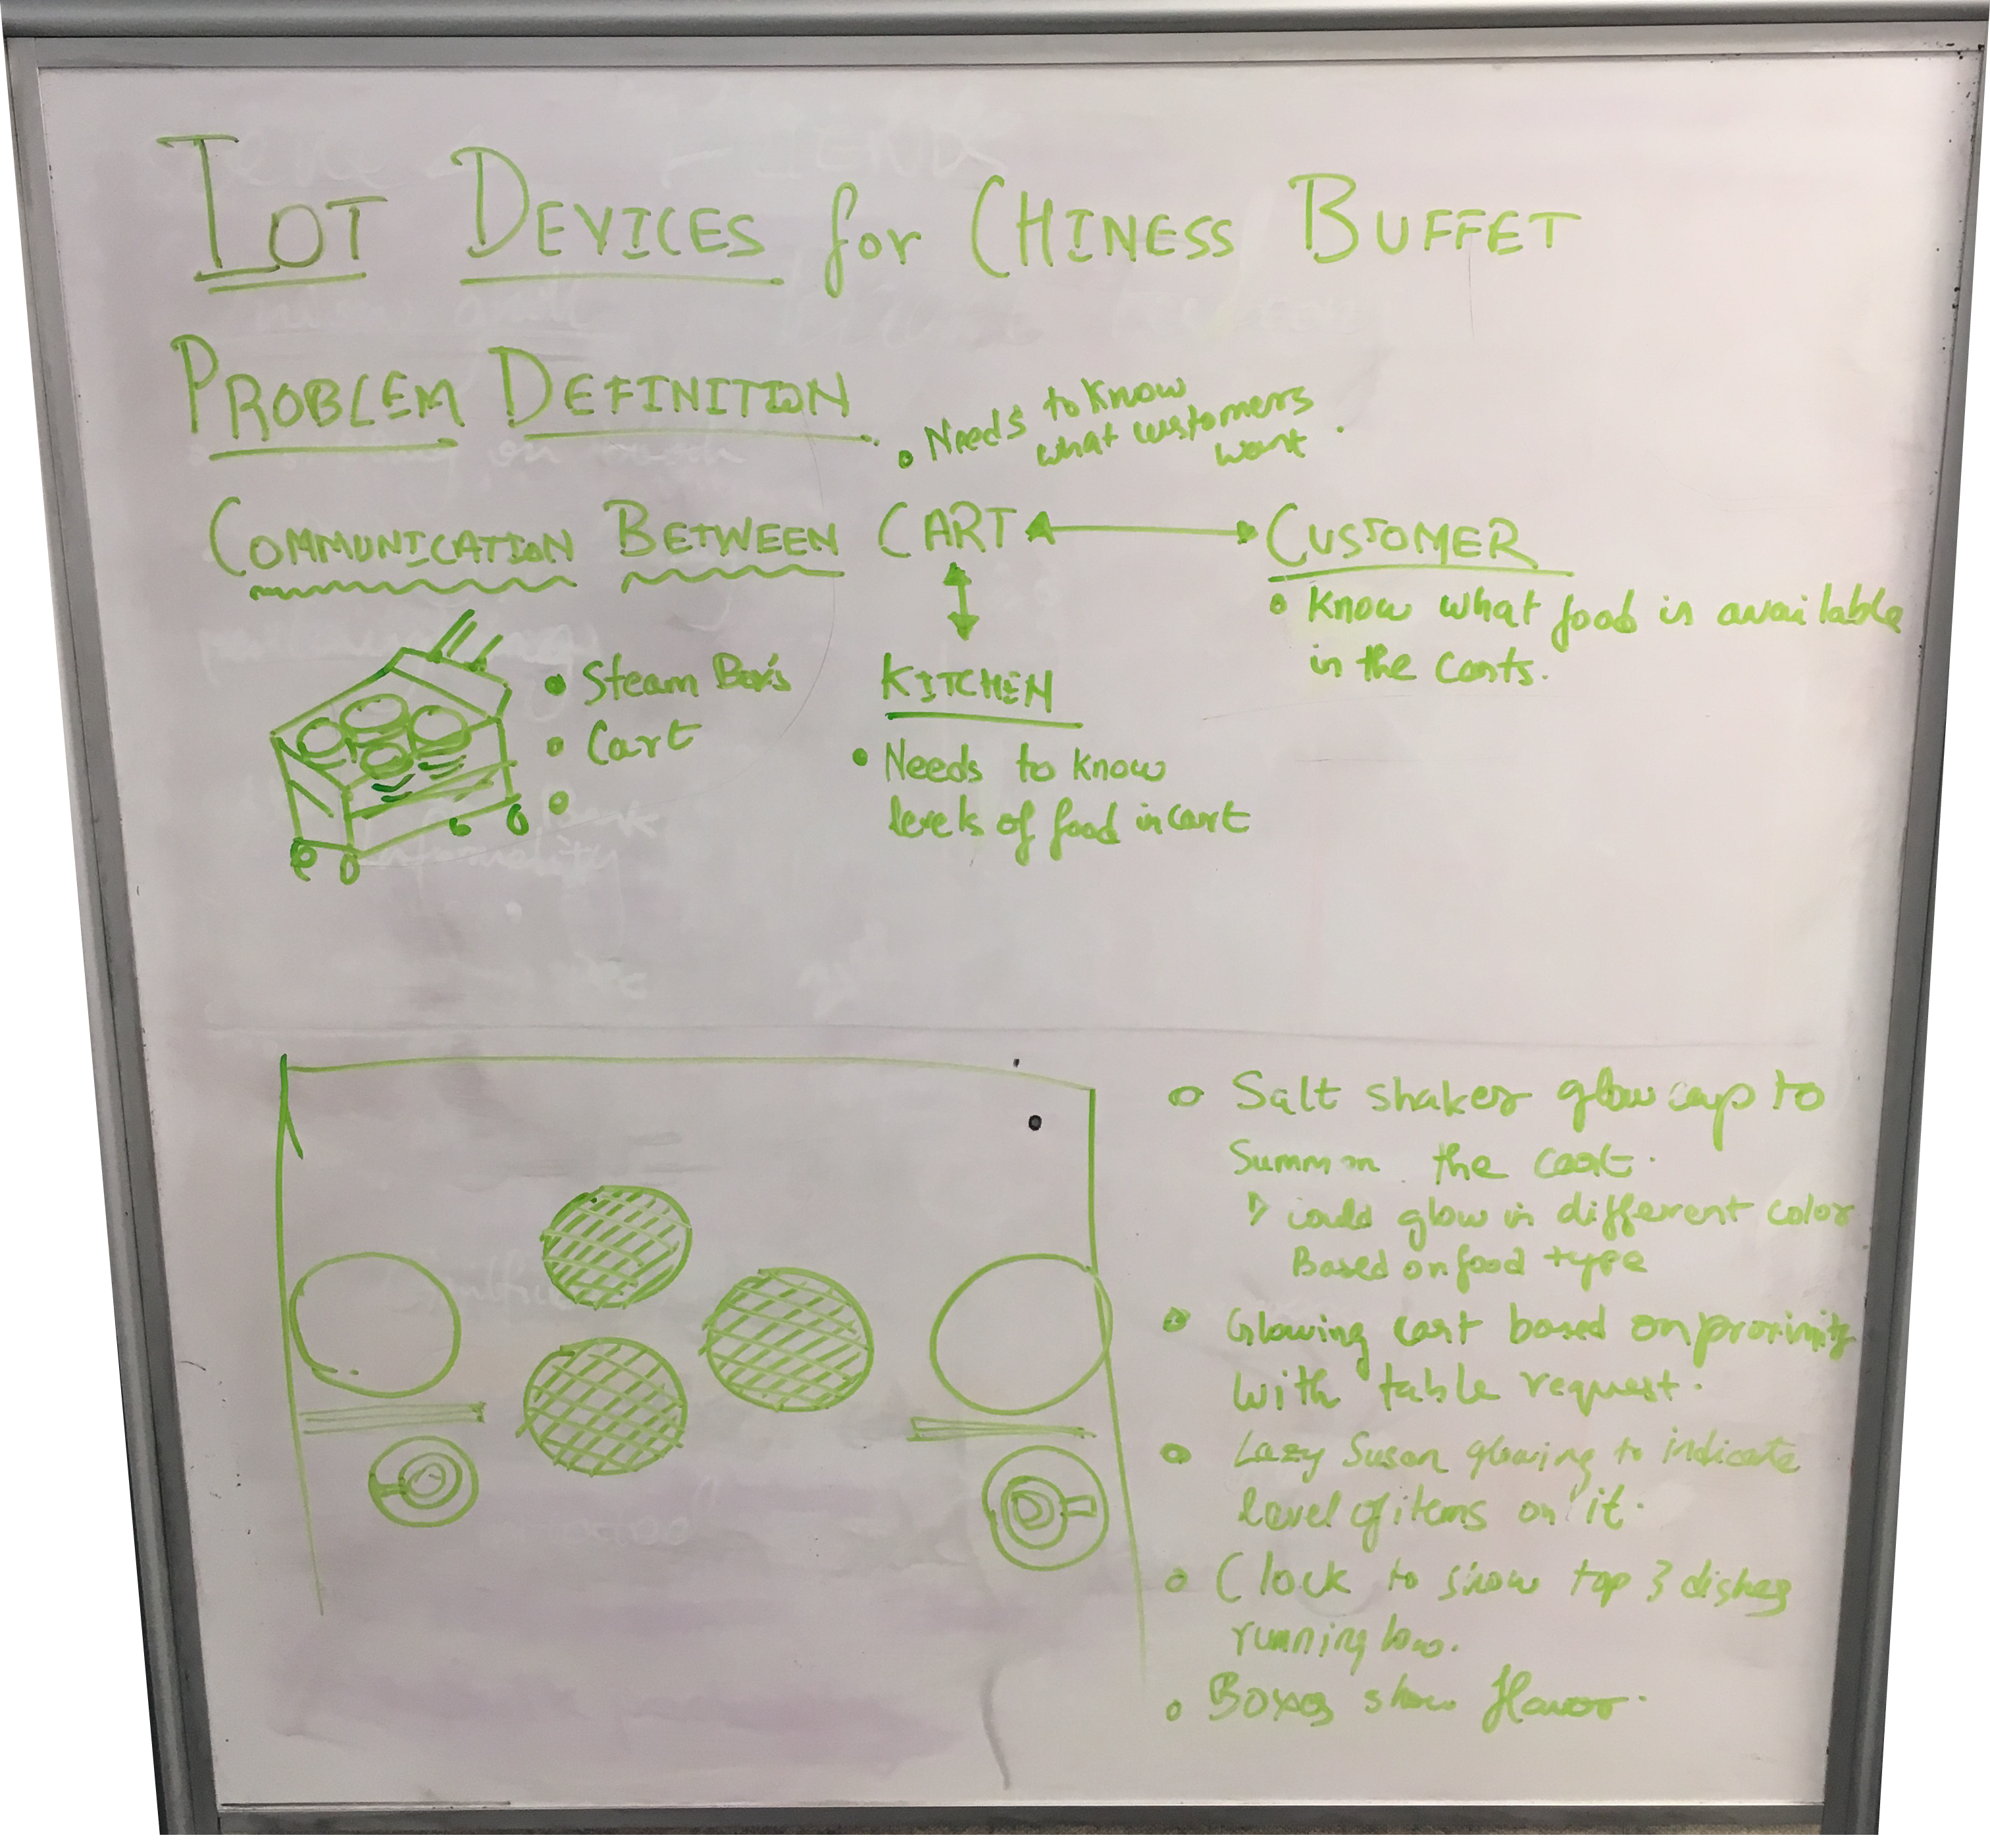
Our project goal is to enhance the user experience of ordering and delivering DimSum in a Chinese brunch context.
Dim Sum restaurant is a traditional place for Chinese elder people to spend hours hanging out with friends or families. The way ordering food works is there are food carts that keep moving around the restaurant with variety of Dim Sums and the customers pick what they want. Our mission was to make this ordering experience enjoyable and playful. So we decided to use two panda dolls to mimic the interaction between the customers and cart. Each customer is provided with a table panda, that upon pressing the belly, will raise its arm and turn on the electromagnet. This signifies the customer needs more food, and the cart panda points to the closest table panda that has the arm raised.
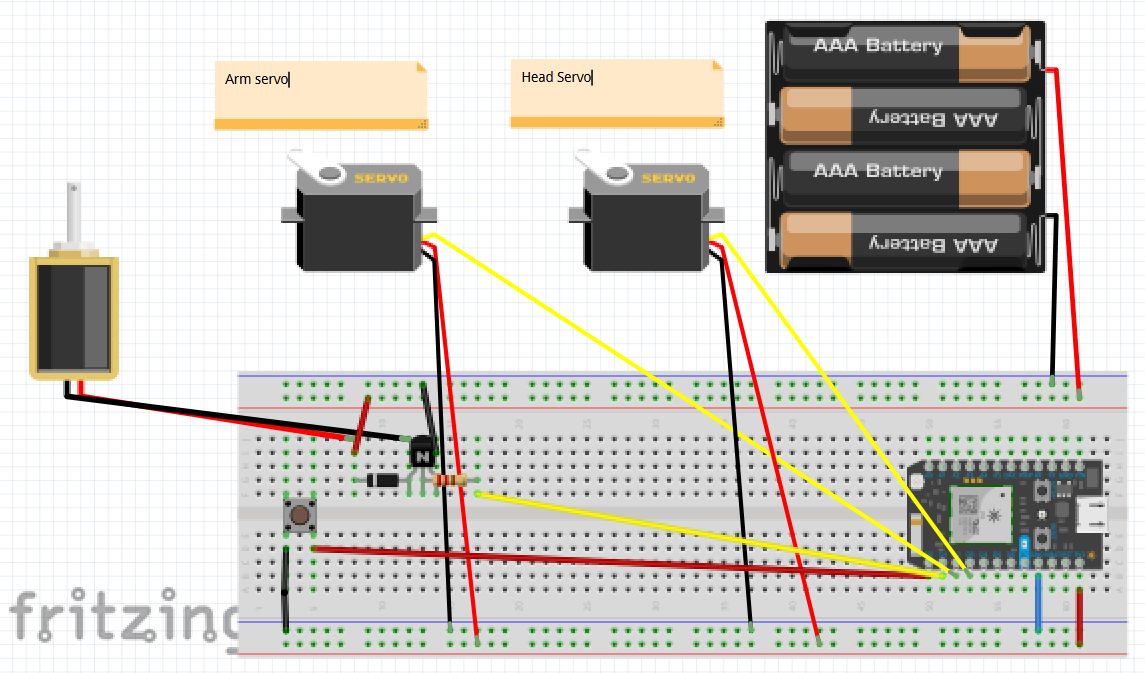
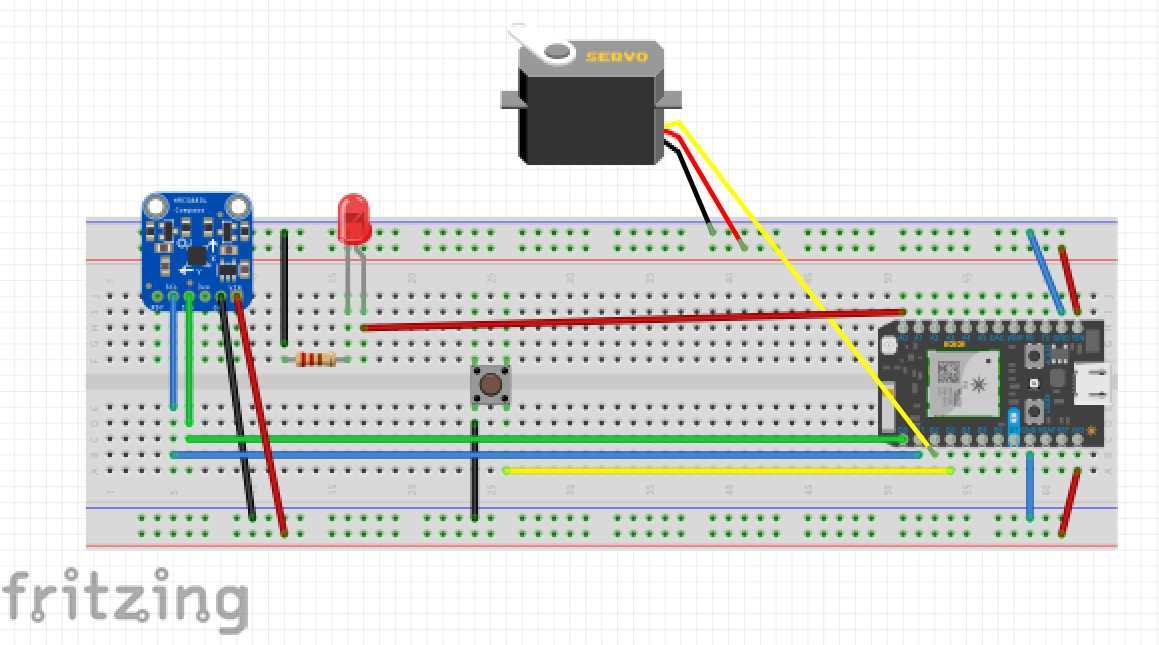
Photons - x 2
Breadboard - x 2
Electromagnet - x 1
Panda stuffed dolls - x 2
Magnetometer - x 1
Wooden box - x 2
Servo motor - x 3
PN2222 Transistor - x 1
1N4001 diode - x 1
270 Ω Resistor (red, purple, brown stripes) - x 1
Led - x 1
Push button - x 1
Lever button - x 1
Lego arm and head assembly
int armServoPin = D2;
int headServoPin = D3;
//int ledPin = D2;
int buttonPin = D0;
int electroMagPin = D1;
//int buttonPinArmDown = D1 ;
Servo pandaArmServo;
Servo pandaHeadServo;
int buttonState = LOW;
int servoPos = 50;
int magstrength = 255;
//
bool shouldDoNod = false;
bool isArmUp = false;

void setup(){
  Serial.begin(9600);
  pandaArmServo.attach(armServoPin); //Attaching Arm servo pin to Arm servo
  pandaHeadServo.attach(headServoPin); // Attaching Head servo pin to Head servo
  pinMode(buttonPin , INPUT_PULLUP); //defining pin Mode
  pinMode(electroMagPin, OUTPUT); // defining electro mag output pin
  /*Particle.function("servo", servoControl);*/
  /*Particle.variable( "Nod" , &Nod , INT );*/
  Particle.subscribe( "diot2017/mashedpotatoes/panda/nod", Nodding );
}

void loop(){

  if( shouldDoNod )
  {
    doNod( );
    shouldDoNod = false;
  }

  int currentButtonState = digitalRead( buttonPin );

  if( buttonState == HIGH && buttonState != currentButtonState ) // Enter only if the button is pushed
  {
      Serial.println("Pressed");
      isArmUp = !isArmUp;
  }

  buttonState = currentButtonState;

  if( isArmUp && servoPos < 100 ){
    // Check if arm is up or down
    servoPos = 100 ; // if arm down, make the new servo position 150 (up)
    pandaArmServo.write( servoPos ); // update servo position
    Serial.println("Arm DOWN");
    analogWrite(electroMagPin, magstrength); // switch the electro magnet ON

    delay( 1000 );
  }else if( !isArmUp && servoPos > 50 ){
    servoPos = 50 ; // if arm up, make the new servo position 50 (down)
    pandaArmServo.write( servoPos ); // update servo position
    Serial.println("Arm UP");
    Particle.publish("diot2017/mashedpotatoes/panda/LedOn");
    digitalWrite(electroMagPin, 0); // switch OFF the electro magnet
    delay( 1000 );


  }

  delay( 50 );
}

void doNod( )
{
  for (int i=0; i< 5; i++ ) // loop to nod head 5 times
  {
    Serial.println("Head UP");
    pandaHeadServo.write(50);
    delay(200);
    Serial.println("Head DOWN");
    pandaHeadServo.write (15);
    delay(200);
  }
}

/*int servoControl( String command ) // Panda head nodding function
{
  int n = command.toInt();
  Serial.println("DO NOD");
  if (n == 1){
    for (int i=0; i< 5; i++ ) // loop to nod head 5 times
    {
      Serial.println("Head UP");
      pandaHeadServo.write (90);
      delay(2000);
      Serial.println("Head DOWN");
      pandaHeadServo.write (15);
      delay(1000);
    }
  }
  return 1;
}*/

int Nodding( const char *event, const char *data ) // Panda head nodding function
{
  Serial.println("DO NOD");
  shouldDoNod = true;
  return 1;
}/*
* MotorKnob
*
* A stepper motor follows the turns of a potentiometer
* (or other sensor) on analog input 0.
*
* http://www.arduino.cc/en/Reference/Stepper
* This example code is in the public domain.
*/
/*
VIN - this is the power in pin, give it 3-5VDC. It is reverse-polarity protected. Use the same voltage as you do for the controlling microcontroller's logic. For an Arduino, 5V is best.
GND - this is the common power and data ground pin
3vo - This is the 3.3V output from the onboard regulator. It will be at 3.3V and you can grab up to 100mA from this to power other items
SDA and SCL - these are the I2C data and clock pins used to send and receive data from the module to your microcontroller. There are 10K pullups on these pins to the VIN pin. You can connect these pins to 5V I2C lines, there are level shifters on board to safely bring the pins down to 3V
RDY - this it the 'data ready' pin output. If you want to stream data at high speed (higher than 100 times a second) you may want to listen to this pin for when data is ready to be read. Check the datasheet for more details about using the RDY pin, we don't use it because we don't read that fast!
*/
/*
WIRING FOR PHOTON
VIN -> 3V3 (regulated)
GND -> GND
3v0 -> NONE
SDA -> D0 - YOU MUST USE THIS PIN
SCL -> D1 - YOU MUST USE THIS PIN
RDY -> NONE
*/
#include <Adafruit_Sensor.h>
#include <Adafruit_HMC5883.h>
Adafruit_HMC5883_Unified mag = Adafruit_HMC5883_Unified(12345);
int sPin = D2;
Servo myServo;
float angle = 0;
int ledPin = A1;
int switchPin = D3;
bool shouldToggleLed = false;
void setup() {
Serial.begin(9600);
myServo.attach(sPin);
Serial.println("HMC5883 Magnetometer Test"); Serial.println("");
/* Initialise the sensor */
if(!mag.begin())
{
/* There was a problem detecting the HMC5883 ... check your connections */
Serial.println("Ooops, no HMC5883 detected ... Check your wiring!");
while(1);
}
/* Display some basic information on this sensor */
displaySensorDetails();
pinMode( switchPin , INPUT_PULLUP); // sets pin as input for switch
pinMode( ledPin , OUTPUT ); // sets pin as output for LED
Particle.subscribe("diot2017/mashedpotatoes/panda/LedOn", Led);
}
void loop() {
if( shouldToggleLed )
{
digitalWrite( ledPin, HIGH );
shouldToggleLed = false;
}
else
{
digitalWrite( ledPin, LOW );
}
/* Get a new sensor event */
sensors_event_t event;
mag.getEvent(&event);
/* Display the results (magnetic vector values are in micro-Tesla (uT)) */
Serial.print("X: "); Serial.print(event.magnetic.x); Serial.print(" ");
Serial.print("Y: "); Serial.print(event.magnetic.y); Serial.print(" ");
Serial.print("Z: "); Serial.print(event.magnetic.z); Serial.print(" ");Serial.println("uT");
// Hold the module so that Z is pointing 'up' and you can measure the heading with x&y
// Calculate heading when the magnetometer is level, then correct for signs of axis.
float heading = atan2(event.magnetic.y, event.magnetic.x);
// Once you have your heading, you must then add your 'Declination Angle', which is the 'Error' of the magnetic field in your location.
// Find yours here: http://www.magnetic-declination.com/
// Mine is: -13* 2' W, which is ~13 Degrees, or (which we need) 0.22 radians
// If you cannot find your Declination, comment out these two lines, your compass will be slightly off.
float declinationAngle = 0.22;
heading += declinationAngle;
// Correct for when signs are reversed.
if(heading < 0)
heading += 2*PI;
// Check for wrap due to addition of declination.
if(heading > 2*PI)
heading -= 2*PI;
// Convert radians to degrees for readability.
float headingDegrees = heading * 180/M_PI;
Serial.print("Heading (degrees): "); Serial.println(headingDegrees);
delay(500);
//Panda Rotation
if ( headingDegrees > 180) {
angle = 360 - headingDegrees;
}
else {
angle = headingDegrees;
}
myServo.write (angle);
Serial.print("Rotation Angle (degrees): "); Serial.println(angle);
delay(1000);
//20 and 60 for arm
//acknowledgement
int buttonState = digitalRead(switchPin);
if( buttonState == LOW )
{
Particle.publish("diot2017/mashedpotatoes/panda/nod");
Serial.println ("It should nod");
}
}
void displaySensorDetails(void)
{
sensor_t sensor;
mag.getSensor(&sensor);
Serial.println("------------------------------------");
Serial.print ("Sensor: "); Serial.println(sensor.name);
Serial.print ("Driver Ver: "); Serial.println(sensor.version);
Serial.print ("Unique ID: "); Serial.println(sensor.sensor_id);
Serial.print ("Max Value: "); Serial.print(sensor.max_value); Serial.println(" uT");
Serial.print ("Min Value: "); Serial.print(sensor.min_value); Serial.println(" uT");
Serial.print ("Resolution: "); Serial.print(sensor.resolution); Serial.println(" uT");
Serial.println("------------------------------------");
Serial.println("");
delay(500);
}
void Led (const char *event, const char *data)
{
Serial.println( "LED Event triggered");
// turn the LED On
// analogWrite( ledPin, HIGH);
shouldToggleLed = true;
}
/*void Rotate()
{
delay()
}*/We as a group had difficulty to get the magnetometer sensor to detect the electromagnet as it was very noisy and hard to triangulate the source of the magnetic field accurately.
If we had more time we would explored IR sensor and triangulation as shown in this Cornell project https://people.ece.cornell.edu/land/courses/ece4760/FinalProjects/s2004/rd73/476finalpro.htm
or hack a indoor navigation systems like;
https://www.infsoft.com/solutions/indoor-navigationlike
It was hard to get the nodding and panda arm raise as we expected. Couple of reasons was the torque of the servo motor was not enough and the stuffed doll form factor was resisting as we repurposed it for the proof of concept. If we could have built the panda doll from scratch factoring in the arm and nodding structure we could have got the working more as we wanted.
Make the Panda location and pointing by the cart panda more robust
Make the form factor of the panda movement more robust
Explore how the we can expand this idea to restaurants other than dim sum diners.
We could also explore ways for the customers to specify the type of food along with the panda belly push.
Explore ways to predict or communicate demand in real time based on Dim Sums being ordered by customers to the kitchen.
A hands-on introductory course exploring the Internet of Things and connected product experiences.
~
March 6th, 2017