49-713 Designing for the Internet of Things
· 26 members
A hands-on introductory course exploring the Internet of Things and connected product experiences.
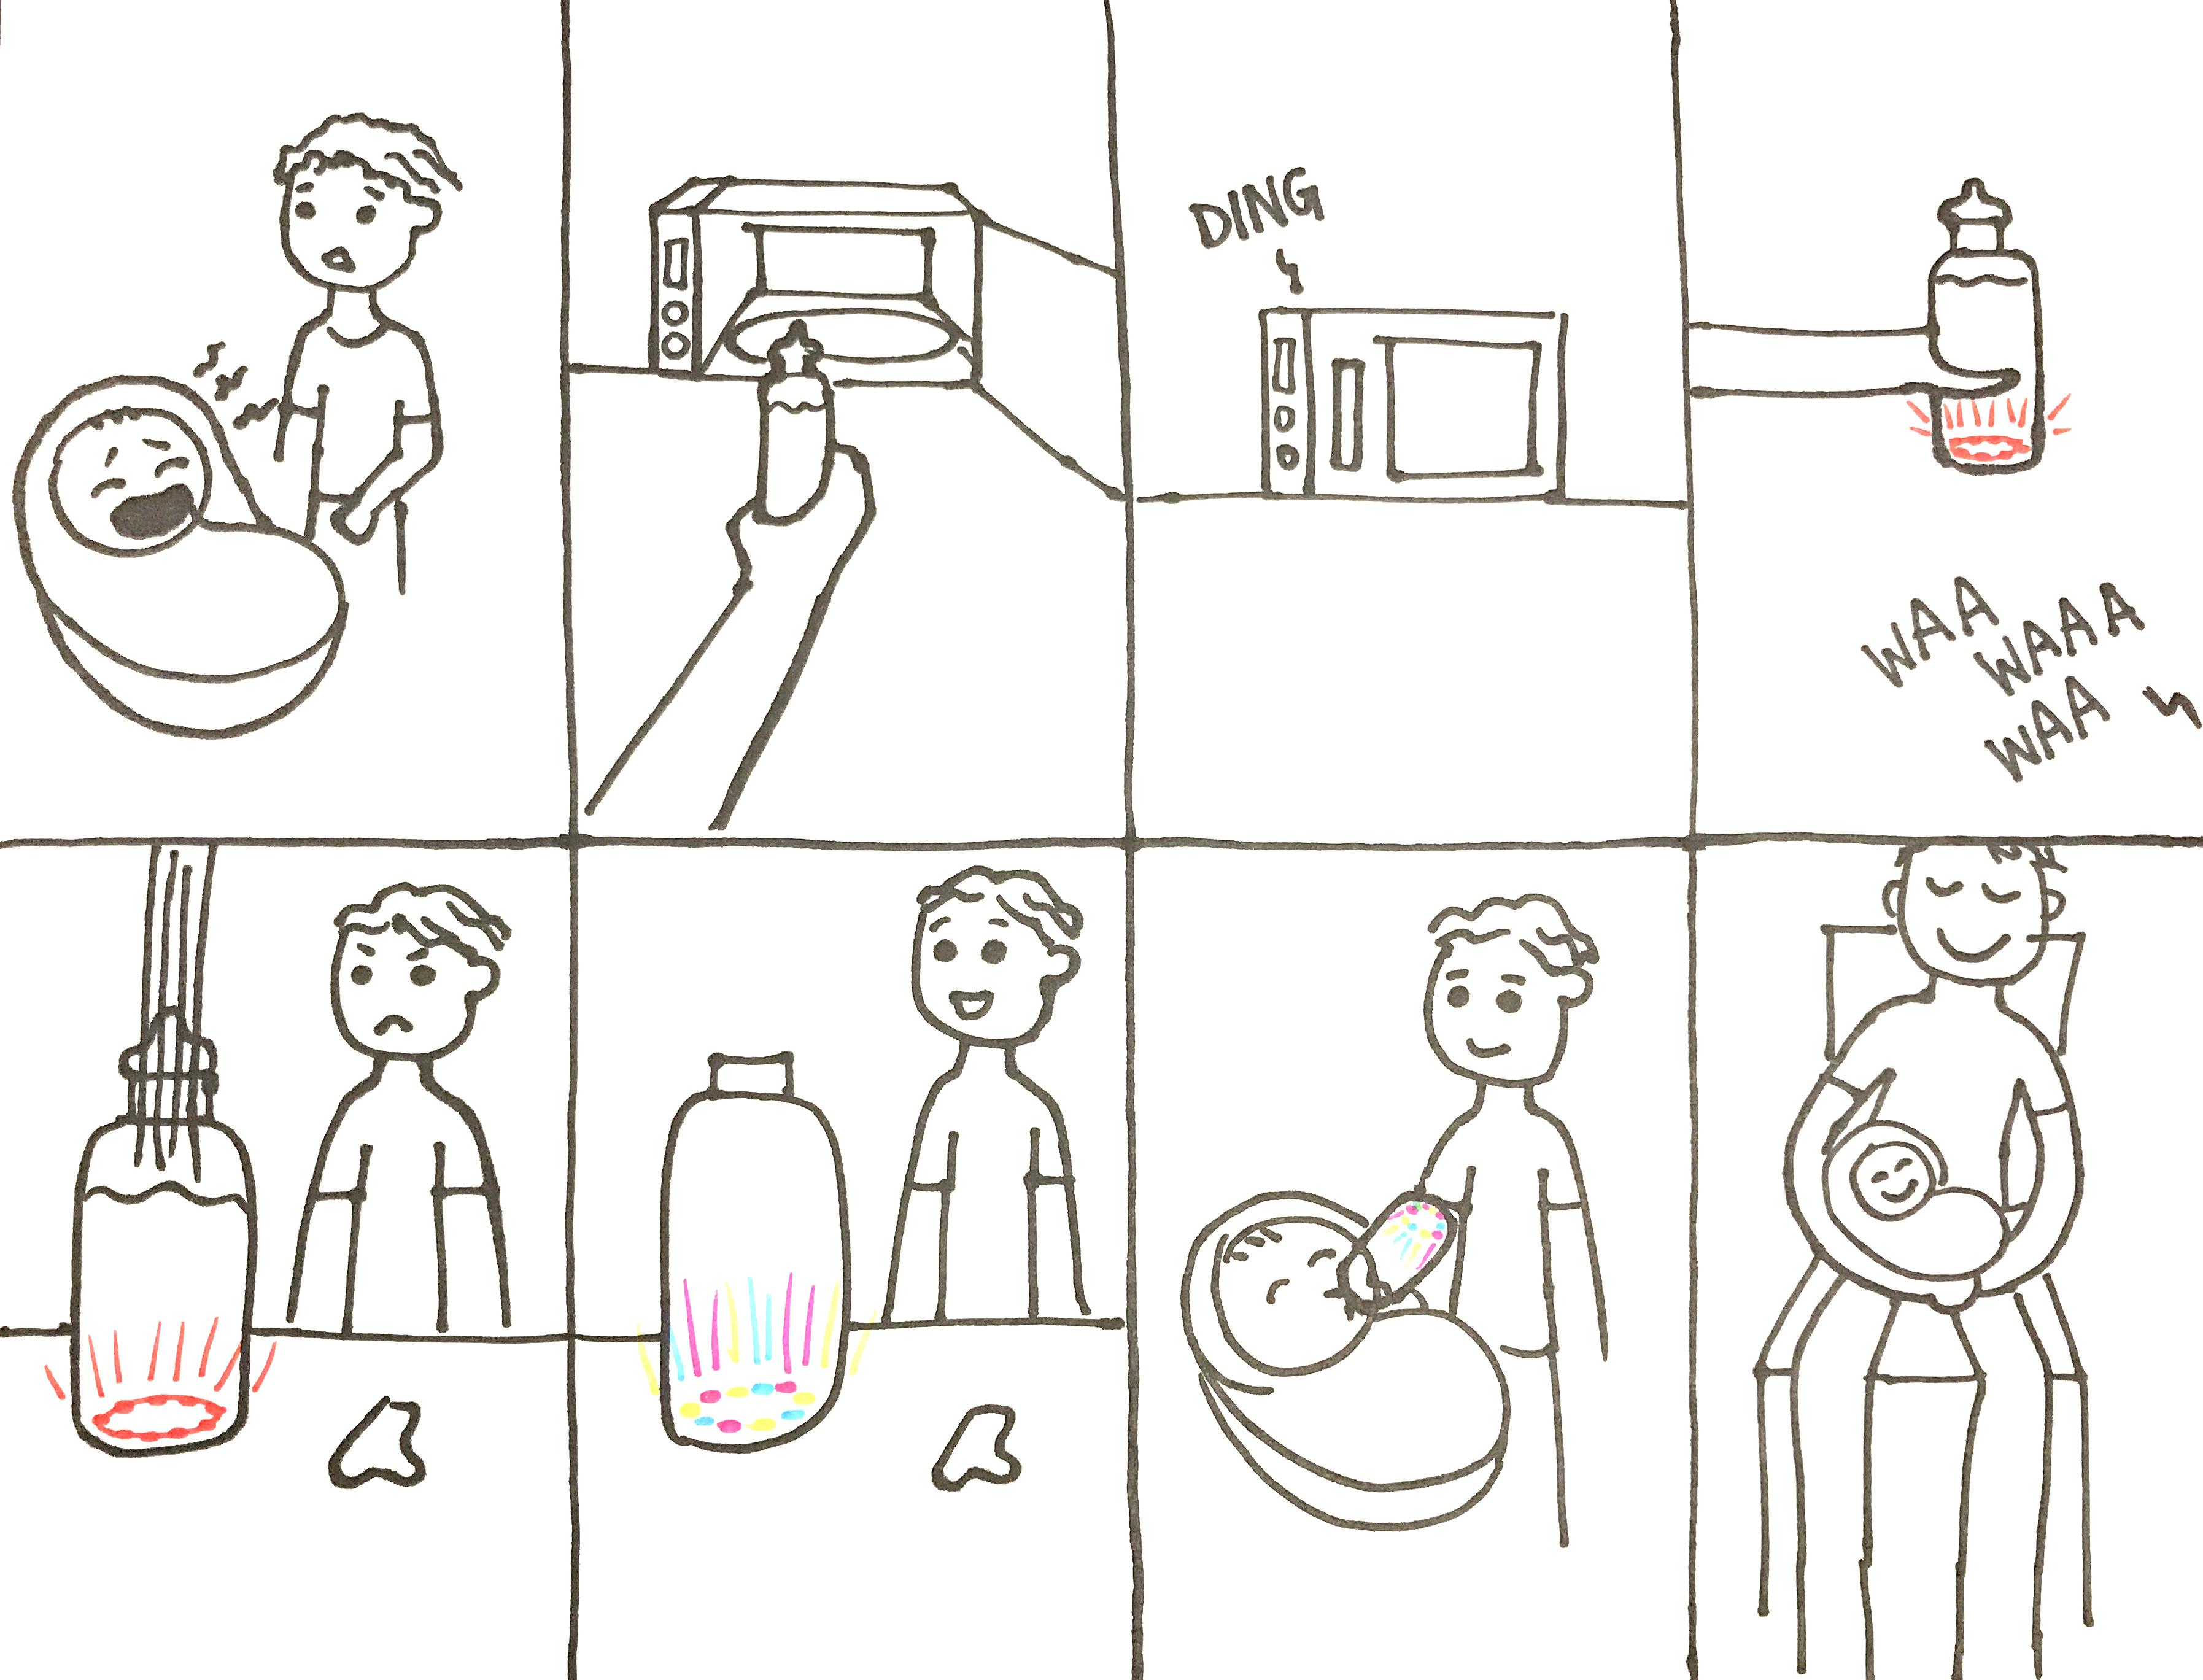
A smart baby bottle that can show and notify parents or baby carers when the liquid in the bottle is at the best temperature range for babies.
Feeding can be a time of anxiety for new parents. Trying to ensure that liquid is the right temperature can be even stressful. A baby’s milk is often heated using boiling water which could sometimes result in overheating and scald the baby. Traditionally, parents test the temperature by squirting a few milk onto their arm, relying on their sensory reaction to judge the temperature. This is messy and often inaccurate. While there are baby bottles with temperature readers on the market, we sought to design an ambient baby bottle that is connected to the internet to notify parents and uses LED lights to evoke certain emotions through color, intensity, and pattern.
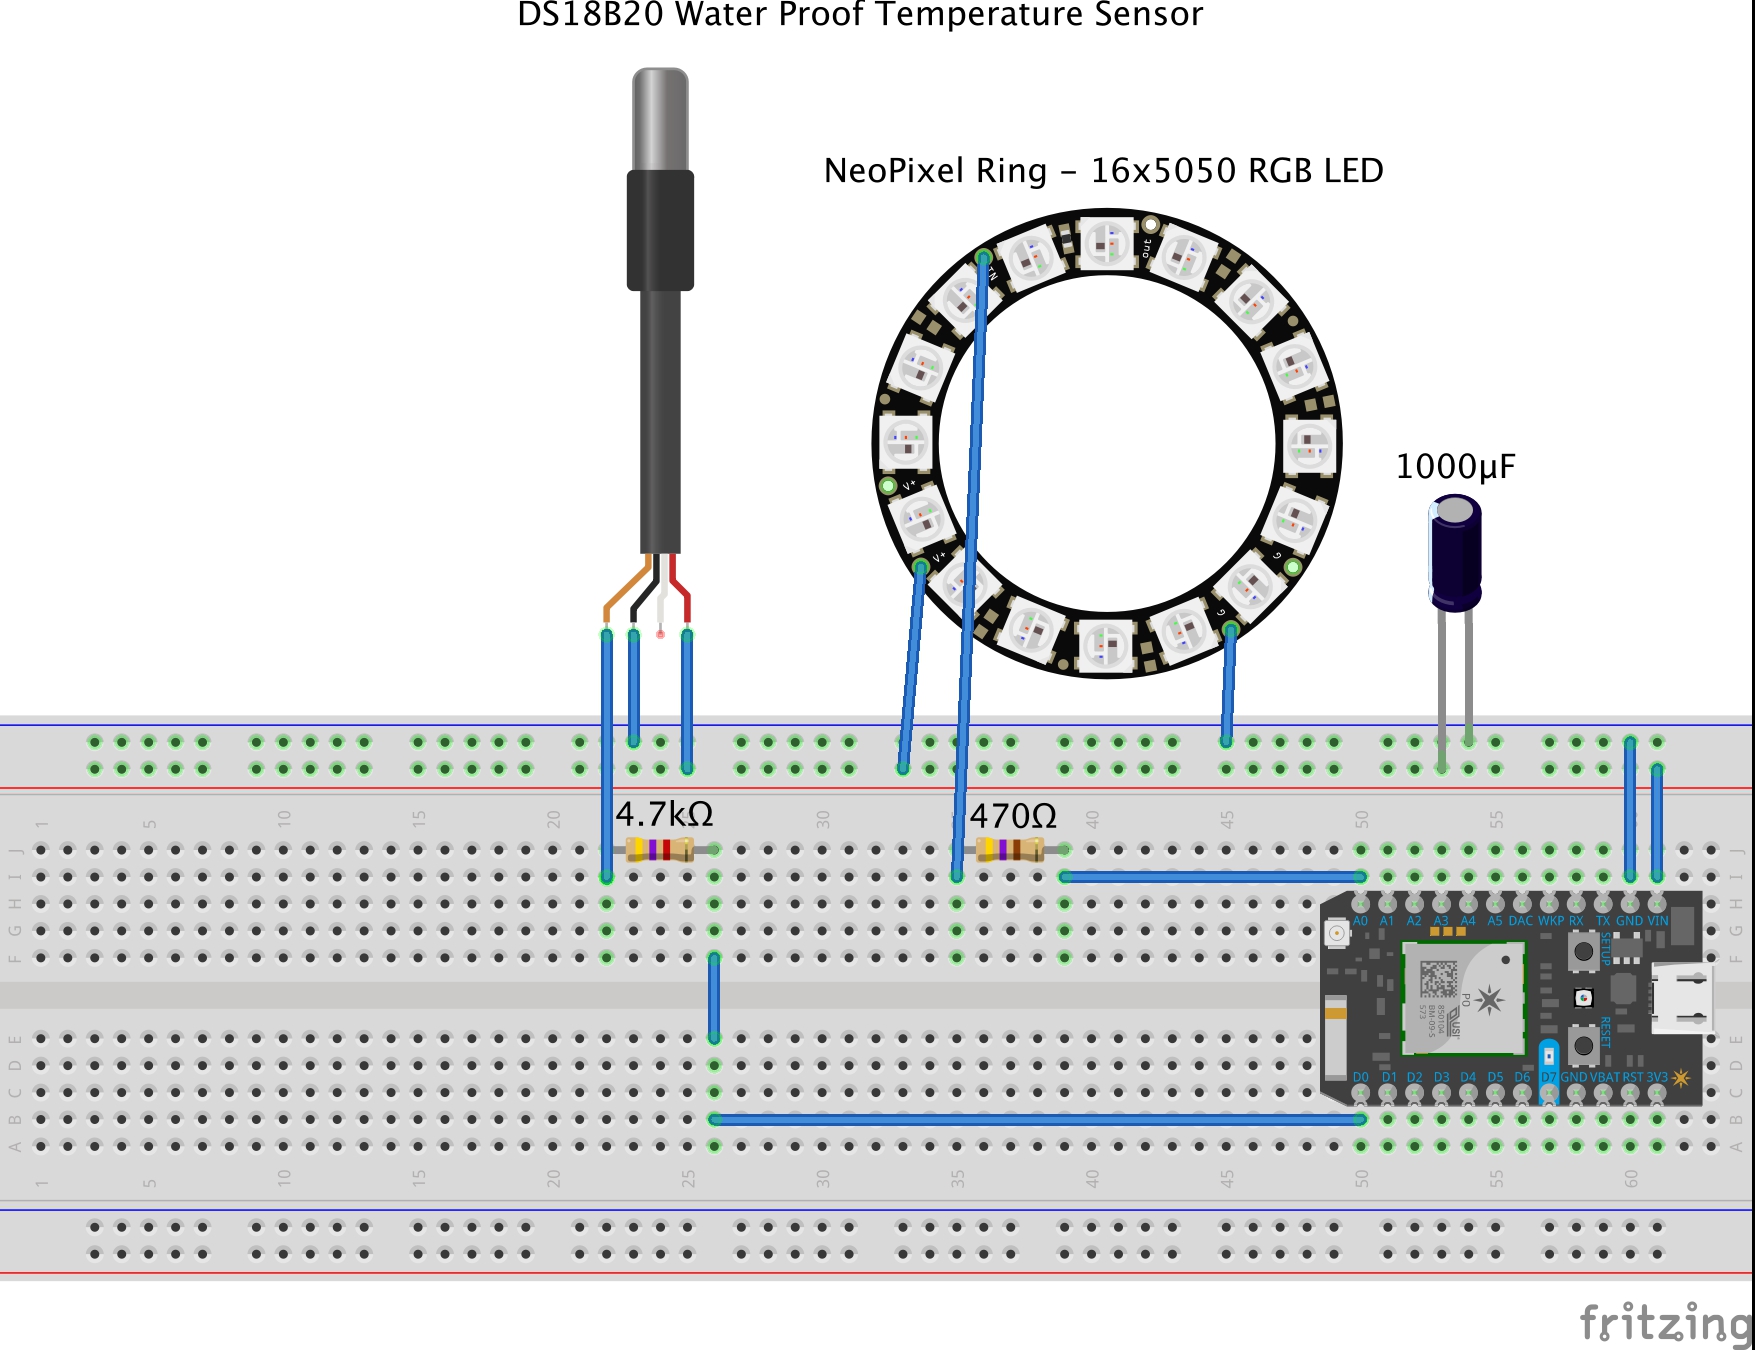
Our baby bottle indicator is a ring that is composed of 16 LED lights which will tell users if the temperature is just right to feed a baby safely through ambiently showing different light displays. The baby bottle will use the waterproof temperature sensor to detect the temperature and based on its reading, the indicator will display a certain light pattern. We designed each LED pattern scenario to evoke a specific emotion that will inform the users if the liquid is safe:
When the milk is too hot, the LED display will evoke the emotion of trepidation.Bill of Materials (sensors, input devices, actuators, and other components)
The iterative prototyping process starts with programming the NeoPixel ring. Different patterns of light are controlled by different methods. Then, the temperature sensor is added to control when to call the certain method to activate the certain pattern of the light. The temperature is also set as a cloud variable in order to use IFTTT service.
#include "Particle.h"
#include "neopixel.h"
#include "OneWire.h"
#include "inttypes.h"
#include "application.h"
#include "spark-dallas-temperature.h"

SYSTEM_MODE(AUTOMATIC);

//Set pixel COUNT, PIN and TYPE
#define PIXEL_PIN A0
#define PIXEL_COUNT 16
#define PIXEL_TYPE WS2812B

Adafruit_NeoPixel strip(PIXEL_COUNT, PIXEL_PIN, PIXEL_TYPE);

//temperature sensor
#define ONE_WIRE_BUS D0
OneWire oneWire(ONE_WIRE_BUS);
DallasTemperature sensors(&oneWire);


// Prototypes for local build, ok to leave in for Build IDE
void coldcycle(uint16_t wait);
void rightblink(uint16_t wait);
void hotblink(uint16_t wait);
uint32_t Wheel(byte WheelPos);
int watertemp;

void setup()
{
  Serial.begin(9600);
  sensors.begin();

  Particle.variable("water temperature", &watertemp, INT);

  strip.begin();
  strip.show(); // Initialize all pixels to 'off'
}

void loop()
{
  sensors.requestTemperatures(); // Send the command to get temperatures
  watertemp = sensors.getTempCByIndex(0);
  Serial.println(watertemp);

  if(watertemp > 37) {
    hotblink(300);
  }else if(watertemp <= 37 && watertemp > 33) {
    rightblink(200);
  }else if(watertemp == -127){ delay(10);
  }else {
    coldcycle(20);
  }

  delay(200);

  /*digitalWrite(motor, HIGH);*/
  /*coldcycle(20);*/
  /*rightblink(100);*/
  /*hotblink(100);*/
}

void coldcycle(uint16_t wait) {
  uint16_t i, j;

  for(j=0; j<256; j++) {
    for(i=0; i<strip.numPixels(); i++) {
      strip.setPixelColor(i, Wheel((i+j) & 255));
    }
    strip.show();
    delay(wait);
  }
}

// Input a value 0 to 255 to get a color value.
// The colours are a transition r - g - b - back to r.
uint32_t Wheel(byte WheelPos) {
  if(WheelPos < 127.5) {
   return strip.Color(WheelPos * 0.9, WheelPos * 0.4, 255);
  } else {
   WheelPos -= 127.5;
   return strip.Color(117.5 - WheelPos * 0.9, 51 - WheelPos * 0.4, 255);
  }
}

void rightblink(uint16_t wait) {
  uint16_t i;
  uint32_t blue = strip.Color(15, 179, 224);
  uint32_t pink = strip.Color(225, 15, 224);
  uint32_t yellow = strip.Color(242, 222, 9);
  const uint32_t colorpool[] = {blue, pink, yellow};

  for(i=0; i<strip.numPixels(); i++) {
    uint32_t randomcolor = colorpool [random (0, 3)];
    strip.setPixelColor(i, randomcolor);
  }
  strip.show();
  delay(wait);
}

void hotblink(uint16_t wait) {
  uint16_t i;
  uint32_t red = strip.Color(255, 0, 0);
  uint32_t orange = strip.Color(255, 85, 0);

  for(i=0; i<strip.numPixels(); i++) {
    strip.setPixelColor(i, orange);
  }
  strip.show();
  delay(wait);

  for(i=0; i<strip.numPixels(); i++) {
    strip.setPixelColor(i, red);
  }
  strip.show();
  delay(wait);

}A hands-on introductory course exploring the Internet of Things and connected product experiences.
A smart baby bottle that can show and notify parents or baby carers when the liquid in the bottle is at the best temperature range for babies.
February 5th, 2017