49-713 Designing for the Internet of Things
· 26 members
A hands-on introductory course exploring the Internet of Things and connected product experiences.
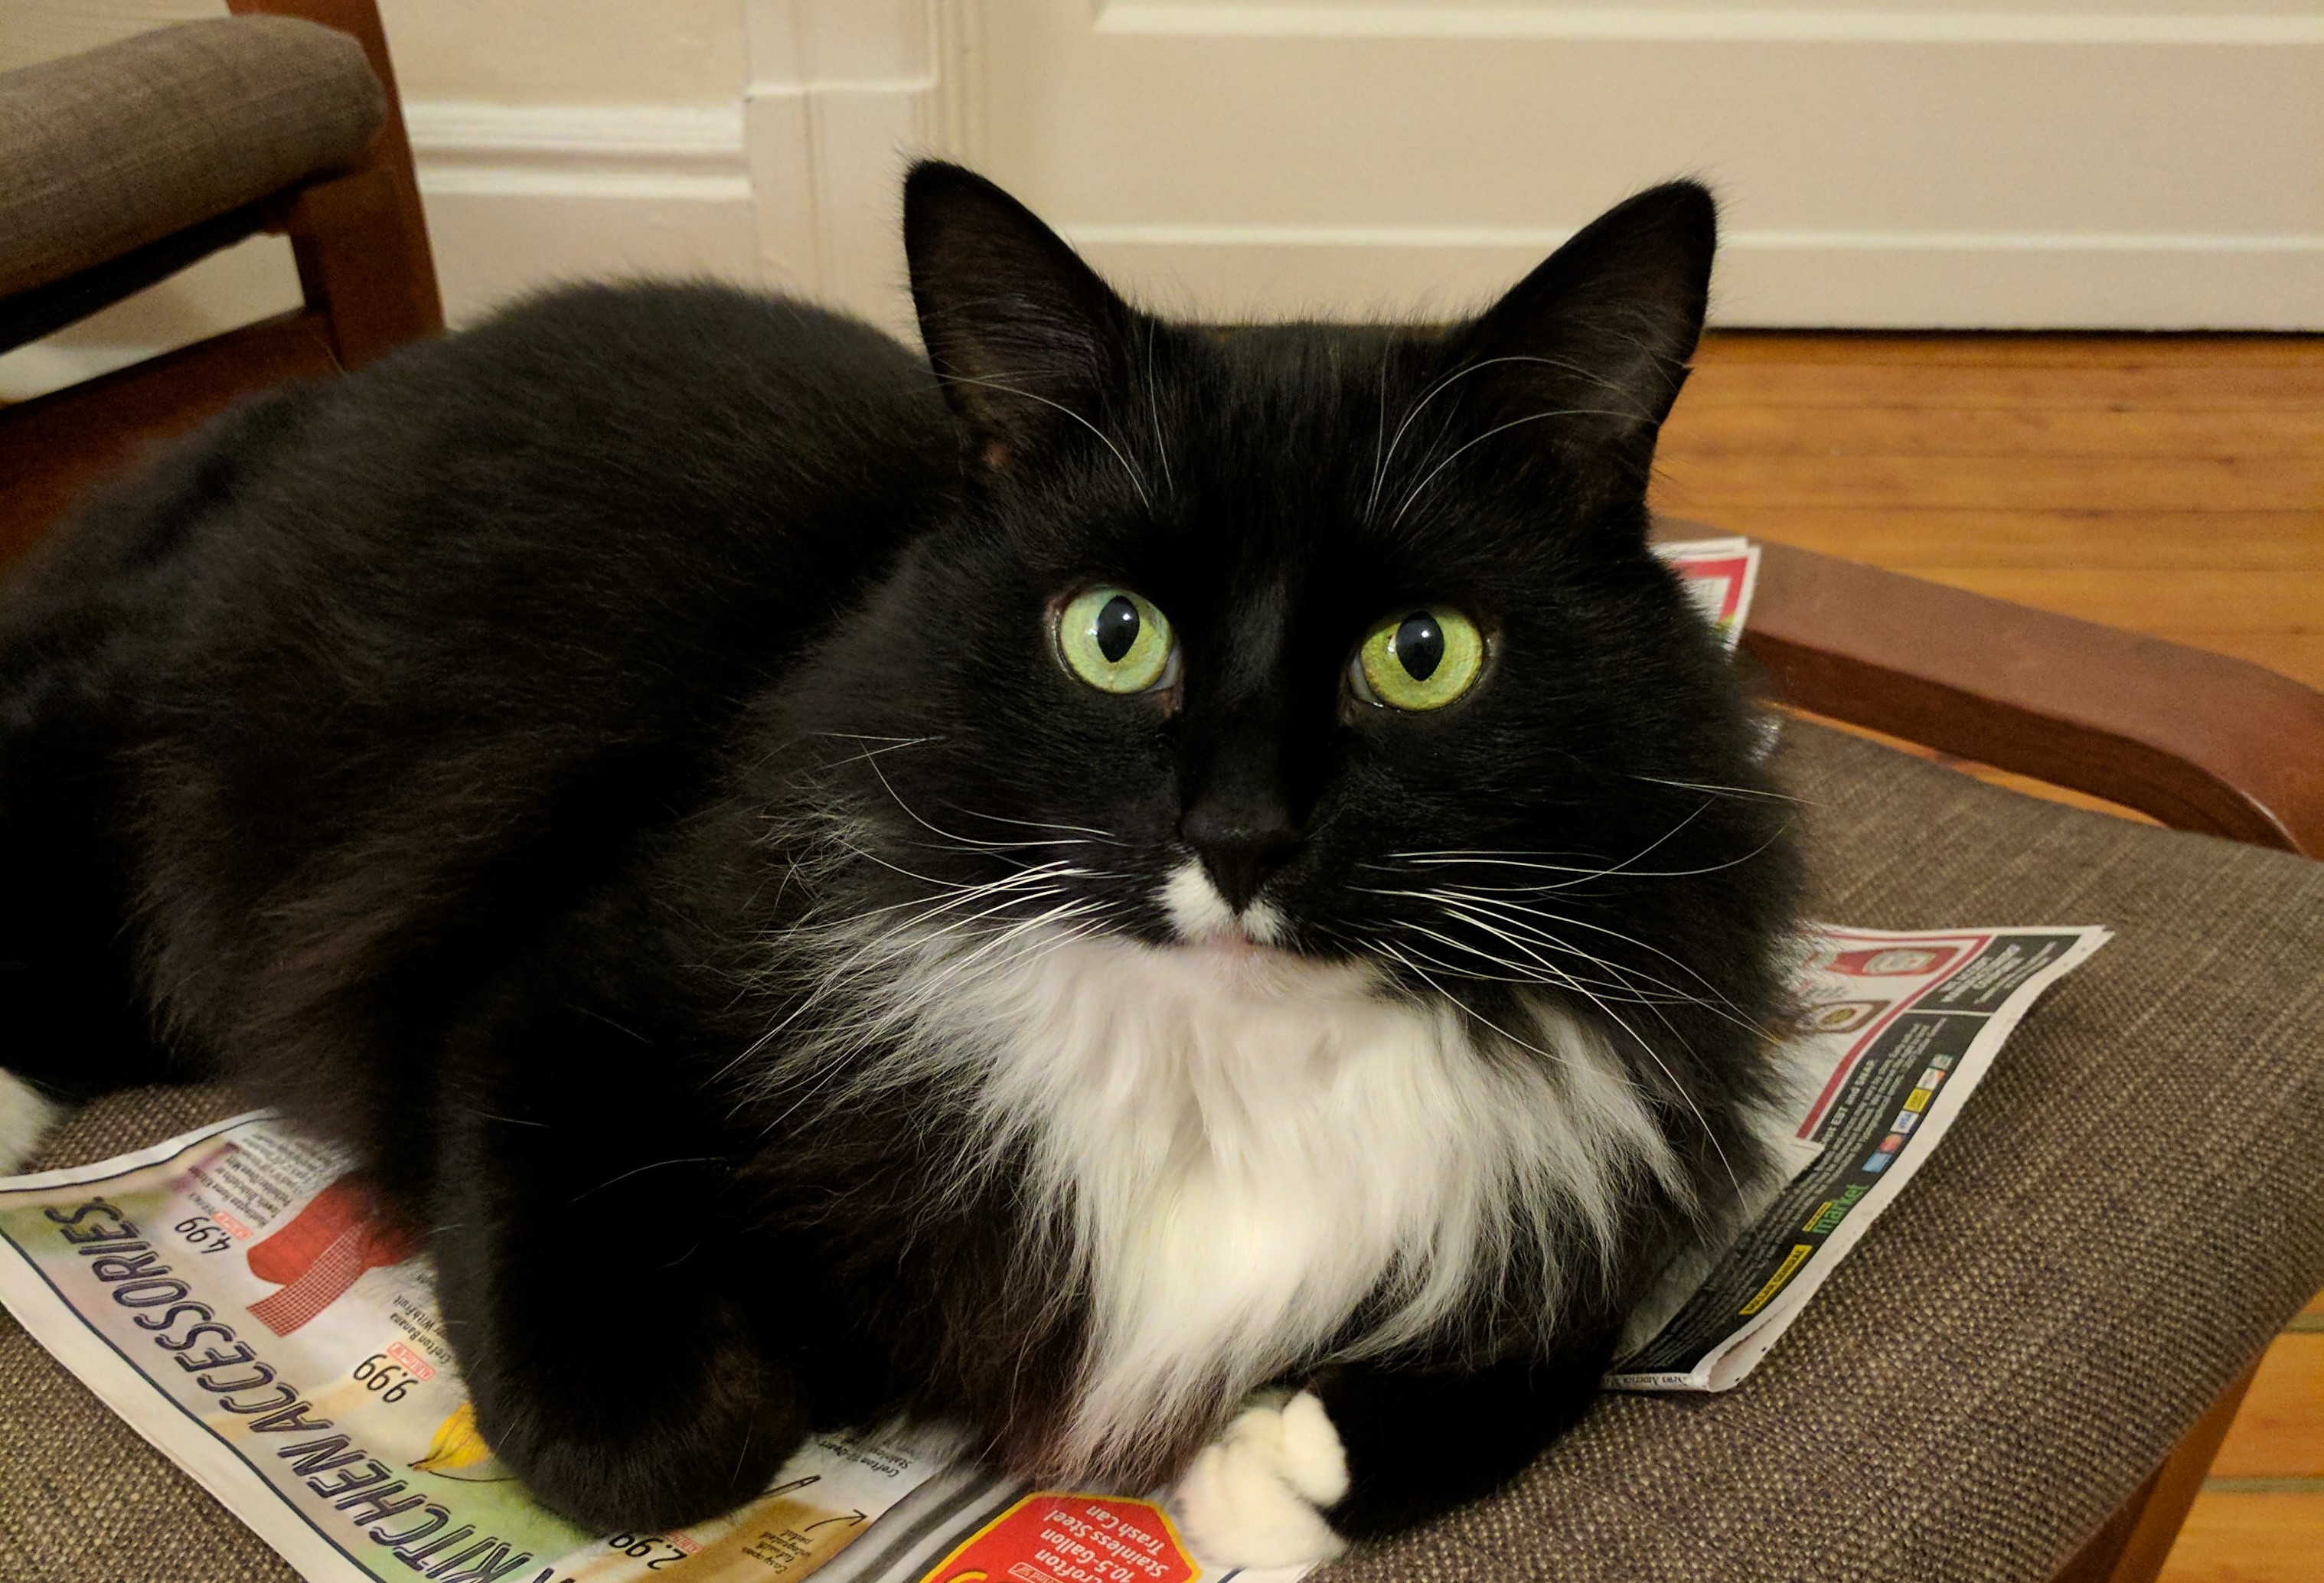
My cat loves to play, but is home alone for most of the day. This project is to create a motion-activated cat toy. When motion is detected in the nearby vicinity, it will trigger a servo motor to move a stick-and-string assembly for the cat to interact with.
Like many cats, Marcel stays home alone for most of the day while the humans are away. Most cats like to play with interactive toys, and most cats grow bored without any stimulation during the day. The goal of this connected device is to detect movement when the cat walks by, and then trigger a servo motor to move a stick with an attached string in a compelling motion for Marcel to play with.
Components: This project will require the following materials
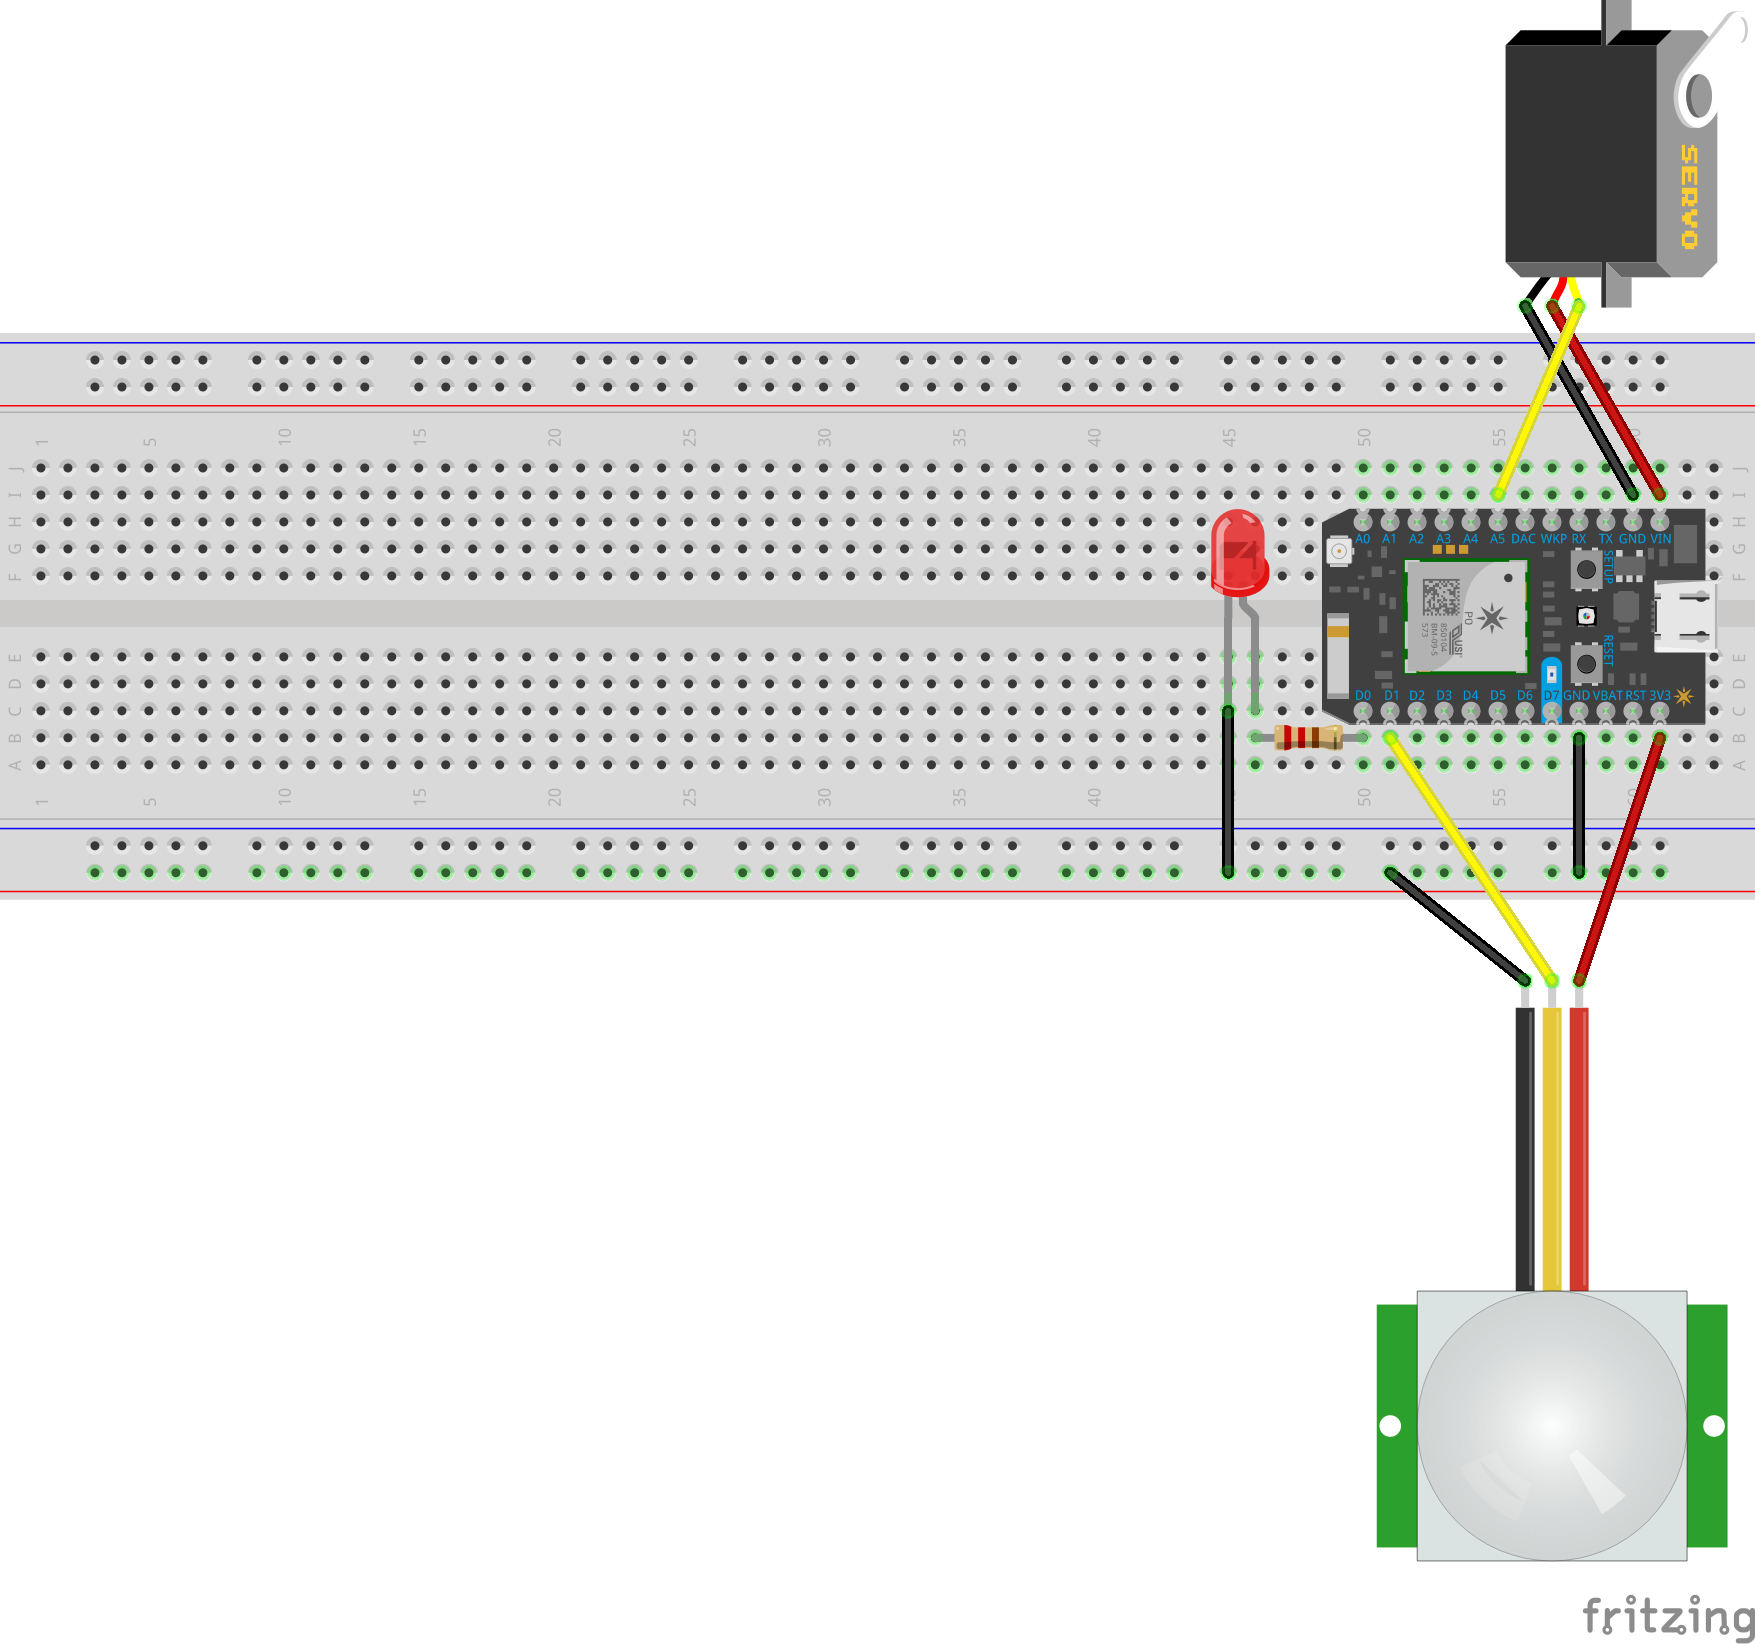
Particle microcontroller
Breadboard
PIR Motion Sensor
Servo motor
Toy assembly, mounted to servo
LED
Misc. resistors and wiring
Process:
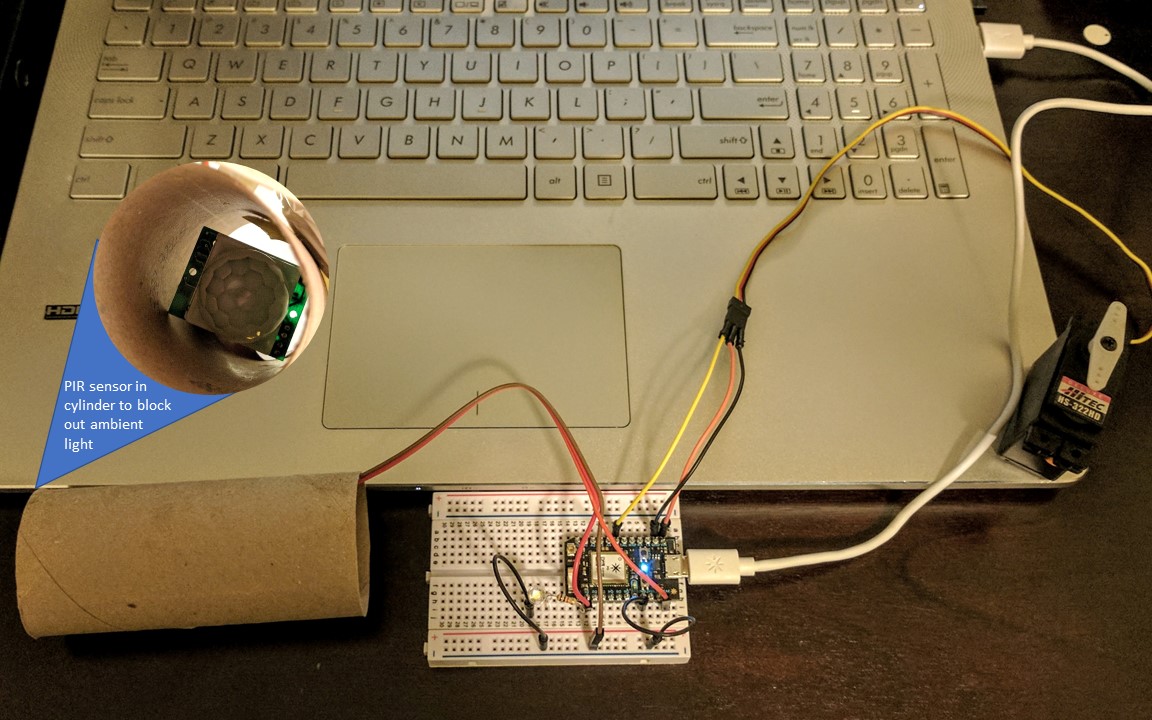
First step was setting up the PIR sensor. I first wired the PIR motion sensor as well as an LED so that I could get feedback on how the PIR sensor was working. I input some simple code to light up the LED if the sensor was triggered. After confirming that the Particle was receiving a signal from the PIR, it seemed to be a constant signal unless the PIR was completed covered up. To prevent the PIR from triggering due to ambient light and movement, I put the sensor inside a toilet paper roll (upcycling!). This solved the issue, and the sensor was only triggered when I wave my hand directly in front of the roll.
Next came the servo. I wired in the servo and input basic servo code that controlled from a cloud function so that I could confirm the servo was wired correctly (see Sources). The full circuit diagram can be found at the end of the post.
Next, I needed to tie together the PIR trigger and the servo movement. Daragh helped me to implement a counter to instruct the servo how long to run after the trigger. I also "randomized" the movement of the servo by inputing a random number as the servo position. See full code below.
Finally, I used IFTTT to populate a spreadsheet, in case I theoretically wanted to know how many times the toy was being set off. I published an event whenever the sensor was triggered (Particle.publish(''catmotion"), and created an applet to populate a spreadsheet in google drive.
This picture shows the completed circuit after finished the code, before assembling with the cat toy.
Outcome:
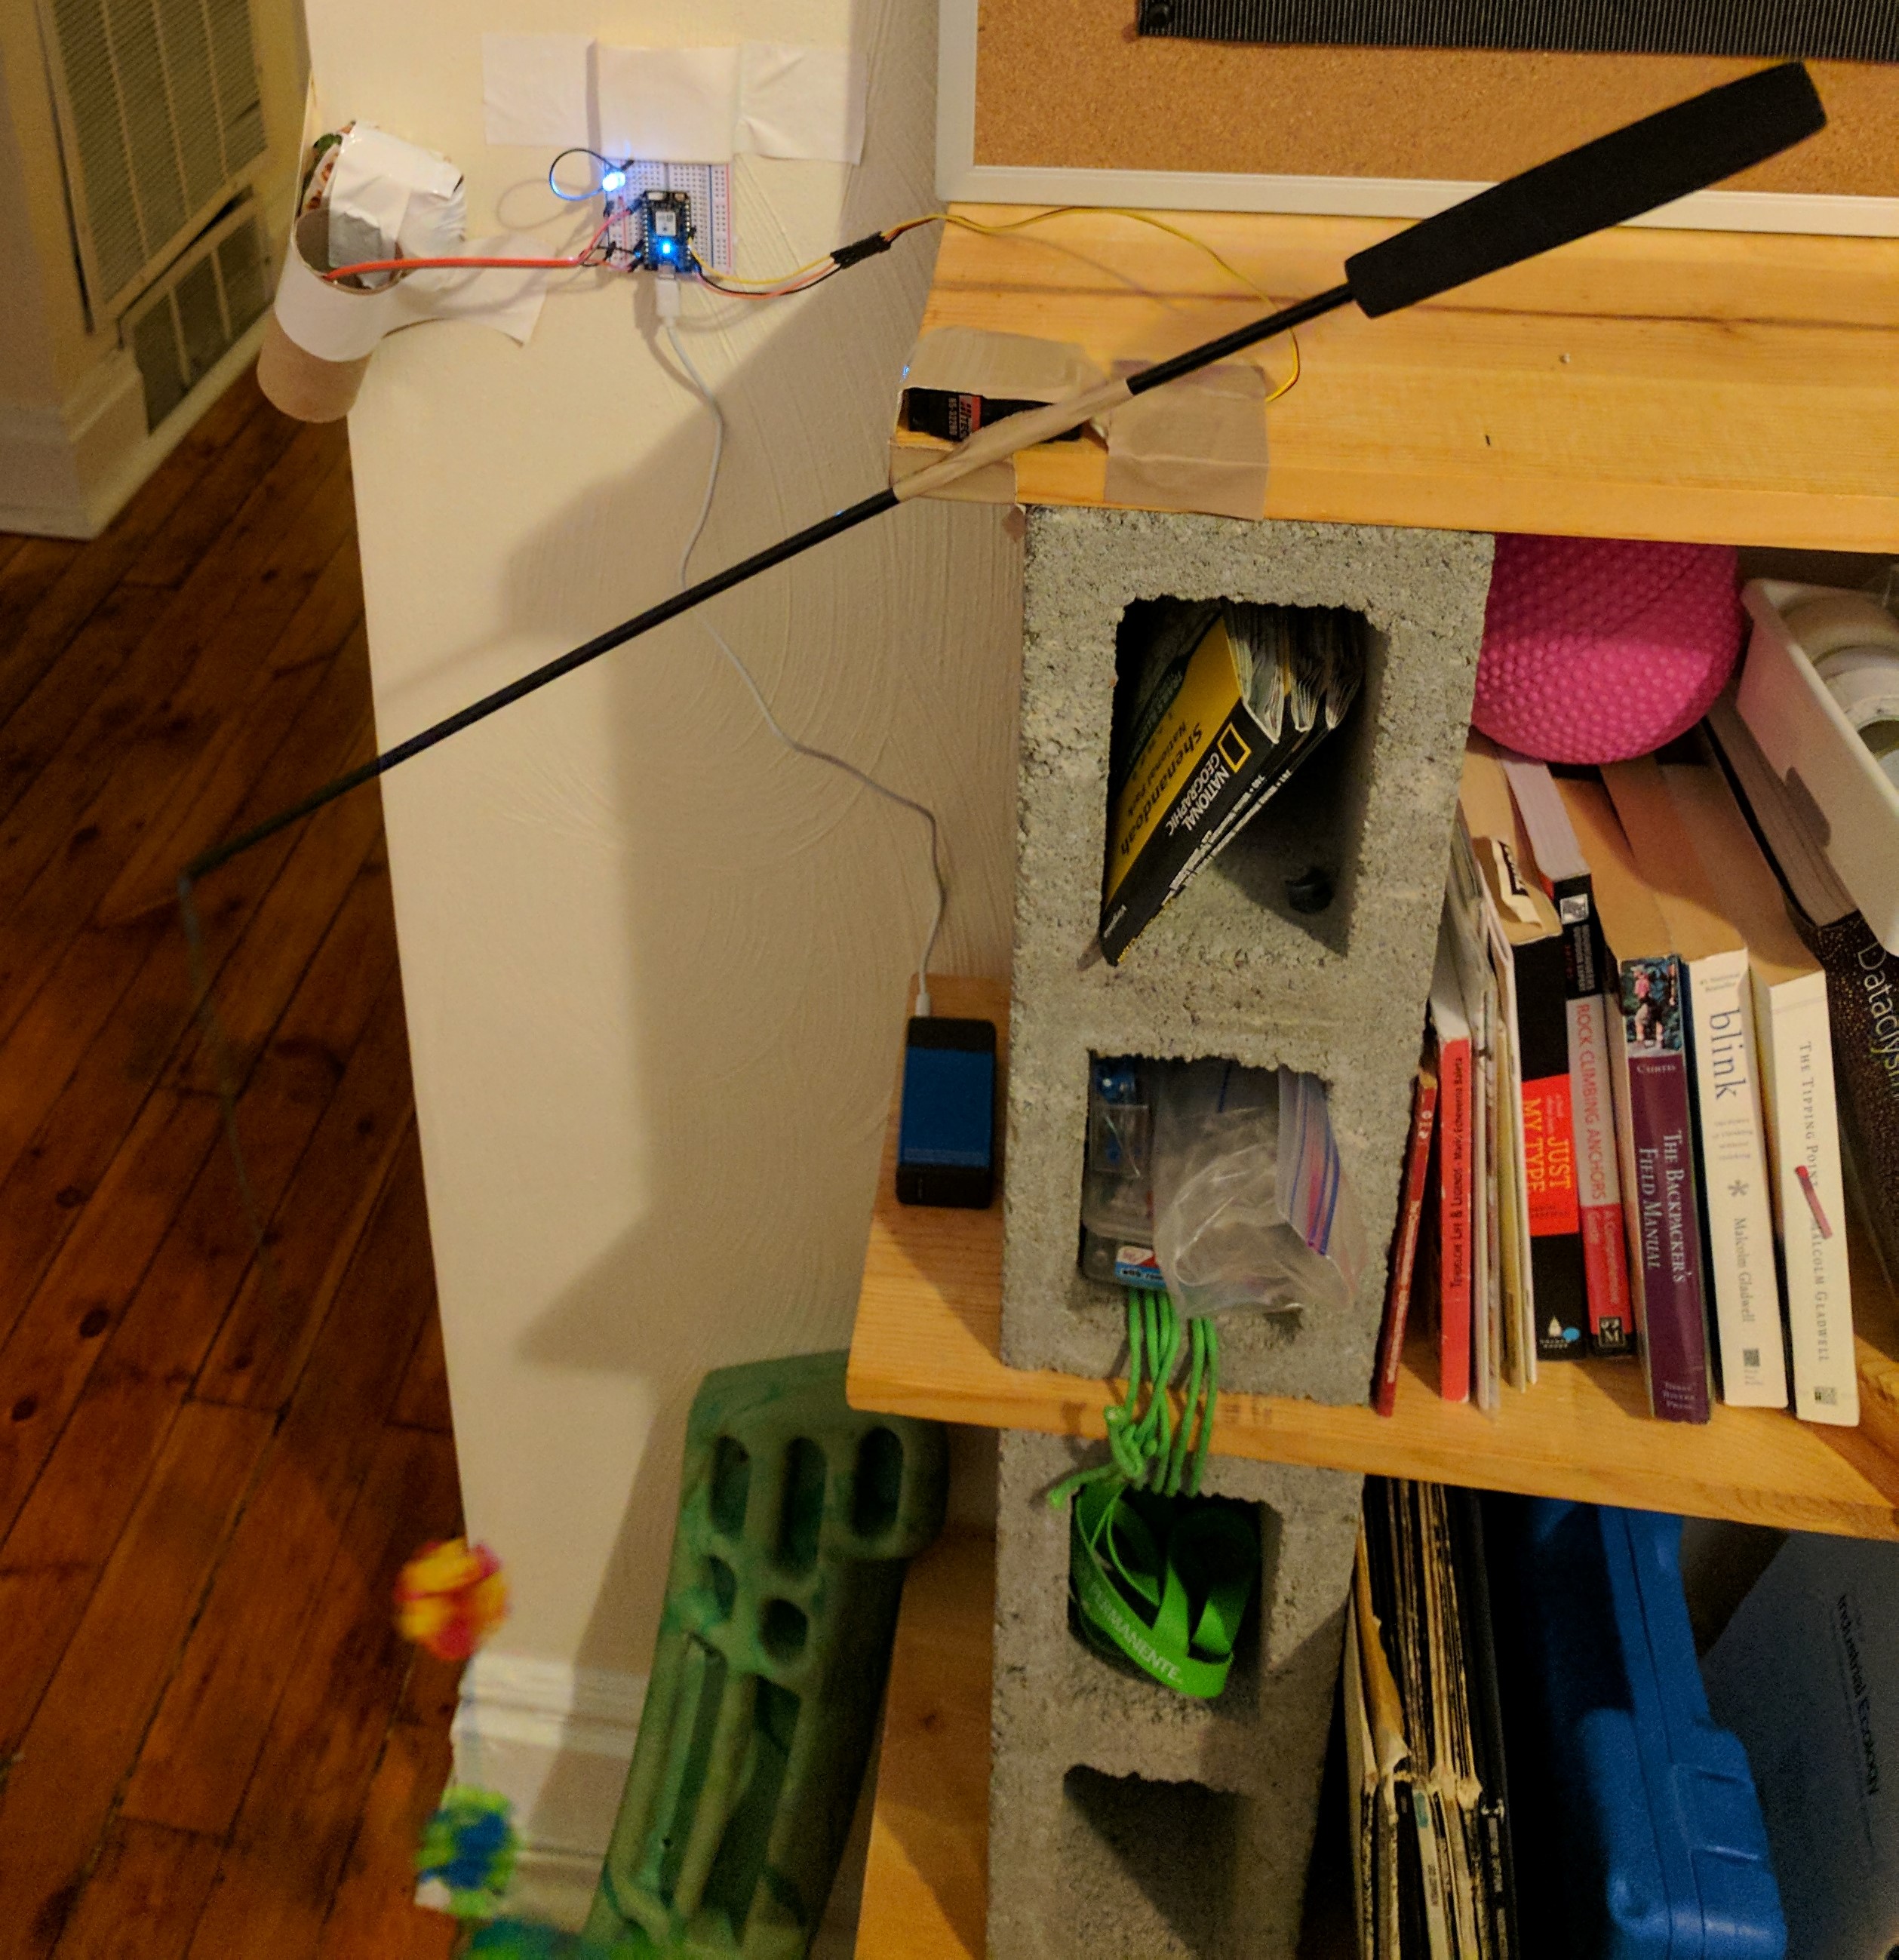
To assemble the prototype, I attached the cat toy, a stick and string assembly, to the servo motor. I mounted the servo and the sensor/toilet roll assembly to a bookshelf. After initial testing, I realized that the sensor would have to be pointed out of range of the moving cat toy, otherwise it would continue on forever. I moved the sensor assembly to the wall. Once everything was attached, it worked great.
Marcel was initially intrigued by the moving string, but I think he was also a little startled by the jerky movement and sound of the servo. I could keep working on a servo movement sequence that most appealed to him. See pictures and video below!
(Continue scrolling to find Reflections and Sources)
Reflection:
This project seemed difficult and intimidating to begin with, but after completing the planning phase and thinking about the required components for the circuit, I felt more confident. Putting together the circuit from various Hackster projects was no problem. I learned a lot from putting together the code and integrating a counter. Overall, it was a fun project and is a good place to start in the world of hacking and IoT!
Sources:
For wiring and coding the PIR, I got started from the following sources:
https://www.hackster.io/falafel-software/pir-sensor-with-a-photon-particle-cloud-and-a-uwa-97e79b
The following project merged a PIR as well as a servo and was very helpful in getting started with the servo code:
I was inspired by the following source but did not end up using any of the code or circuits:
https://particle.hackster.io/jacob-tucker/cat-caddie-3cb886?ref=search&ref_id=pet&offset=3
For my counter, I adapted code from Daragh Byrne.
int PIRpin = D1; //sets PIR equal to pin D1

int LEDpin = D0; //sets LED equal to pin D0

int SERVOpin = A5; //sets servo control to pin A0
Servo myServo;
int servoPos = 0;

boolean isTriggered = false;//prepare counter
// Know how long to wait
long timeBeforeSomethingHappens = 10 * 1000;//#seconds * milliseconds
//10 seconds was used here for testing. Increase to how long you want servo to run

// To Know if you're waiting for something to happen
// You'll start the counter by turning it to true
boolean counterRunnning = false;
// But you also need to know how long it's been
// since you started waiting
long counterStartedAt = 0;

void setup() {
    pinMode(PIRpin, INPUT);
    //sets pin D0 as an input
    pinMode(LEDpin, OUTPUT);

//servo inputs
    myServo.attach(A5);
    Particle.function("servo", servoControl);
    Particle.variable(  "servoPos" , &servoPos , INT );

    Particle.variable("motion",&PIRpin, INT);

    Time.zone(-4);
}


void loop() {
    digitalWrite(LEDpin,LOW);
    if (digitalRead(PIRpin) == HIGH) {
        //counter is started by PIR trigger
      startCounter();
       // event published for IFTTT
      Particle.publish( "catmotion", "The cat toy has been triggered");
    }
    else{
      digitalWrite(LEDpin,LOW);
    }

    if( counterRunnning ){
      digitalWrite(LEDpin,HIGH); // Turn on LED
      //do servo stuff for time of counter
      int new_position = random( 50, 130 );
      myServo.write( new_position );
    }

    if( checkIfCounterIsFinished() )
    {
      myServo.write(90);
      digitalWrite(LEDpin,LOW);
      // finally set the timer to false to finish
      counterRunnning = false;
    }

    // Time between each servo move
    delay( 500 );

}

void startCounter()
{
  counterRunnning = true;
  // the time now
  counterStartedAt = millis() ;
}
bool checkIfCounterIsFinished()
{
  // the counter is not running
  // so it can't be finished
  if( counterRunnning == false ){
    return false; // exit
  }
  // check if the time now
  // is after the time we started our counter
  // plus the time before something should happen
  // note : millis() returns the number of millis seconds since the
  // program started
  if( counterStartedAt + timeBeforeSomethingHappens < millis() )
  {
    return true;
  }
  return false;
}


int servoControl(String command)
{
    // Convert
   int newPos = command.toInt();
   // Make sure it is in the right range
   // And set the position
   servoPos = constrain( newPos, 0 , 180);

   // Set the servo
   myServo.write( servoPos );

   // done
   return 1;
}A hands-on introductory course exploring the Internet of Things and connected product experiences.
My cat loves to play, but is home alone for most of the day. This project is to create a motion-activated cat toy. When motion is detected in the nearby vicinity, it will trigger a servo motor to move a stick-and-string assembly for the cat to interact with.
January 25th, 2017