Build a enchanted child monitor in the form of a teddy bear for the child to sleep with

0

Our user & Problem Statement

Our stakeholder is Niven Mangrey, a 32 year old man, living in Johannesburg South Africa. He is recently married and has a newborn son, Shivan. Being a new parent, Niven is very focussed on his son and very anxious to ensure that he is kept safe and has everything that is needed. He has bought a new baby monitor which monitors noises, feeds video and senses movement. Niven checks this obsessively even when guests are visiting. 

Niven needs a way of alleviating this anxiety and feeling more secure about the well-being of his son. We have chosen to focus on an enchanted baby monitor which would help him to do this while being less conspicuous than checking a monitor continually or similarly, checking his phone - especially in company!

Below are photographs of Niven and his son in their home:


0

Solution

One of our product concept consists of two teddy bears (Since toys are playful, and most importantly β€˜fabric materials’ are safe for children to interact with). One teddy bear to monitor the sounds and discomfort of the child using a movement(accelerometer) and sound sensor embedded inside it. Another teddy bear would be with the parent. The two teddy bears are connected via WiFi network. Parents would know the status of child via vibration feedback system.

Enchantment and creativity

We are envisioning to simplify the functioning of a baby monitor and make it much more 'polite' in the presence of company. In addition, we intend to create a sense of connectedness with the baby through the form of the baby monitor Sender and Receiver components which both shall be in the form of teddy bears.

0

Prototype

The video below shows the prototype of the detector device and the receiver device and how it would respond to a baby crying by providing a gentle vibration.

Below are the Signal transmitter code and circuit. The circuit includes both a sound sensor and an accelerometer.  

0
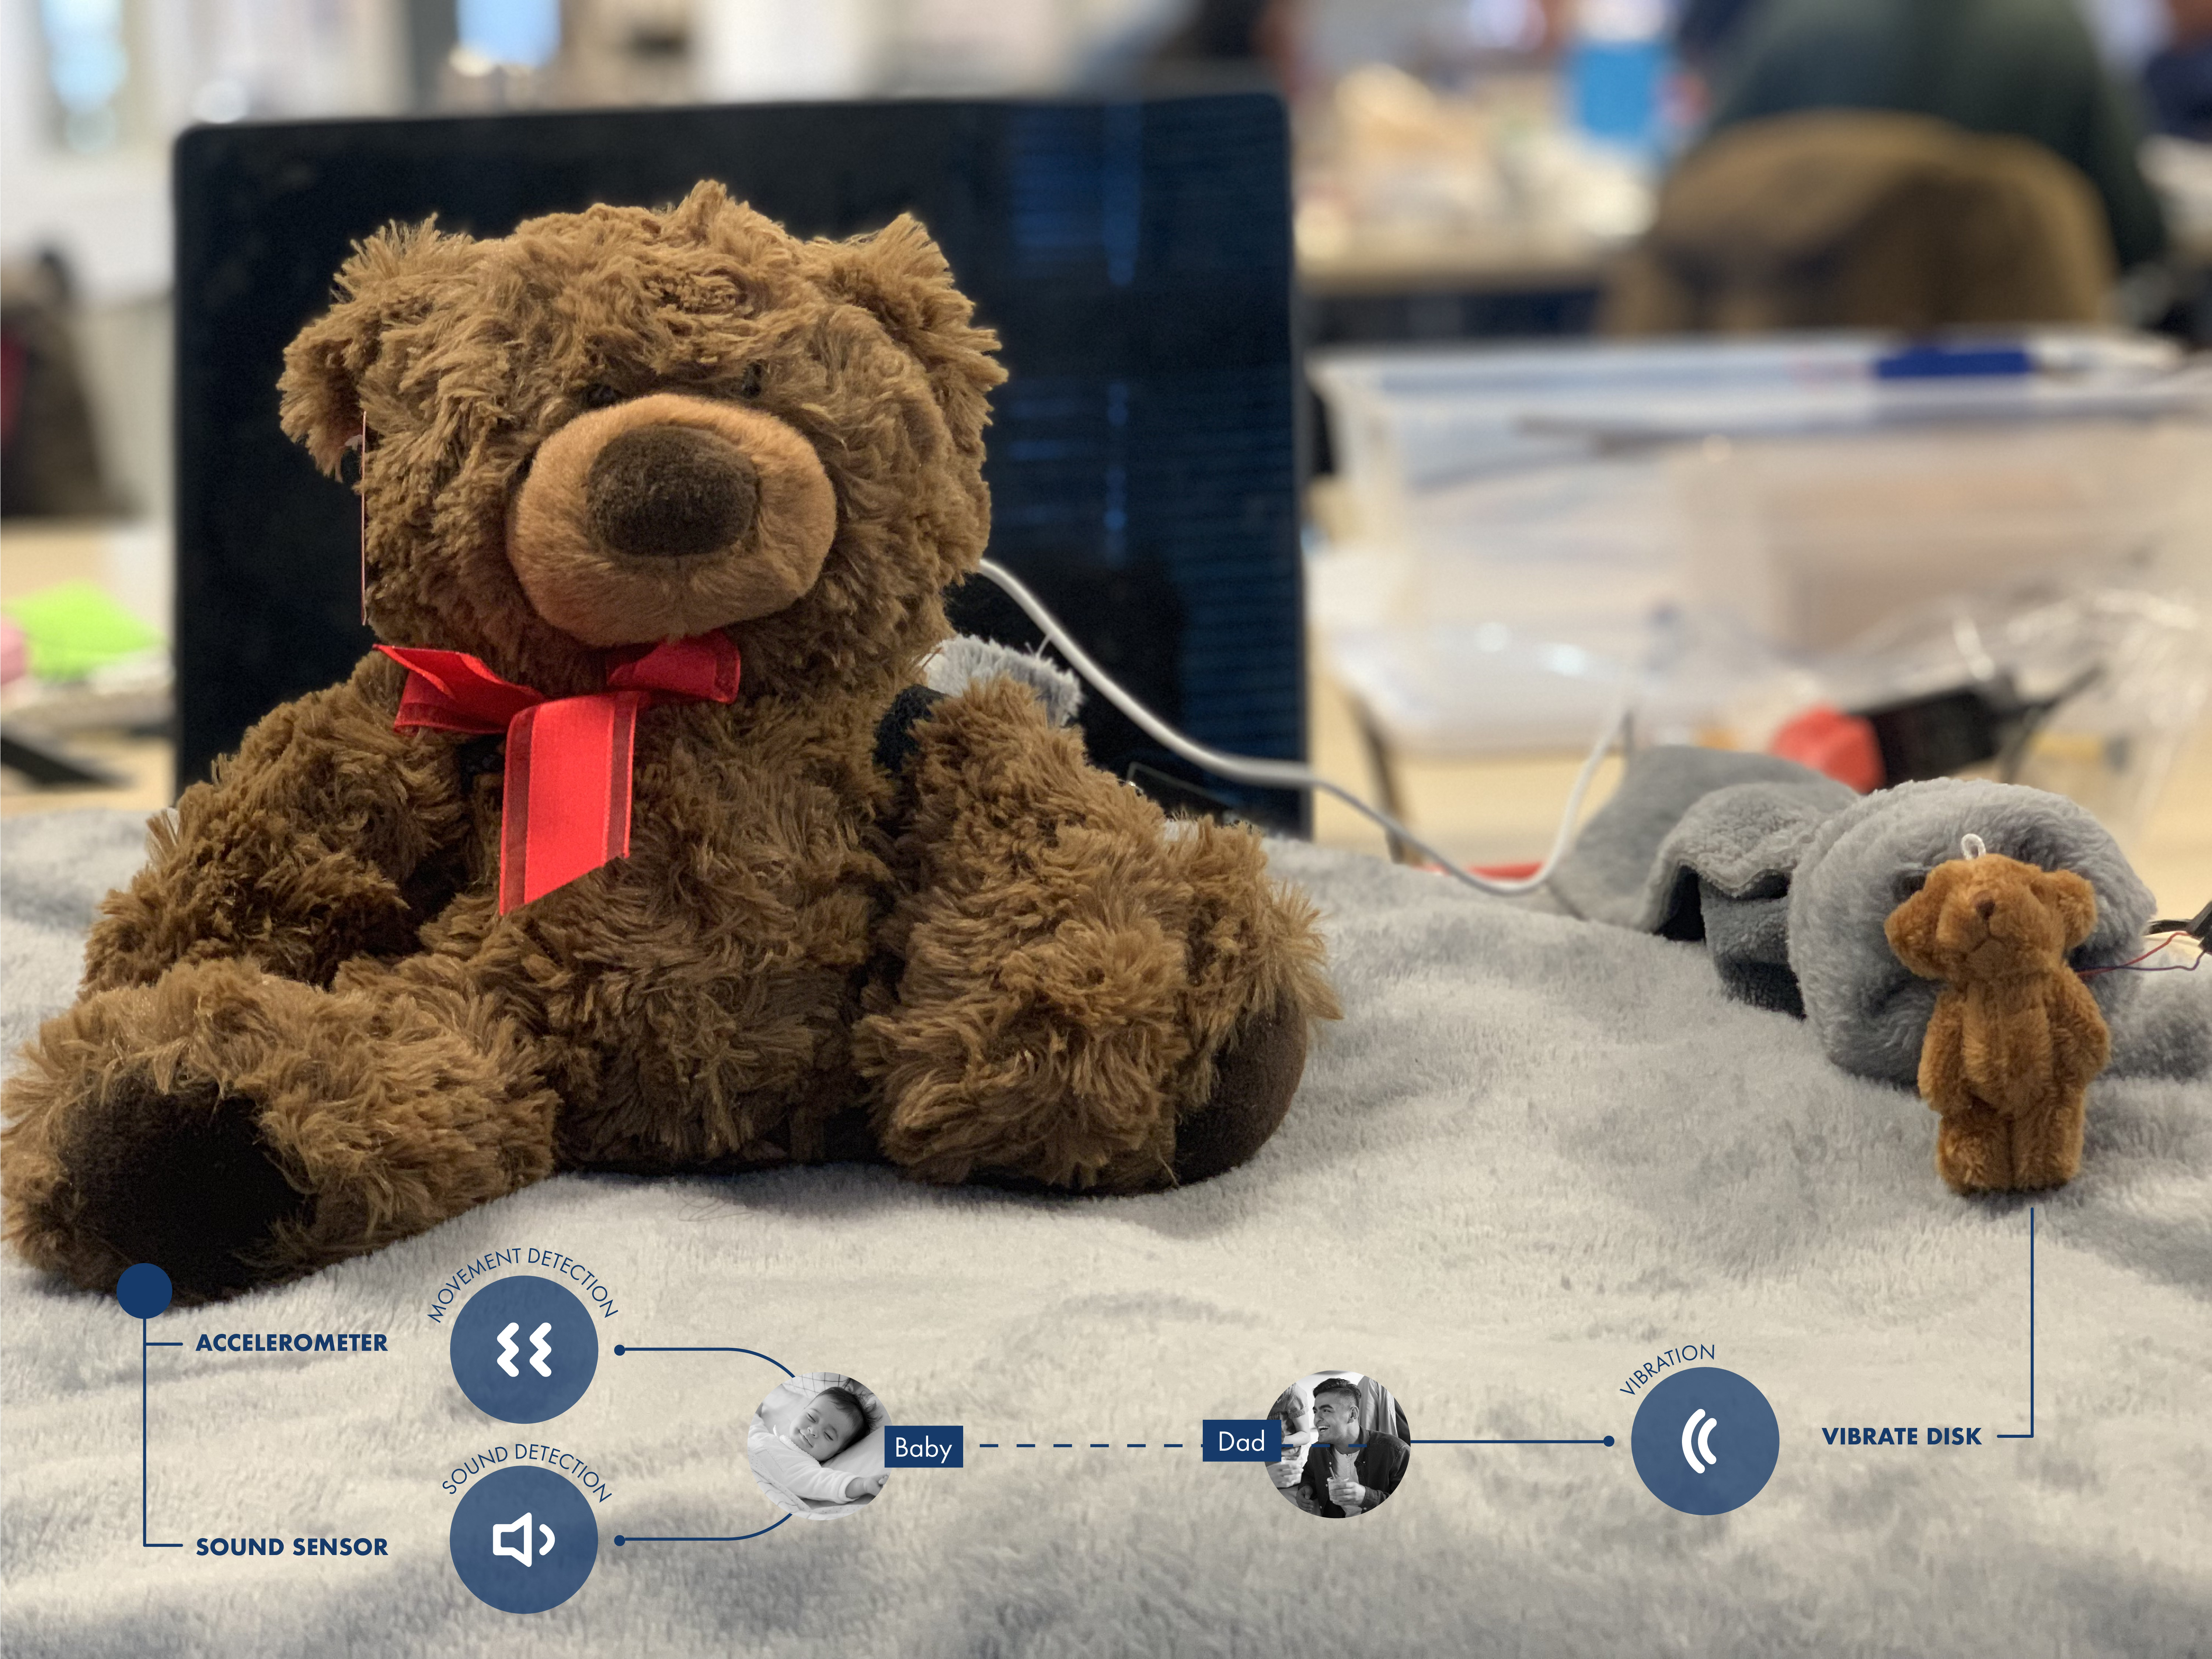
// This #include statement was automatically added by the Particle IDE.
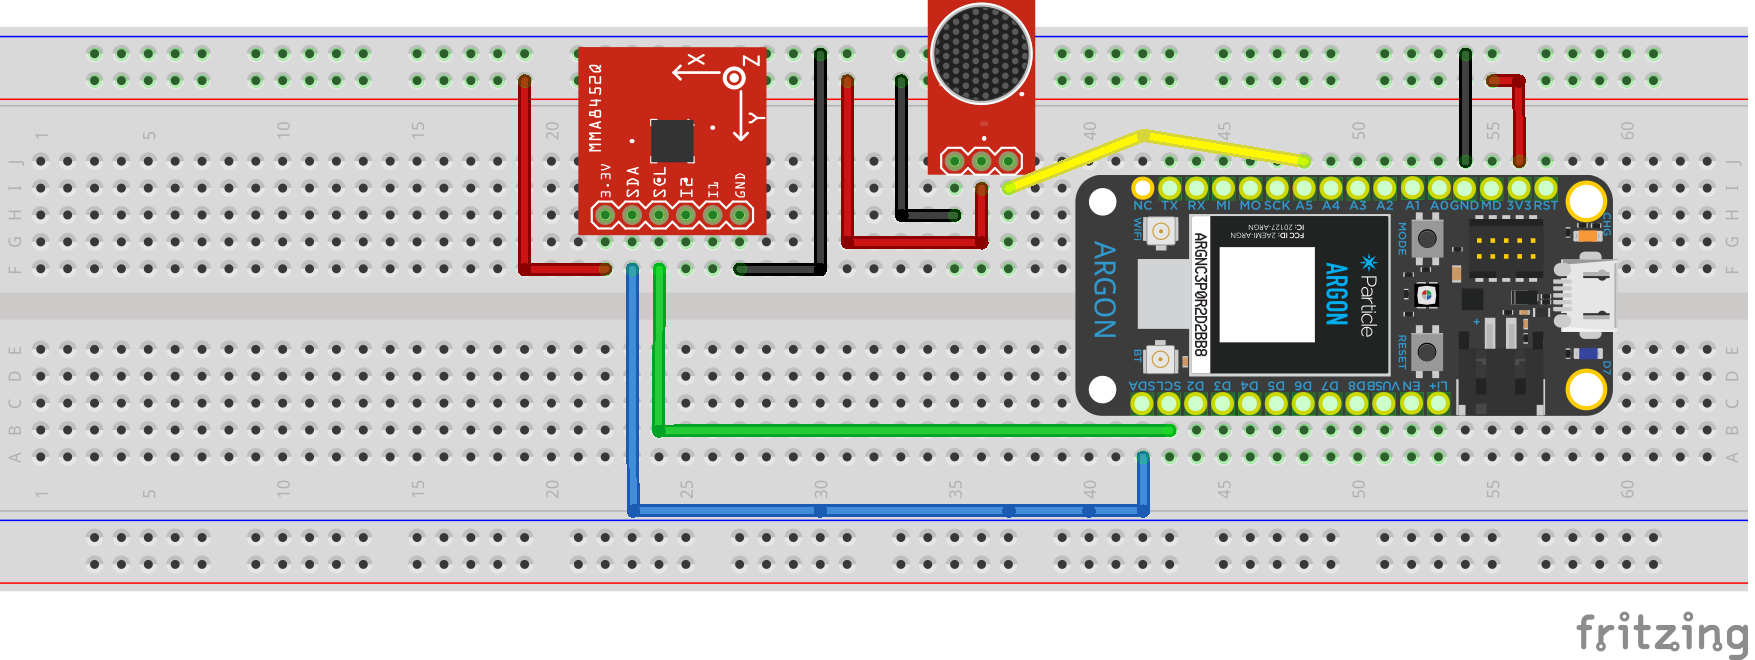
#include <SparkFunMMA8452Q.h>
#include <math.h>

int sound_pin = A5;
// int acc_pin = A4; // TODO:
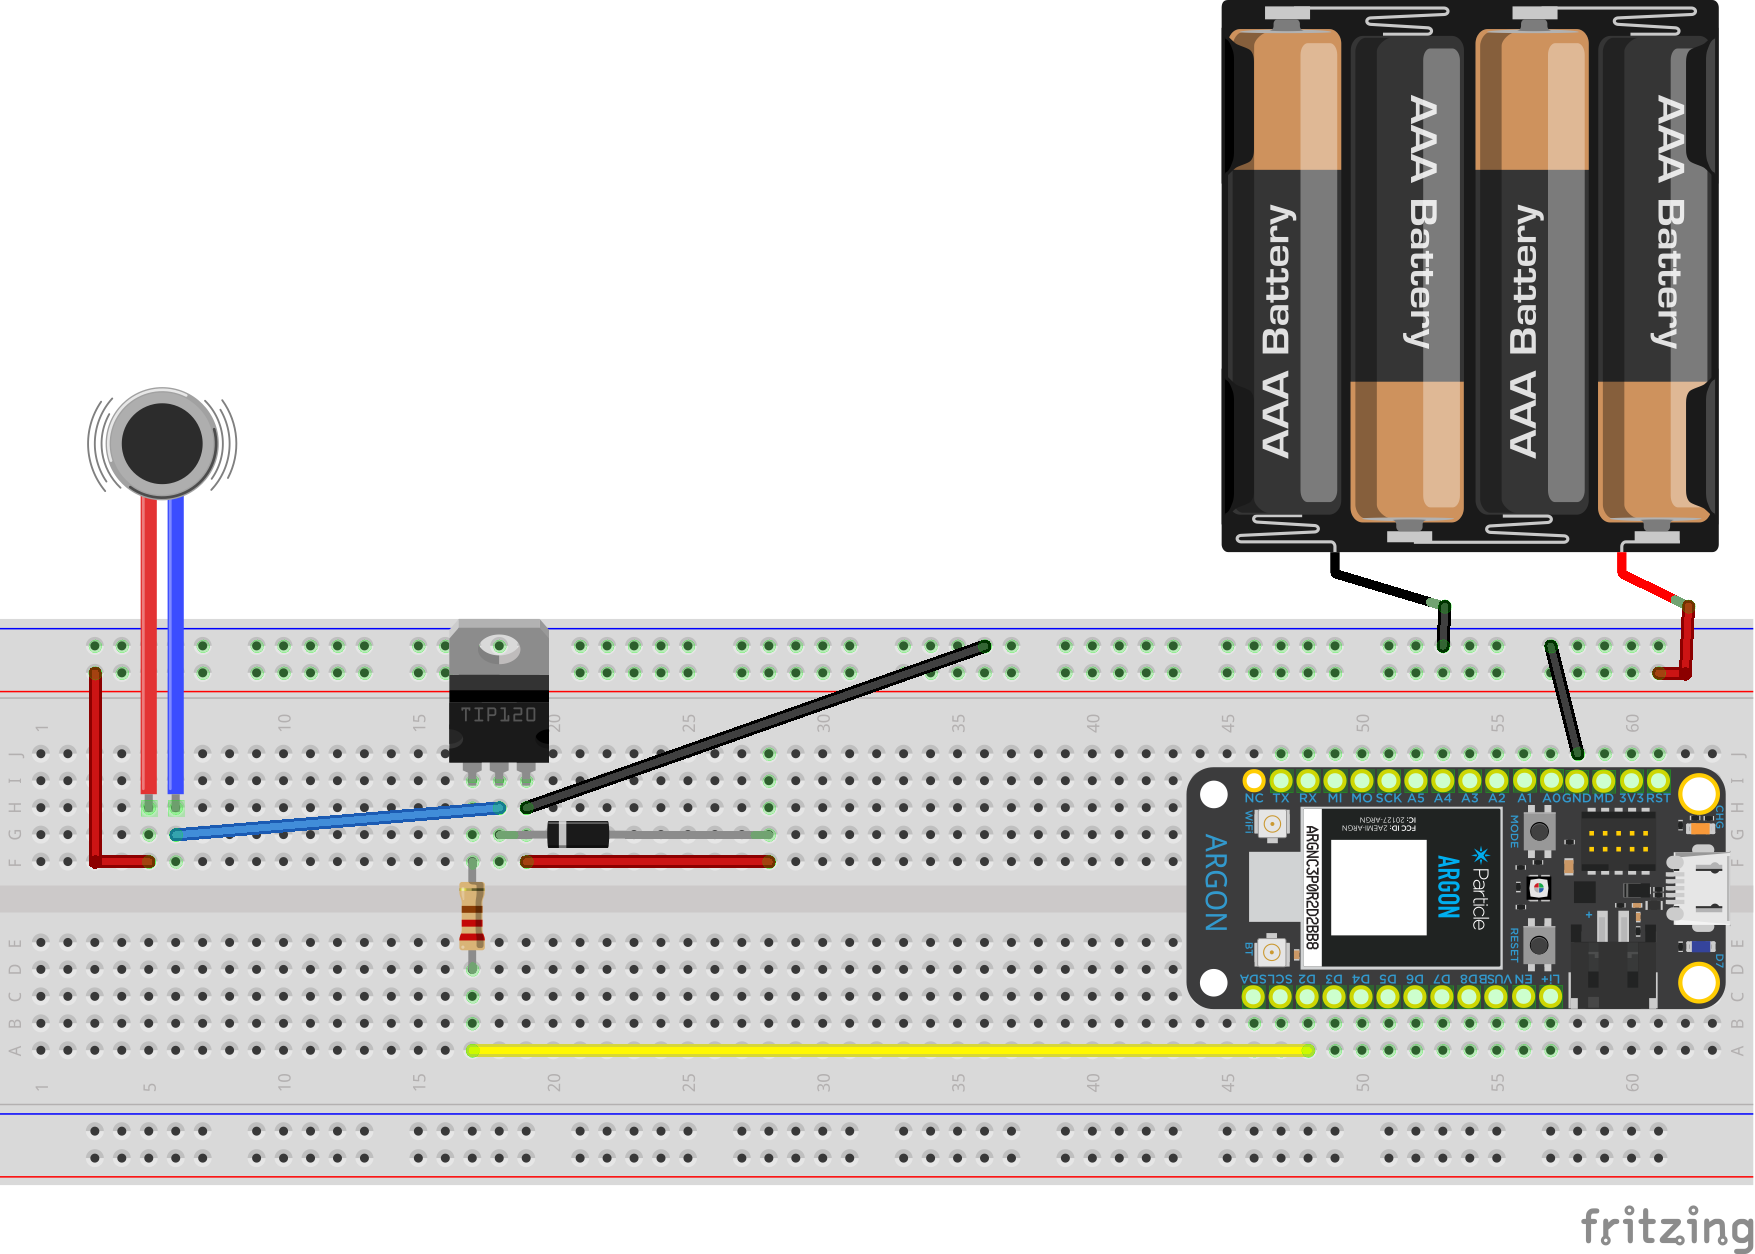
int sol_pin = D3;
int sound_reading = 0;
int acceleration = 0;
double midaccel = 0.99;
MMA8452Q accel; // Default constructor, SA0 pin is HIGH
double accRead = 0;
double accReadTrans = 0;

void setup() {
    pinMode(sound_pin, INPUT);
    pinMode(sol_pin, OUTPUT);
    Particle.variable("sound", &sound_reading, INT); //Set up sound on consol for reading
    accel.begin(SCALE_4G, ODR_1); // Set up accel with +/-2g range, and slowest (1Hz) ODR
    Particle.variable("analogvalue", accRead); //Set up accelerometer on console for monitoring
}

void loop() {
    	// accel.available() will return 1 if new data is available, 0 otherwise
    if (accel.available())
    {
		// To update acceleration values from the accelerometer, call accel.read();
        accel.read();
		// After reading, six class variables are updated: x, y, z, cx, cy, and cz.
		// Those are the raw, 12-bit values (x, y, and z) and the calculated
		// acceleration's in units of g (cx, cy, and cz).
		// use the printAccelGraph funciton to print the values along with a bar
		// graph, to see their relation to eachother:
        printAccelGraph(accel.cx, "X", 20, 2.0);
        printAccelGraph(accel.cy, "Y", 20, 2.0);
        printAccelGraph(accel.cz, "Z", 20, 2.0);
        Serial.println();
       // Particle.publish( "accelerometerX", String(accel.cx));
       accRead = sqrt(accel.cx*accel.cx + accel.cy*accel.cy + accel.cz*accel.cz);
       Particle.publish( "accReadtrans", String( accReadTrans) );
       //Particle.publish( "accRead", String( accRead) );
       delay(3000);
      // Particle.variable("analogvalue", accRead);
    }else{
        Particle.publish( "accelError" );
        delay(3000);
    }
    // int sound_threshold[] = {50, 40, 30}; // TODO: define the threshold of sound (descending)
    // int acc_threshold[] = {300, 200, 100}; // TODO: threshold of acceleration (descend)
     Serial.begin(9600);
    sound_reading = get_db(sound_pin);
     Particle.publish( "sound_read", String(sound_reading));
    // acceleration = get_acc(acc_pin);
    // if(sound_reading >= sound_threshold[0] || acceleration >= acc_threshold[0])
    //     vibrate(3);
    // else if(sound_reading >= sound_threshold[1] || acceleration >= acc_threshold[1])
    //     vibrate(2);
    // else if(sound_reading >= sound_threshold[2] || acceleration >= acc_threshold[2])
    //     vibrate(1);
    // else
    //     vibrate(0);
    // delay(10000);
    /* for test
    if(sound_reading < 100)
        vibrate(0);
    else if(sound_reading < 200)
        vibrate(1);
    else if(sound_reading < 1000)
        vibrate(2);
    else
        vibrate(3);
    delay(1000);
    */
    accReadTrans = accRead - midaccel;
    if (accReadTrans < 0){
        accReadTrans = -1 * accReadTrans;
    }
    if (sound_reading > 400 || accReadTrans > 0.07){
        Particle.publish("diot/2019/paired/guardianteddy/vibrate", "2");
        //level 2
        vibrate(2);
    }else{
        if (sound_reading > 100 || accReadTrans > 0.02){
        Particle.publish("diot/2019/paired/guardianteddy/vibrate", "1");
            //level 1
            vibrate(1);
        }else{
            //Particle.publish("diot/2019/paired/guardianteddy/vibrate", "0");
            //level 0
             vibrate(0);
        }
    }
    /*
    if(sound_reading < 100 && accRead < 1.1 && accRead > 0.9)
        vibrate(0);
    else if(sound_reading < 500 && accRead < 1.6 && accRead > 0.5)
        vibrate(1);
    else if(sound_reading < 1000 && accRead < 2 && accRead > 0.3)
        vibrate(2);
    else
        vibrate(3);
    delay(1000);
    */
}

int get_db(int sound_pin) {
    int n = 15;
    int sound = 0;
    for(int i = 0; i < n; i++) {
        sound += analogRead(sound_pin);
        delay(10);
    }
    return sound / n;
}

void vibrate(int level) {
    if(level == 0)
        return;
    for(int i = 0; i < 3 * level; i++) {
        digitalWrite(sol_pin, HIGH);
        delay(100 * level);
        digitalWrite(sol_pin, LOW);
        delay(500 / level);
    }
}

void printAccelGraph(float value, String name, int numBarsFull, float rangeAbs)
{
	// Calculate the number of bars to fill, ignoring the sign of numBars for now.
	int numBars = abs(value / (rangeAbs / numBarsFull));
    Serial.print(name + ": "); // Print the axis name and a colon:
	// Do the negative half of the graph first:
    for (int i=0; i<numBarsFull; i++)
    {
        if (value < 0) // If the value is negative
        {
			// If our position in the graph is in the range we want to graph
            if (i >= (numBarsFull - numBars))
                Serial.print('='); // Print an '='
            else
                Serial.print(' '); // print spaces otherwise
        }
        else // If our value is positive, just print spaces
            Serial.print(' ');
    }
    Serial.print('|'); // Print a pipe (|) to represent the 0-point
	// Do the positive half of the graph last:
    for (int i=0; i<numBarsFull; i++)
    {
        if (value > 0)
        {	// If our position in the graph is in the range we want to graph
            if (i <= numBars)
                Serial.print('='); // Print an '='
            else
                Serial.print(' '); // otherwise print spaces
        }
        else // If value is negative, just print spaces
            Serial.print(' ');
    }
	// To end the line, print the actual value:
    Serial.println(" (" + String(value, 2) + " g)");
}
Click to Expand
0

Below are the signal receiver code and circuit. The circuit is powered by a 5v battery and is actuated by a vibrating disc.  

0
int VibratePin = D2;
//bool shouldActivate = false;
int level =0;
void setup()
{
  //Particle.function( "Teddyvibrate", Teddyvibrate );
  Particle.subscribe("diot/2019/paired/guardianteddy/vibrate", Vibrate);
  Particle.publish("Start");
  pinMode(VibratePin, OUTPUT);
  delay(3000);
}
void loop()
{
  //Particle.publish("Pulse");
  //delay(3000);
  vibratelevel(1);
  delay(3000);
}
void Vibrate(const char *event, const char *data)
{
    /*
    if (data=="2");
    {
        Particle.publish("It worked!", data);
        vibratelevel(2);
    }
    */
    Particle.publish("It worked!", data);
    delay(3000);
    if(data=="1")
    {
    vibratelevel(1);
    }
    else if (data=="2")
    {
    vibratelevel(2);
    }
    else{
    vibratelevel(0);
    }
}
void vibratelevel(int level)
{
    if(level = 0)
        return;
        for(int i = 0; i < 3 * level; i++)
        {
            digitalWrite(VibratePin, HIGH);
            delay(100 * level);
            digitalWrite(VibratePin, LOW);
            delay(500 / level);
        }
}
Click to Expand
0
Guardian Teddy Prototype 2
Kavishin Pather - https://youtu.be/LArYKpdUk98
0

Process

We briefly outline the process that was followed below, which may be characterised as six steps:

1. Co-design with the user

2. Ideation and initial concept

3. First prototype (looks like and work like prototypes)

4. Feedback from users

5. Final prototype (as depicted above)

Below, we describe these steps in slightly more detail

0

Co-design with the user

Note: Result of initial co-design with Niven. The original idea was a way to protect babies from Mosquitos. Our solution pivoted when we realized that mosquito nets were an already effective solution.


Initial Concept


Note: Our initial concept diagram depicting an initial idea for the solution. At this stage, the precise form and technical solution were still uncertain.


Initial prototyping: Looks-like and works-like


Note: We used the above picture as a reference for the form of the prototype and designed the 'works-like' prototype with this in mind. It was also shown to stakeholders during feedback solicitation.  We envisaged the product to look like a normal teddy which a child and a parent would love to have regardless of functionality.

The video below depicts our works-like prototype

0
Functional Prototype
ηŽ‹ε©‰δΉ” - https://youtu.be/nvZIpdjN2is
0

Feedback from stakeholders and classmates

We were provided with many aspects of feedback that we could have invested effort to improve. However, as a group, we chose to focus on two pieces of feedback in particular, because they related to the core functionality of the device, namely:

1) The device should be able to tune out ambient noises in the room since some rooms are noisy

2) Sometimes there may be noise spikes (such as when the baby turns over) or a bathroom door nearby closing which should ideally not trigger the alert.

In order to deal with the first one, we set the initial threshold level for alerts carefully (also allowing this to be customized by the user in the final product) and introduced two alert levels. Together this would allow the device to tune out some ambient noise while also allowing the user to distinguish between louder and softer noises (still keeping the interaction simple).

In dealing with the second, we used a smoothing technique (a moving average) to average out any noise spikes and focus on sustained noises (lasting at least a few seconds).

We were not able to get feedback from Niven owing to his being in South Africa. However, we did incorporate all feedback received into the final prototype depicted above.

0

Next Steps

Our envisioned next steps are aligned to feedback that we received from our demonstration of the final prototype before faculty and staff from Carnegie Mellon University.  Below we outline the feedback received and then follow with our envisioned next steps:

Feedback:

1. False triggers: It was pointed out that our prototype is low fidelity and would result in many false-positive signals. e.g. Someone walking into the room to check on the baby or the baby simply turns while it is sleeping. 

2. Sensitivity levels: Related to the false triggers, the sensitivity level of the device may need to be adjusted for the specifics of each baby and the preferences of each parent. This could be done using a setting or a learning algorithm.

3. Turning the alarm off: There is currently no easy way to turn the device off once the parent attends to the baby. This will need to be addressed in the final version. 

4. Feedback on the status of the device: It is not currently evident that the device is working by looking at it. In fact, one would only be aware by triggering it. A way of knowing it was working would also reduce a parent's anxiety. 

5. Form factor: The form factor, while cute, may not blend into every lifestyle. A receiver that was more appropriate for carrying around may be more desirable.      

6. Technical challenge: Can this be made to communicate more information and more relevant information. What do we really need to know about the status of a baby. We were challenged to take the technical solution further and consider computer vision and bio metrics.

We find all this feedback to be relevant and worthy of consideration. We have listed the items above in order of our priority for tackling them.

0

Reflection:

As a team we reflected on the project and wish to convey the following thoughts that occurred to us during the project:

  • Human-computer interaction is a delicate space. It needs a lot of usability testing, taking back the feedback and incorporating in our design to refine the prototype to be more reliable. 
  • Thinking in terms of scenarios the user might experience helped us a lot to design the prototype the product more robustly. A question we asked a lot while prototyping is: What is the worst case scenario the user might encounter? 
  • Designing for private spaces has its own difficulties. We believe that with hours of observation of the baby, we could easily understand the pain points of the user and different scenarios. Doing a co-design is invaluable. Including the user in the design process has its own benefits. We designed for the right problem.      

0

References: 

1) Reference code for the accelerometer 

https://github.com/sparkfun/SparkFun_MMA8452Q_Particle_Library/blob/master/firmware/examples/MMA8452Q-Serial_Example.ino

2) We received help from our TA's and Lecturer, Daragh Bryne, when getting the accelerometer to work. 

x
Share this Project

Courses

49713 Designing for the Internet of Things

· 16 members

A hands-on introductory course exploring the Internet of Things and connected product experiences.


Focused on
About

Build a enchanted child monitor in the form of a teddy bear for the child to sleep with

Created

November 20th, 2019