49713 Designing for the Internet of Things
· 25 members
A hands-on introductory course exploring the Internet of Things and connected product experiences.
The goal of the project is to be able to monitor and adjust the lights in your room as per your mood or requirement. For all the lazy people our their, this is intended especially for you, since allows you to control the color and lighting in your own home all from your phone.
This project was inspired by my friend who had colorful lights in his room. He wanted a way to automate them according to his mood. I designed a lamp, which can be controlled by the tweets he posts on twitter. The color acts as the trigger word - if he tweets pink, the lamp would turn pink. It also has a distance sensor which lights up the lamp as soon as he walks close to the lamp, and shuts off as he walks away from it.
My goal is to create an IoT connected device that can manipulate the lights in my lamp, through a social media platform - twitter. It also has an additional functionality of turning on and off the light based on a distance sensor. The goal is to make my friend( who tweets a lot ) control his lights in his room by tweeting the color he wants as per his mood.
As I approached this project, I first created an account on thingspeak which is an open source IoT application and API to store and retrieve data using the Http protocol.
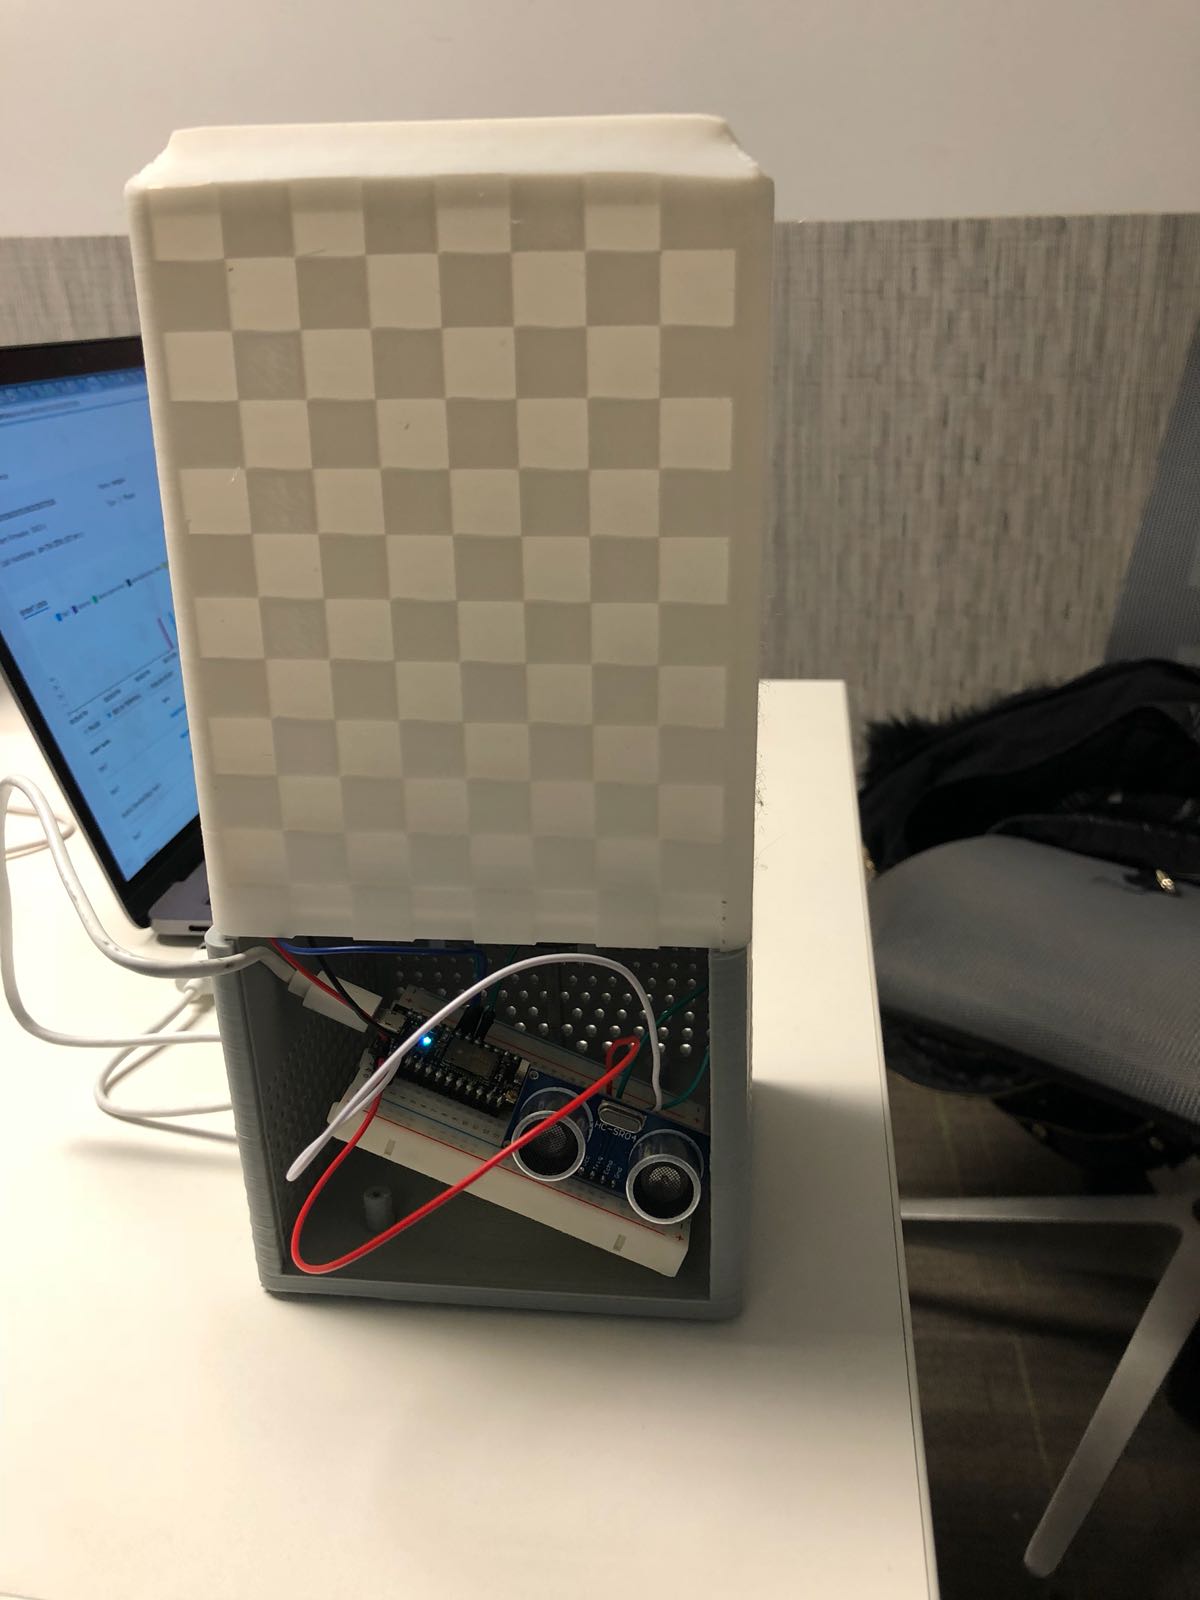
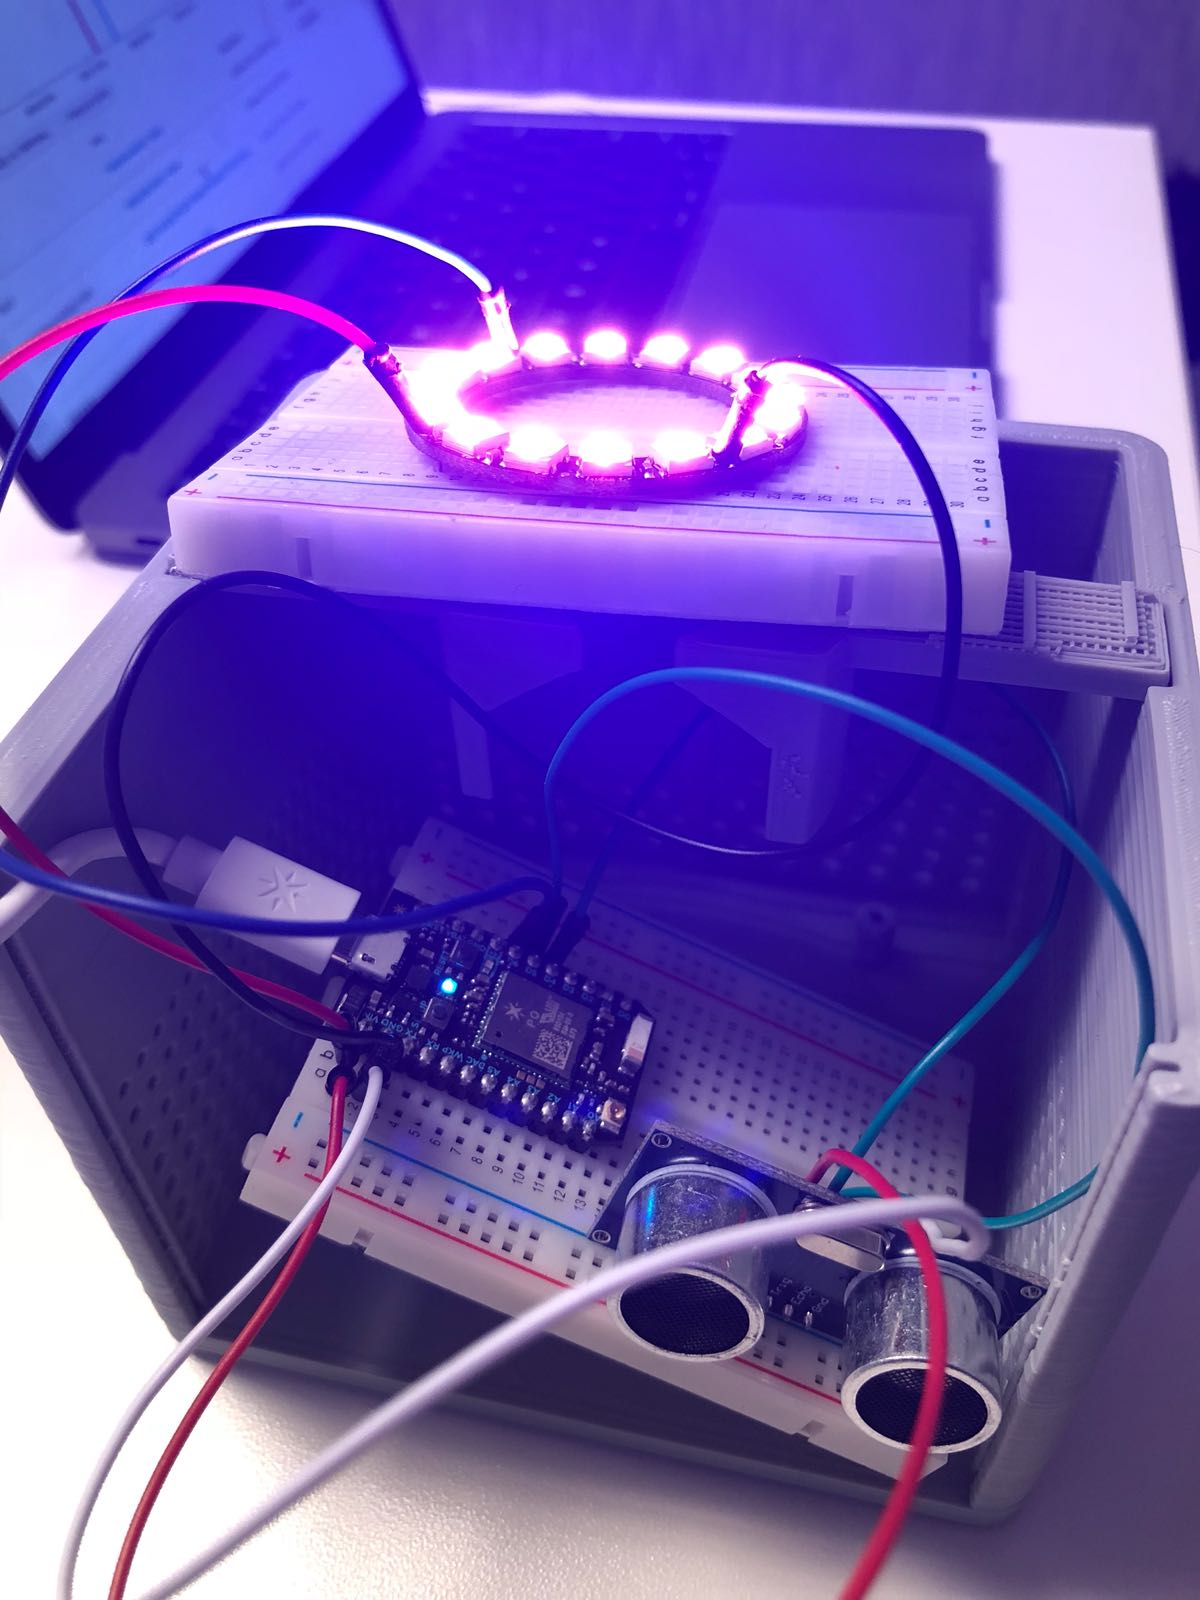
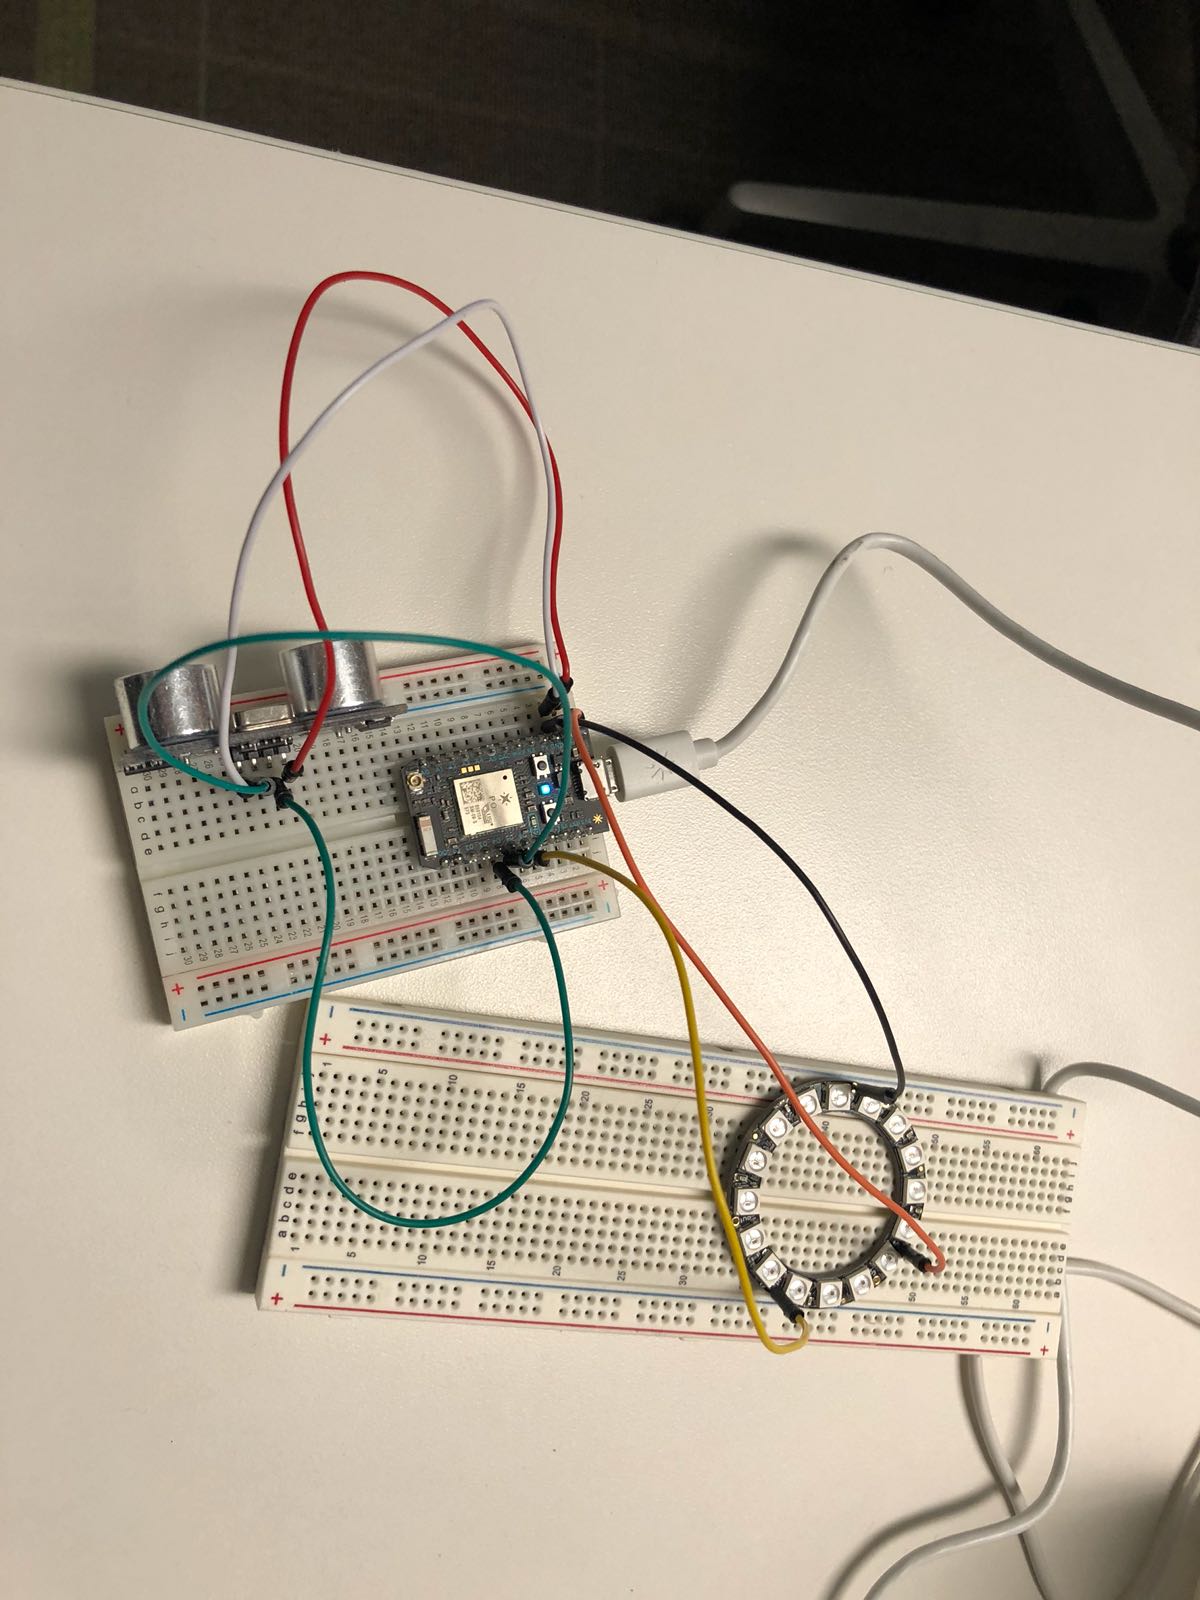
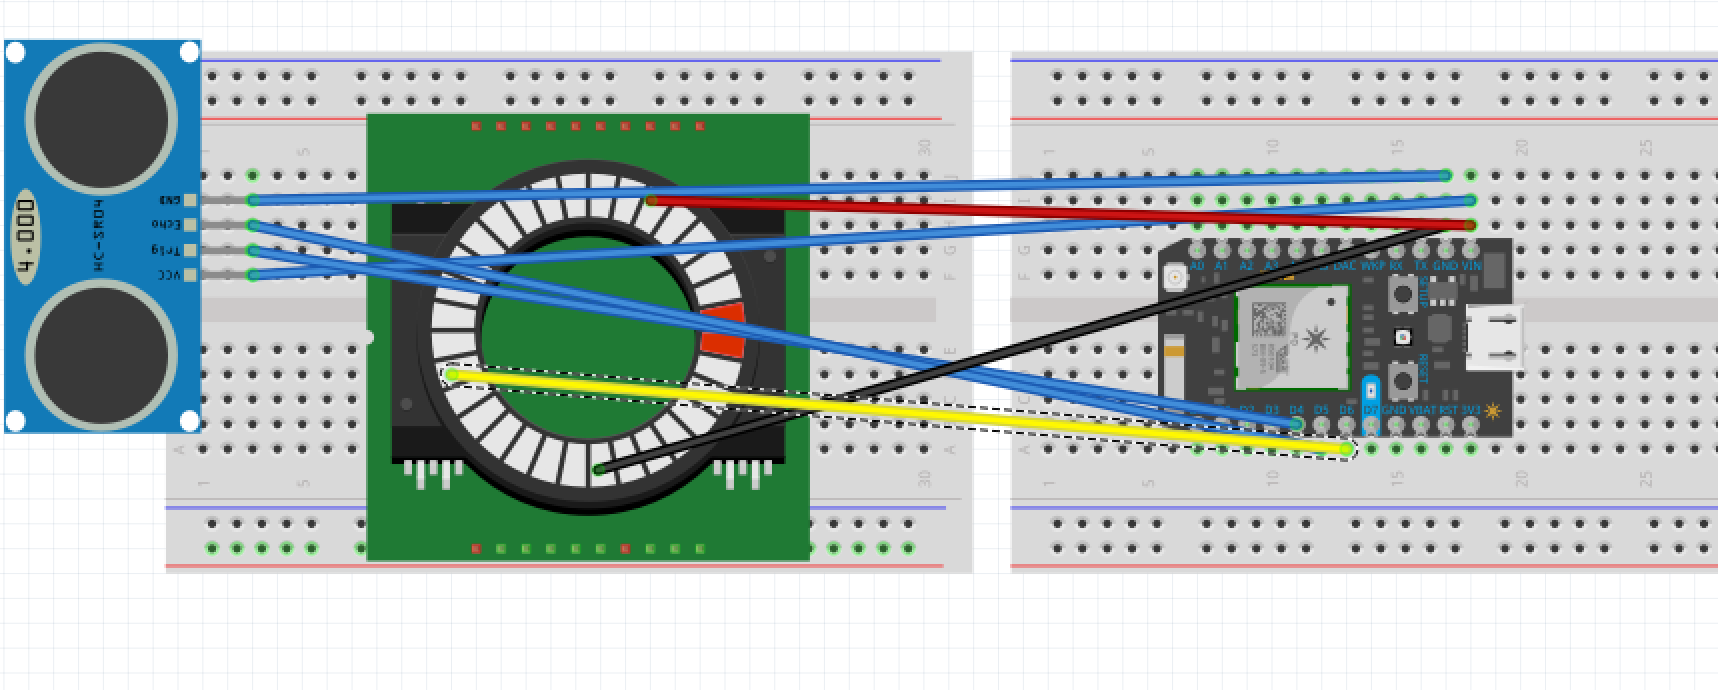
Next, I connected the neopixel on a separate breadboard and connected it to the photon using the jumper wires. Then, i added the distance sensor.
The code needed 3 libraries in order to implement - httpclient, neopixel and HC_SR04 for the sensor. I connected my channel on thingspeak and added the ID on my code to establish the Http connection
Finally, I 3D printed a case for the lamp.
#include <HC_SR04.h>

// This #include statement was automatically added by the Particle IDE.
#include <HttpClient.h>

// This #include statement was automatically added by the Particle IDE.
#include <neopixel.h>

#include "application.h"
//#include "spark_disable_wlan.h" // For faster local debugging only
#include "neopixel/neopixel.h"

// IMPORTANT: Set pixel COUNT, PIN and TYPE
#define PIXEL_PIN D6 //witch pin do you use to control the leds?
#define PIXEL_COUNT 16 //how many pixels does your lamp have?
#define PIXEL_TYPE WS2812B //witch kind of leds do you use?

#include "HttpClient.h"
HttpClient* client1;


Adafruit_NeoPixel strip = Adafruit_NeoPixel(PIXEL_COUNT, PIXEL_PIN, PIXEL_TYPE);

TCPClient client;

int ledPin = D7; //onboard LED pin
String responseLine;
String MagicTwitterWord;
unsigned long nextPoll = 0;
int flag = 0;

HttpClient http;
unsigned int nextTime = 0;    // Next time to contact the server


http_header_t headers[] = {
     { "Accept" , "/"},
     { NULL, NULL } // NOTE: Always terminate headers will NULL
 };

 http_request_t request;
 http_response_t response;

double cm = 0;
int trigPin = D4;
int echoPin = D5;

HC_SR04 rangeFinder = HC_SR04(trigPin, echoPin);

void setup() {
    Particle.publish("test1","insideSetup");
    Serial.begin(9600);
    pinMode(ledPin, OUTPUT);
    delay(2000);
    pinMode(PIXEL_PIN, OUTPUT);
    strip.begin();
    strip.setBrightness(250);
    strip.show(); // Initialize all pixels to 'off'
}

 void loop(){

    cm = rangeFinder.getDistanceCM();
    Particle.publish("distance", (String) cm);
    if (cm < 30.00){
        Particle.publish("distance threshold reached", (String) cm);
        SetLedColor(strip.Color(0, 0, 0)); // black
    }else{

     if (nextTime > millis()) {
         return;
     }

     request.hostname = "api.thingspeak.com";
     request.port = 80;
     request.path = "/channels/413448/field/1/last.txt";

     http.get(request, response, headers);
     Particle.publish("test1","response.body-->"+response.body);
     MagicTwitterWord = response.body;

     if (MagicTwitterWord == "Off"){
    Particle.publish("test1","Light is now off" +MagicTwitterWord);
    SetLedColor(strip.Color(0, 0, 0)); // black
  }
  // Notification colors
  else if (MagicTwitterWord == "red"){
    Particle.publish("test1","Light is now Red");
    SetLedColor(strip.Color(255, 0, 0));
  }
  else if (MagicTwitterWord == "blue"){
    Particle.publish("test1","Light is now Blue");
    SetLedColor(strip.Color(0, 0, 255));
  }
  else if (MagicTwitterWord == "green"){
    Particle.publish("test1","Light is now Green");
    SetLedColor(strip.Color(0, 255, 0));
  }
  else if (MagicTwitterWord == "purple"){
      Particle.publish("test1","Light is now Purple");
    SetLedColor(strip.Color(250, 0, 250));
  }
  else if (MagicTwitterWord == "pink"){
    Particle.publish("test1","Light is now Pink");
    SetLedColor(strip.Color(255, 0, 255));
  }

// Lighting modes
  else if (MagicTwitterWord == "cozy"){
    SetLedColor(strip.Color(255, 105, 0));
  }
  else if (MagicTwitterWord == "study"){
    SetLedColor(strip.Color(250, 165, 45));
  }
  else if (MagicTwitterWord == "reading"){
    SetLedColor(strip.Color(252, 135, 20));
  }
  else if (MagicTwitterWord == "romantic"){
    SetLedColor(strip.Color(255, 75, 0));
  }
  else if (MagicTwitterWord == "industrial"){
    SetLedColor(strip.Color(255, 255, 255));
  }
  else {
      Particle.publish("test1","Didn't find a matching magic word.");
  };
     nextTime = millis() + 5000;
    }
 }

 void connectToTwitter() {
  if (client.connect("api.thingspeak.com", 80)){
    client.println("GET /channels/413448/field/1/last.txt HTTP/1.0");
    client.println();
    Particle.publish("test1","I'm connected to the channel! WooHoo!");
  }
  else {
    Particle.publish("test1","Connection Failed");
  }
  responseLine = "";
  MagicTwitterWord = "";
}


void SetLedColor(uint32_t c) {
  for(uint16_t i=0; i<strip.numPixels(); i++) {
      strip.setPixelColor(i, c);
      strip.show();

  }
}This project was a very interesting experience.
To add on, i would like to implement a facial recognition system which captures the mood, and then displays the corresponding light.
The coding aspect was not that tough for me, but the electronics was new, and i learnt a lot about the different components used in circuits.
I feel very satisfied with this project and learnt a lot in the process.
A hands-on introductory course exploring the Internet of Things and connected product experiences.
The goal of the project is to be able to monitor and adjust the lights in your room as per your mood or requirement. For all the lazy people our their, this is intended especially for you, since allows you to control the color and lighting in your own home all from your phone.
January 25th, 2018