49713 Designing for the Internet of Things
· 25 members
A hands-on introductory course exploring the Internet of Things and connected product experiences.
If the sun has set and you turn the doorknob to enter the bedroom, it lit up the atmosphere lights on the ceiling resemble stars. The outside lights can show kids status to their parents when they went to sleep.
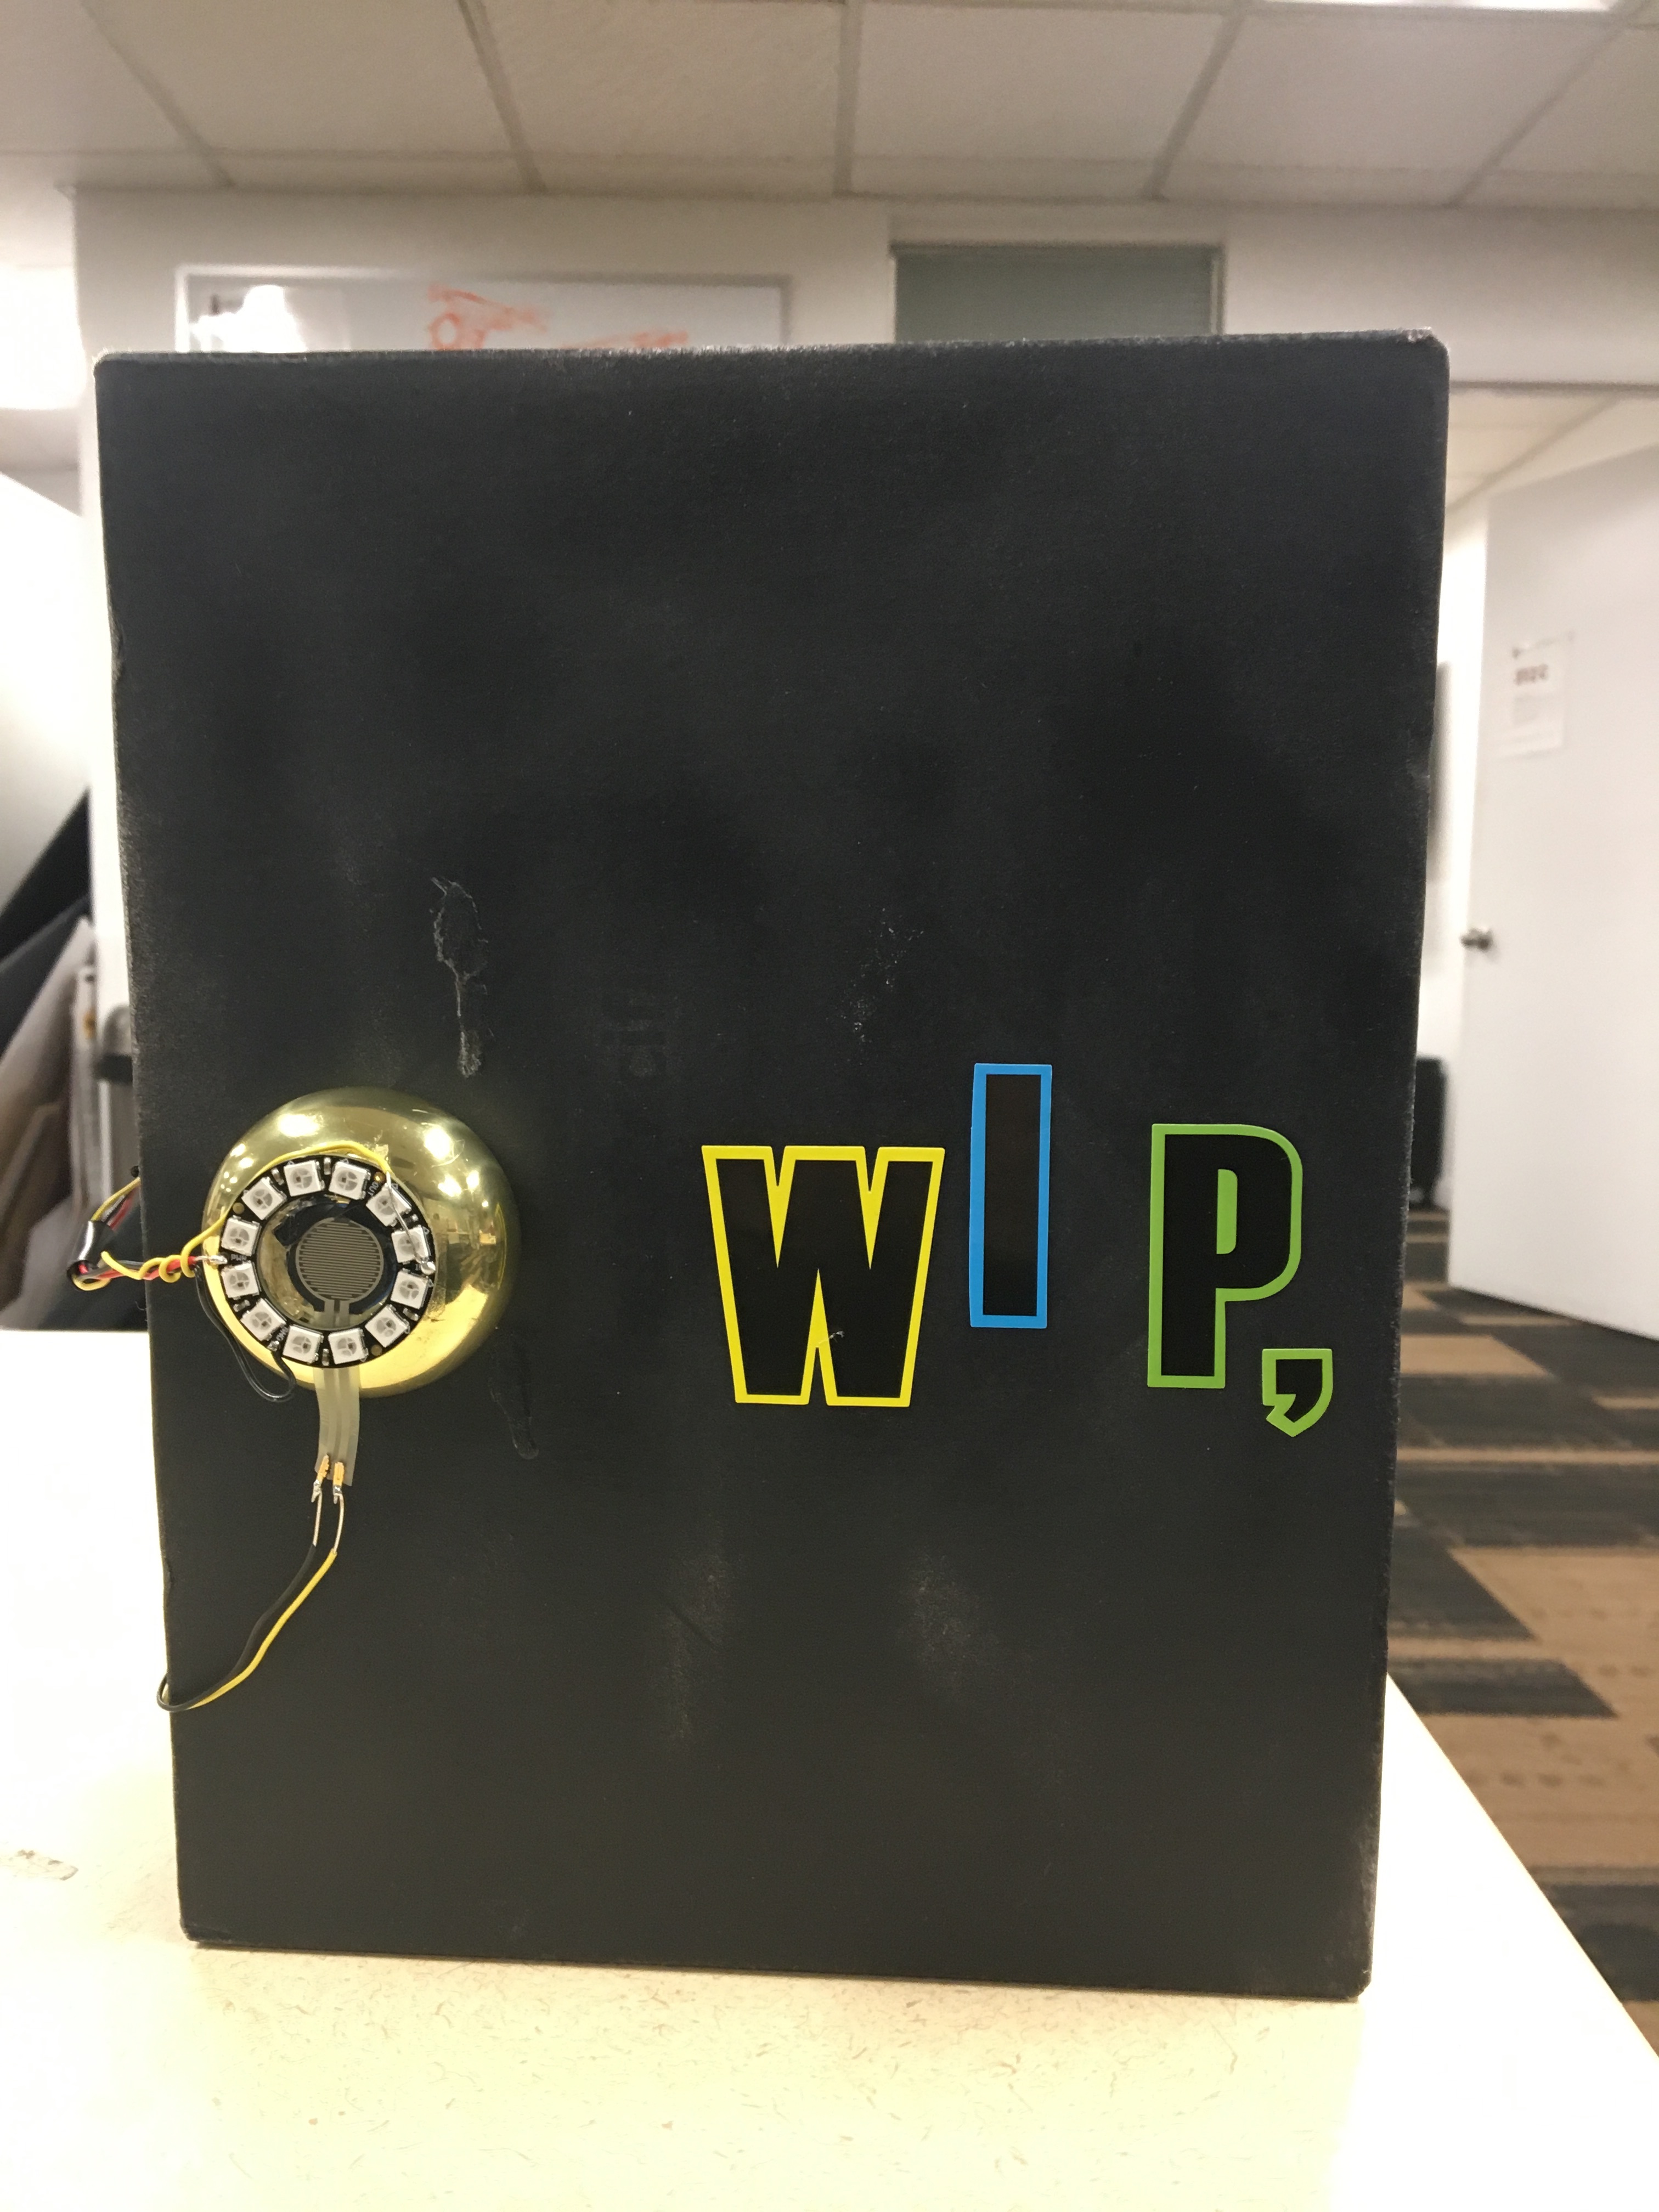
The ambient door knob is part of the SleepStars connected night time "go-to-bed" system. It is the product that initiates the system to turn on and it also communicates information to parents of kids who have and use the doorknob. It is meant to make the child feel like they are entering a magical bedroom world and that they have transformed it to be a space that is no longer "scary and dark" at night. Entering this soothing environment and knowing it won't be scary if they initiate the system helps ease them into a smooth and calming "go-to-bed" experience.
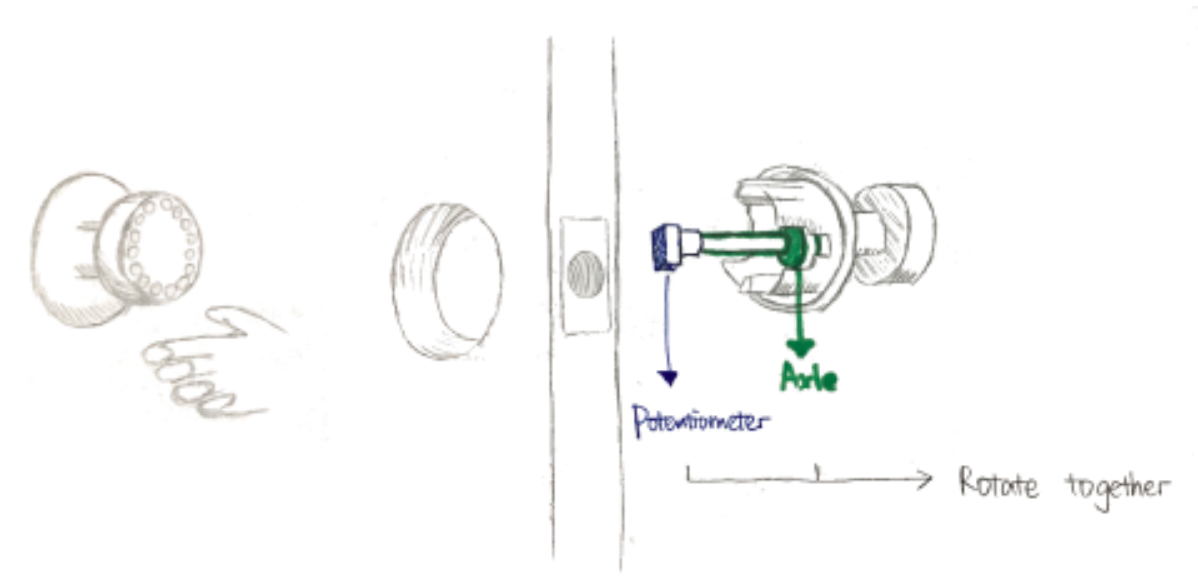
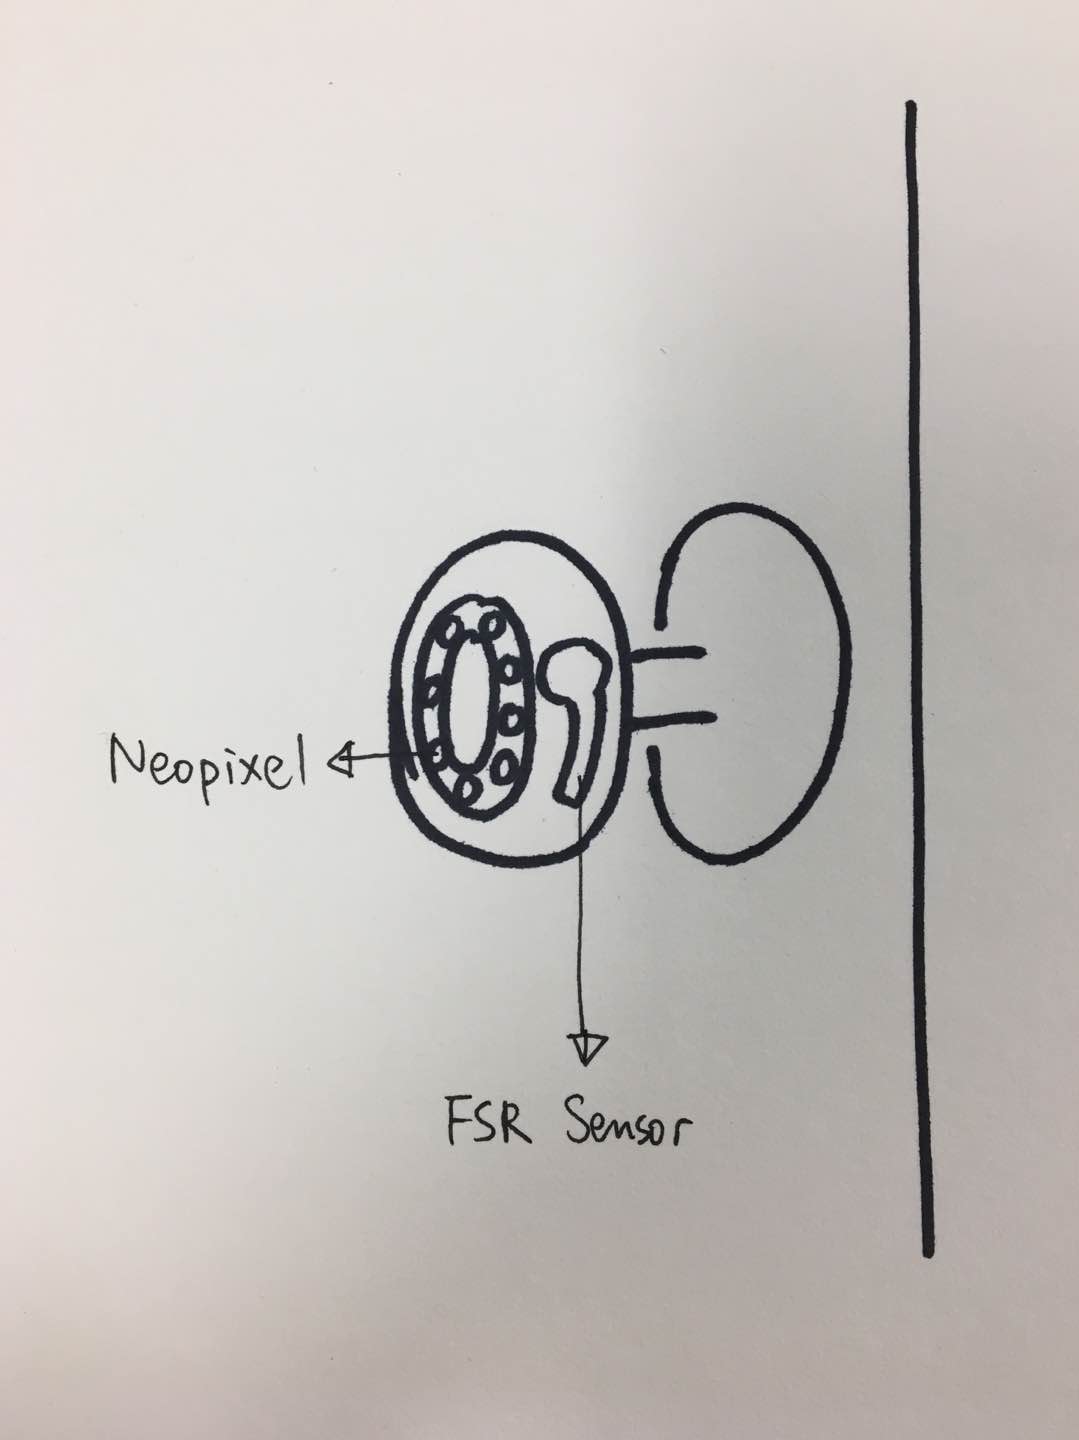
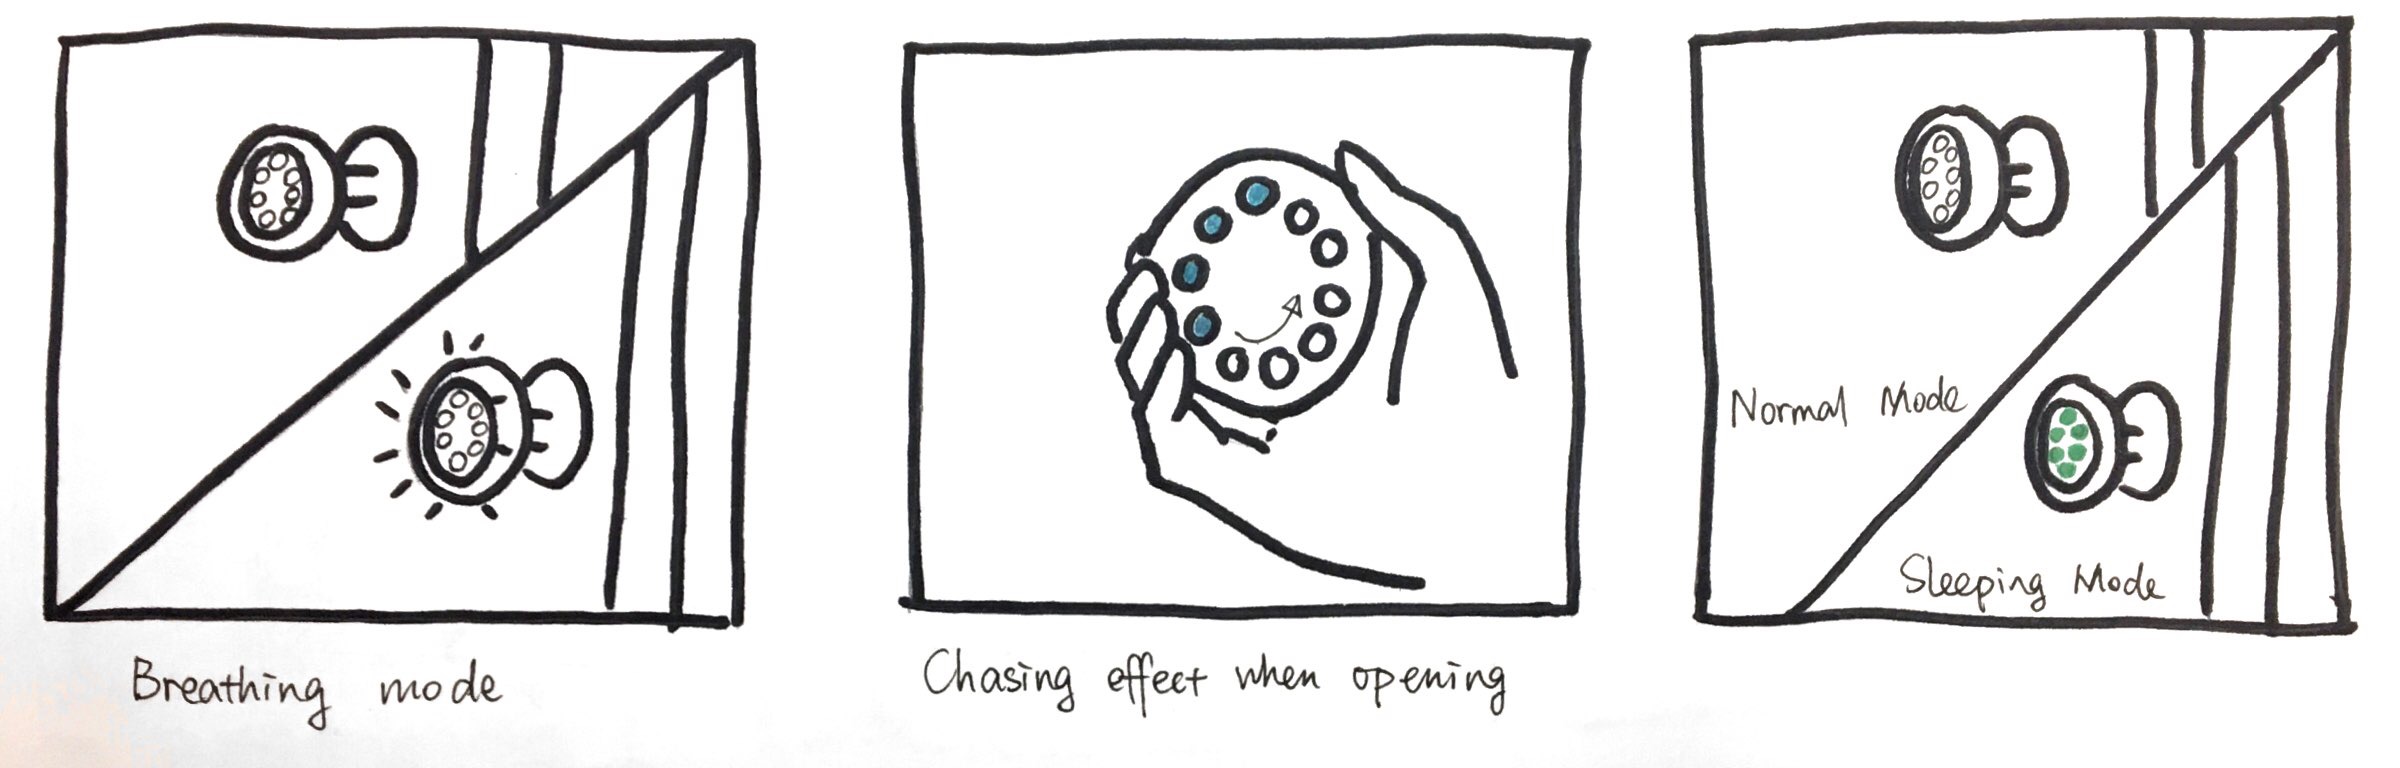
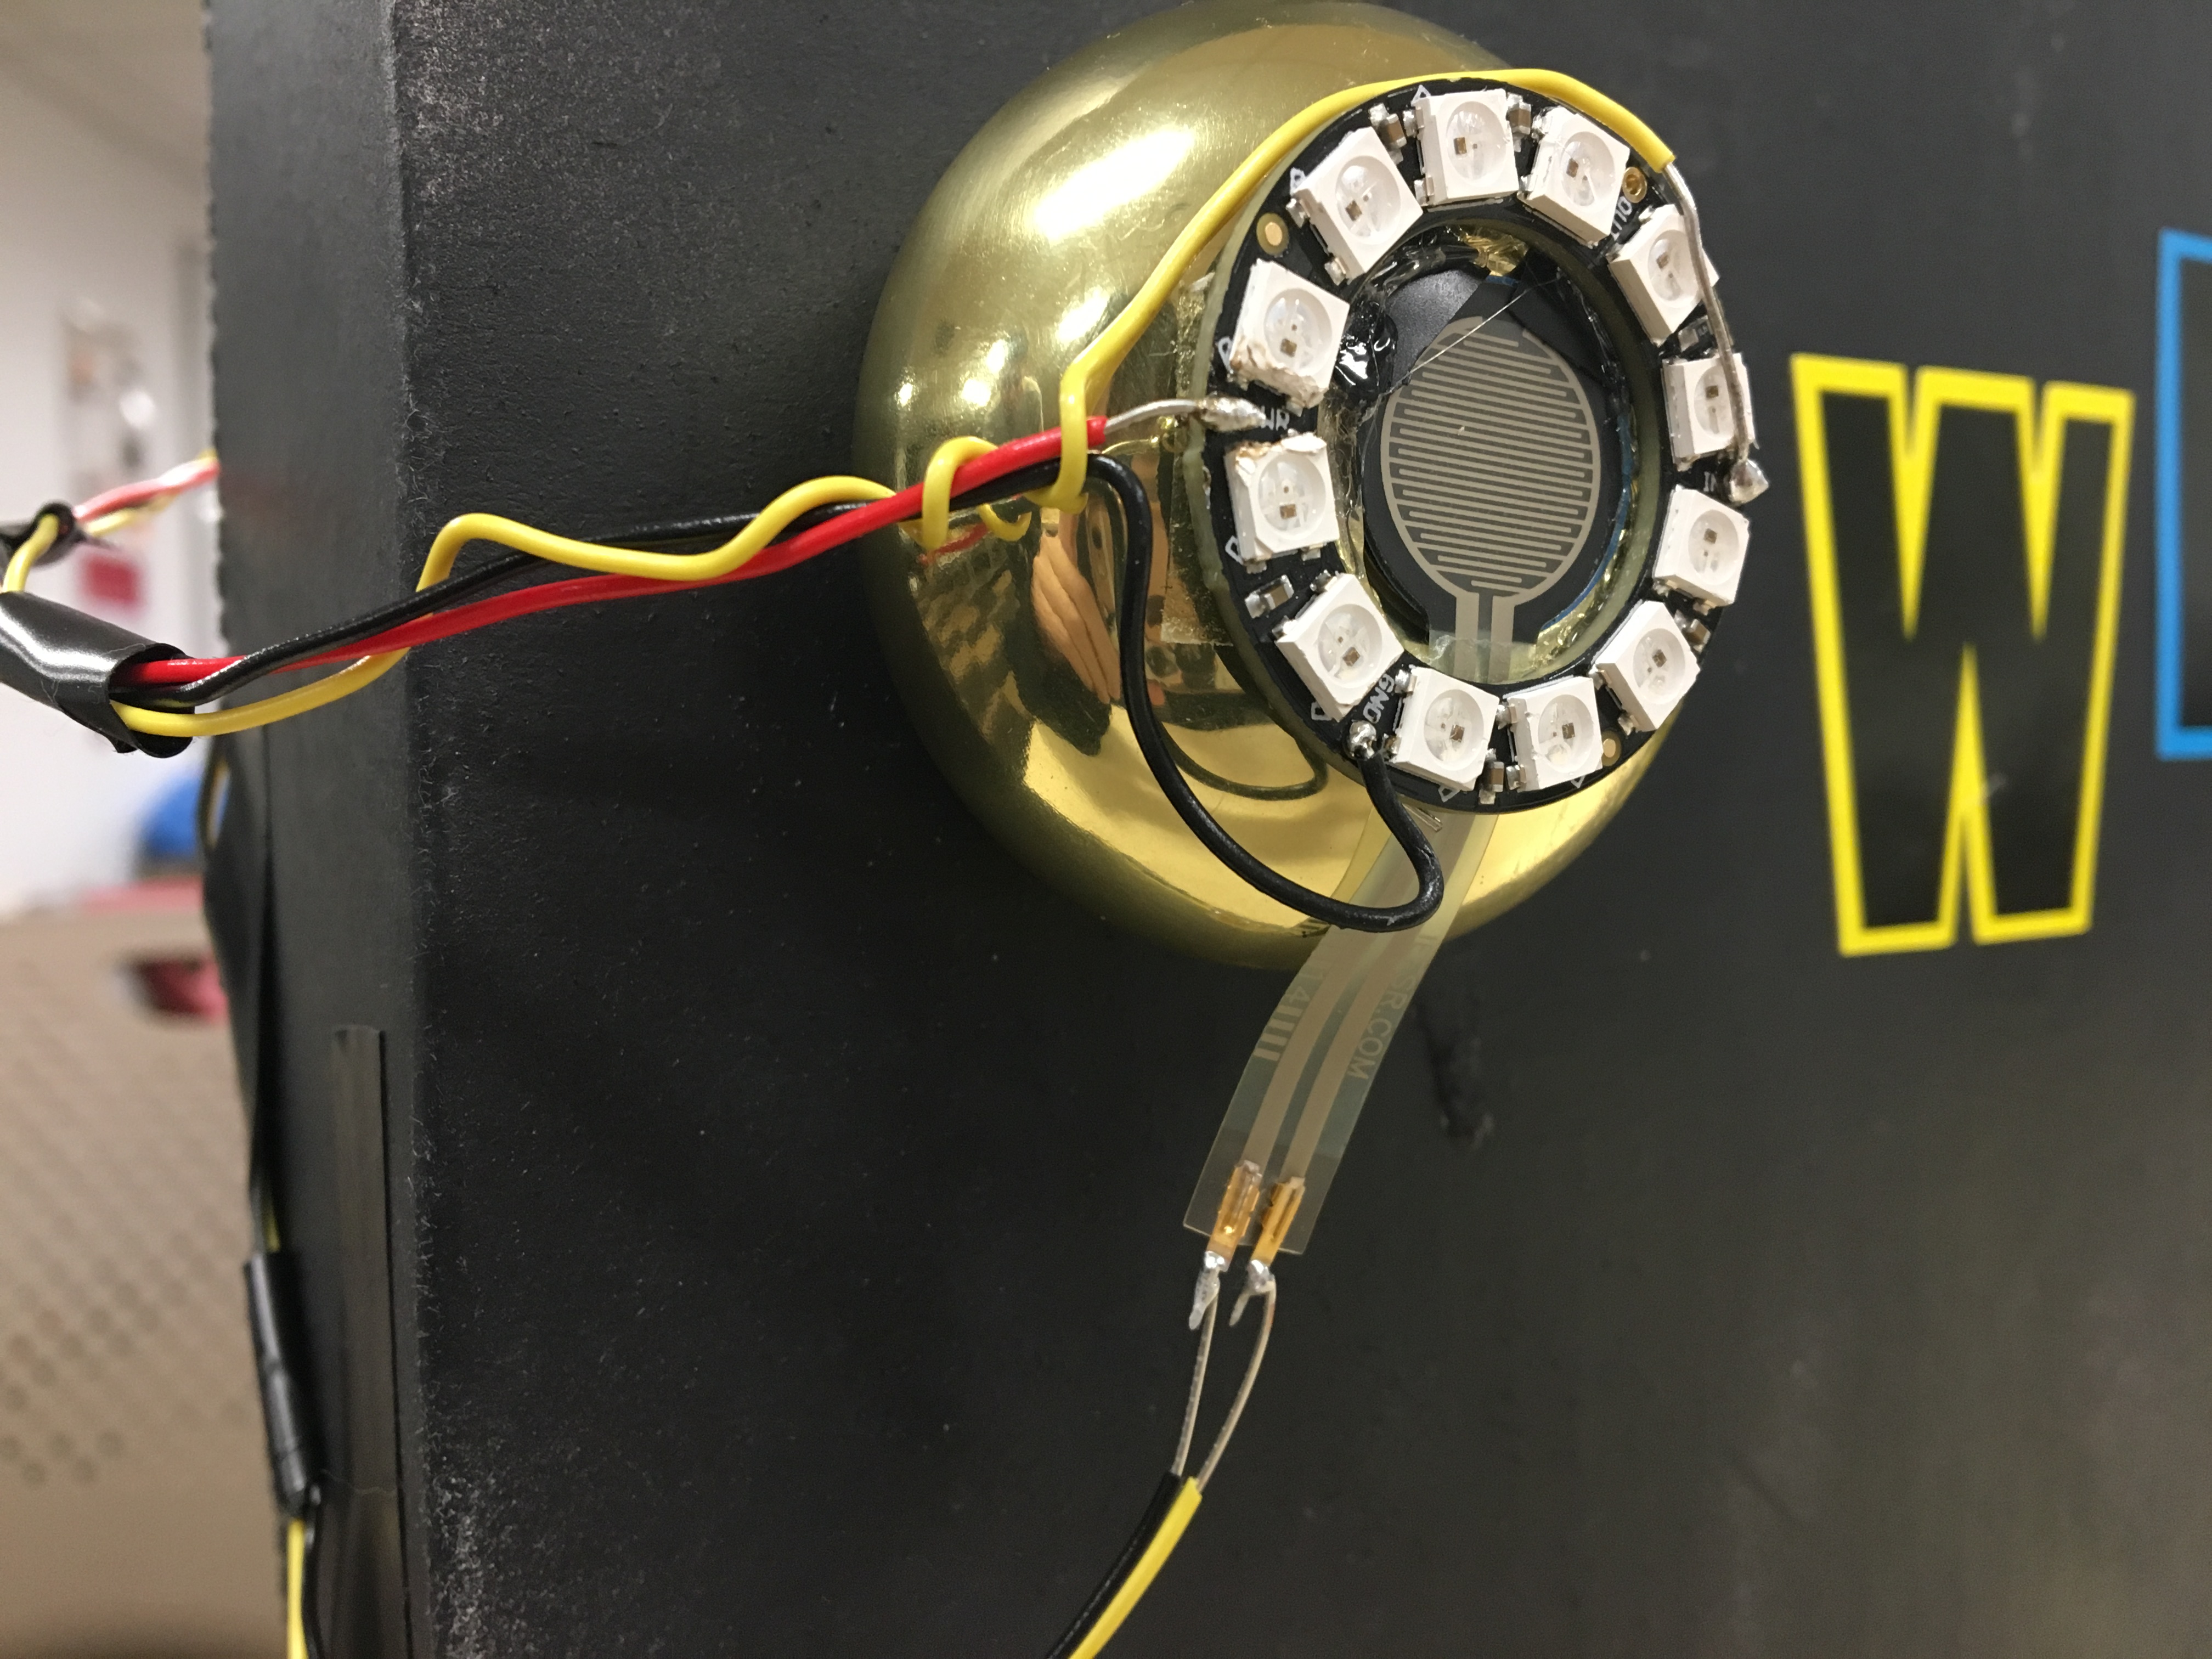
The doorknob itself will be lit up with a white light that "breaths" when the system is not activated, but it indicates to the child that the system is on. When they enter their bedroom and want to activate the system at night, they grab the doorknob and press the FSR sensor where a keyhole would typically be on the door knob and it activates the neopixel light (that was previously white and breathing) to animate and turn shades of blue. Pressing the FSR also activates the second product of the system, which is an ambient light we've named "Star Cloud" that you can read about in this gallery (http://integratedinnovation.xsead.cmu.edu/gallery/projects/sleepstars-ambient-light).It creates the visuals for the calming atmosphere.
The following link is the full IoT ecosystem Gallery Page: http://integratedinnovation.xsead.cmu.edu/gallery/projects/sleepstars-wip-8295faa7-5fc4-40ee-b535-27295299c750.
The doorknob spun out a research finding that many young kids (ages 5-6) are afraid of the dark. We also remember being afraid of the dark at young ages too. We wondered how we could mitigate this fear during a child's go to bed experience and ideated product solutions for entry into the room. We came up with the doorknob form because it is the object that the child uses to intentionally enter their bedroom. If it could transform the bedroom into a pleasant space for them at night, then they would feel at ease as they went to sleep on their own and without their parent's support.
We also thought about the parent's role in this experience. They want their children to learn to be independent, but also want to make sure their child is getting enough sleep. There is a signal on the door knob (change in color) that let's the parent know when the child is going to sleep, so they don't need to interrupt their child's "go-to-sleep" process by entering the room.
During the course of building this prototype we encountered some challenges, which are detailed below:
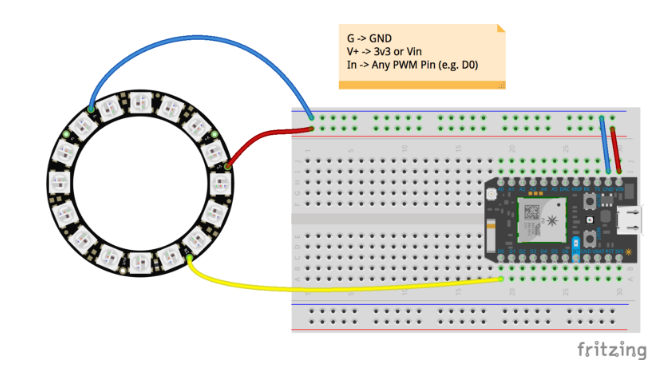
1. Neopixel setup
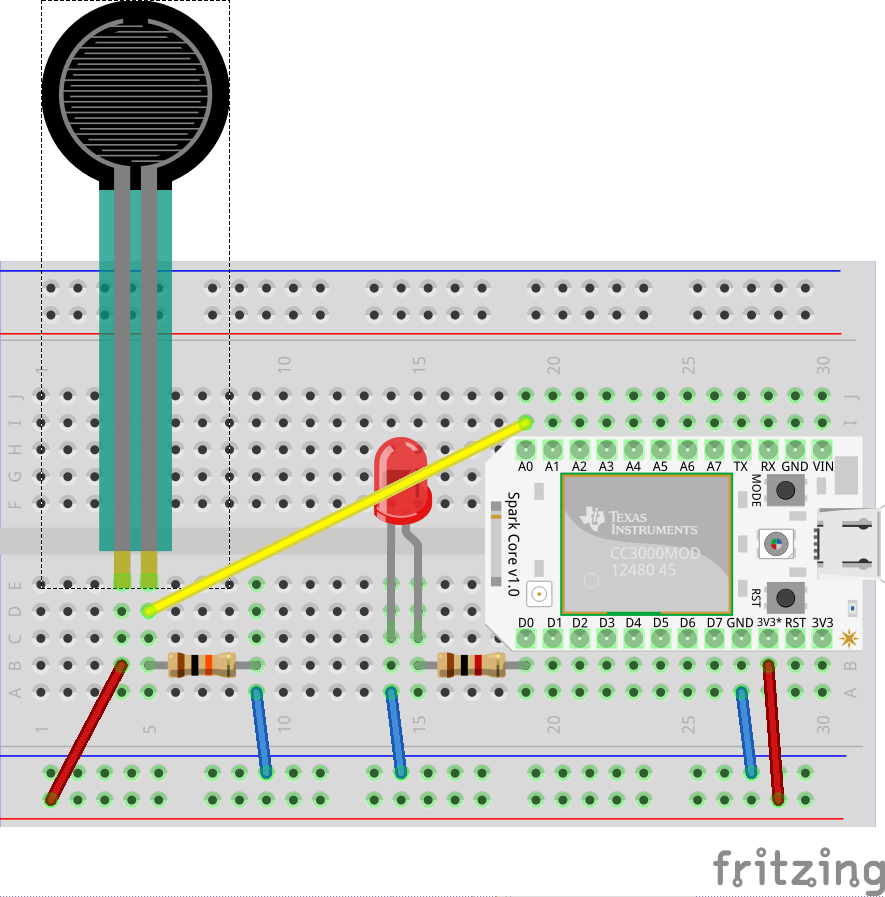
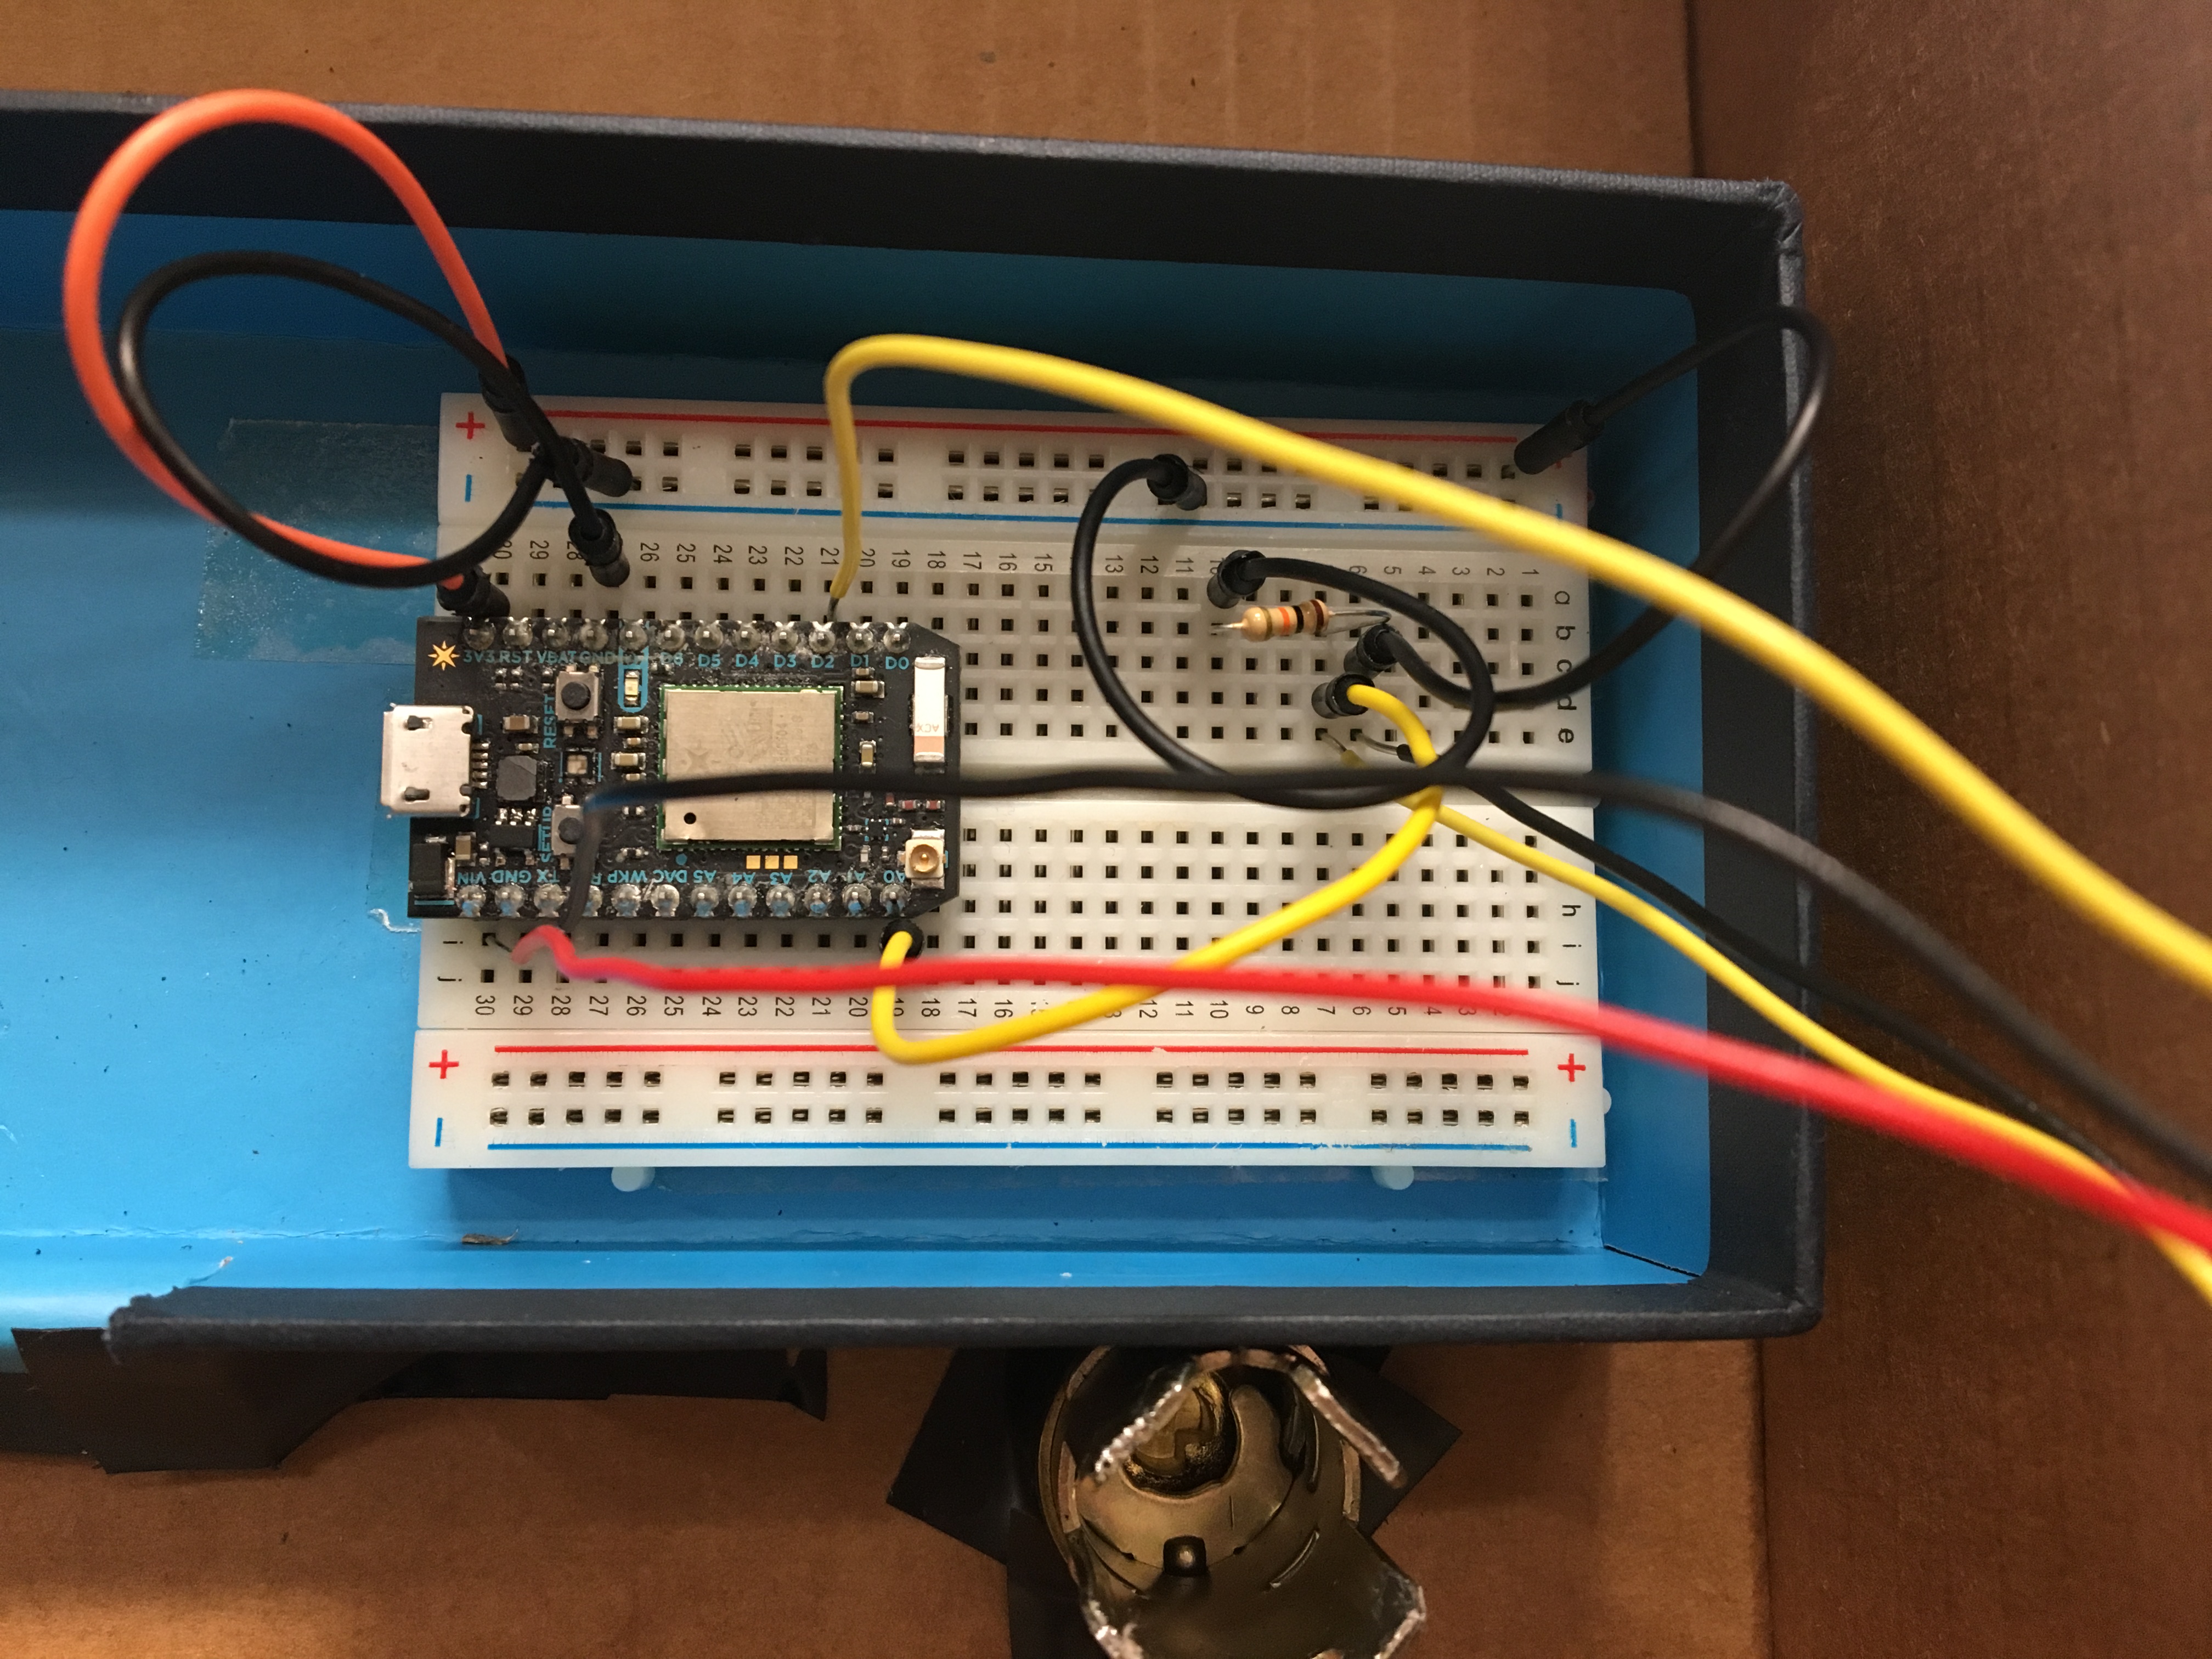
One confusing part of using Neopixel is the voltage. It says on the back of Neopixel, 5v is the required voltage, however, seems like photon only support 3v. Don' t let it hold you back, if the neopixel is less than 25 pixels and no other major components, you can power from the Vin and not 3v3 otherwise your Photon might brown out. If there are more than 25 pixels, unfortunately, you do need to add extra power, for instance, a 5v battery. Additionally, you need to be cautious when setting up the circuit. It is necessary to solider jumper wires to neopixel to ensure the connection with photon.
2. Neopixel code
Neopixel code is often challenging to write. But it isn't as intimidating as it seems to be. Once you understand the basic of it, it becomes easy since sample code is easy to assess online. Here are basics you need to know.
a) Add the library by #include <neopixel.h> before everything else. You may add #include <math.h> to achieve more sophisticate effects involving math functions.
b) To kick off neopixel project, you should include following three lines of code in setup (): strip.setBrightness ( xx); strip.begin(); strip.show(); SetBrightness allows you to adjust neopixel to the comfort brightness. Strip.begin() and show() is the commend to jump start the neopixel. Especially command show() is to light up the neopixel to the way you want.
c) There are various of effect neopixel can display and for loop is commonly used. One important trick in the for loop is strip.numpixel(), which used to determine number of the total pixel. It becomes handy when programming any effects of neopixel.
// This #include statement was automatically added by the Particle IDE.
#include <neopixel.h>
#include <math.h>

// IMPORTANT: Set pixel COUNT, PIN and TYPE
#define PIXEL_PIN D2
#define PIXEL_COUNT 12
#define PIXEL_TYPE WS2812

Adafruit_NeoPixel strip = Adafruit_NeoPixel(PIXEL_COUNT, PIXEL_PIN, PIXEL_TYPE);

int fsrPin = A0;
// Create a variable to hold the FSR reading
int fsrReading = 0;
// Define a pin we'll place an LED on
int ledPin = D0;
// Create a variable to store the LED brightness.
int ledBrightness = 0;
int buttonPin = D2;
int thresholdValue = 1000;
int shouldRun = 0; // It serves like Bool, to turn on and off the neopixel light


    void setup()
{
  // Set up the LED for output
  pinMode(ledPin, OUTPUT);
  // Create a cloud variable of type integer
  Particle.variable("force", &fsrReading, INT);


  strip.setBrightness( 30 );
  strip.begin();
  strip.show();

  Particle.subscribe("sleepstar/2p", ChangeLight);

  Particle.variable("Bool", &shouldRun, INT);

}

    void loop()
{
    doorknob();


    if( shouldRun == 1 ){
    breathe2(0);
    delay(5000);
    }
    else  {
    doorknob();
    }
}


    void doorknob(
{

  fsrReading = analogRead(fsrPin);
  //Particle.publish("test",;fsrReading");
  // Map this value into the PWM range (0-255)
  // and store as the led brightness
  if((fsrReading > thresholdValue) && (shouldRun == 0) )
  {
  Particle.publish("sleepstar/2p", "run");

  colorWipe(50,50);

  }
  else if ((fsrReading <= thresholdValue) && (shouldRun == 0)){

      breathe(50);
 }

}

    void ChangeLight(const char *event, const char *data)
{
  String dataStr = String(data);
  if( dataStr.equals( "sleep_t" )) {
    shouldRun = 1;
  }
    else if (dataStr.equals( "sleep_ts" )){

        shouldRun = 0;
    }
}

  /* Calc the sin wave for the breathing white led */
  float breathe( uint8_t wait ){

  float val = (exp(sin(millis()/2000.0*M_PI)) - 0.36787944)*108.0;
  Serial.println( val );

  uint16_t i;
  uint32_t c = strip.Color(val, val, val );

  for(i=0; i< strip.numPixels(); i++) {
    strip.setPixelColor(i, c );
  }
  strip.show();
  delay(wait);

  }

    /* Calc the sin wave for the breathing white led */
  float breathe2( uint8_t wait ){

  float val = (exp(sin(millis()/2000.0*M_PI)) - 0.36787944)*108.0;
  Serial.println( val );

  uint16_t i;
  uint32_t c = strip.Color(val, 225, val );

  for(i=0; i< strip.numPixels(); i++) {
    strip.setPixelColor(i, c );
  }
  strip.show();
  delay(wait);

  }


  void colorWipe(uint32_t c, uint8_t wait) {
  for(uint16_t i=0; i<strip.numPixels(); i++) {
    uint32_t c = strip.Color(0, 255, 255);
    strip.setPixelColor(i, c);
    strip.show();
    delay(wait);
  }
}During the course of this project, we learned that the Neopixel is an engaging and useful way to communicate information, because it is versatile in color and animation, but we had a difficult time determining what the correct brightness and animation was for our product in use. If we had more time, we would explore other ways to use the Neopixel or other ways to place it in the doorknob or door to communicate information through light.
Additionally, though the FSR is effective to show the basic proof of concept for the door knob, ideally, it would be built with a fingerprint verification system, like what is installed on iPhones and the newest MacBook Pro, so that the child could be the only person to "unlock" or "transform" his or her bedroom into the magical world. This would make it feel even more like their own private, personal space.
This project taught us how to strategically design connected ecosystems that support a common goal and we enjoyed working together and within a larger group. It felt more like a "real world" business team.
A hands-on introductory course exploring the Internet of Things and connected product experiences.
If the sun has set and you turn the doorknob to enter the bedroom, it lit up the atmosphere lights on the ceiling resemble stars.
The outside lights can show kids status to their parents when they went to sleep.
March 2nd, 2018