-
-
-

-
Meditation Timer & Thermometer Circuit
A meditation light timer and temperature sensor that is personalized to an individual's needs in her home.
0
Proposal
I will create a meditation light that stays on for ten minutes (the amount of time that the person meditates daily). It will be activated by a button and also simultaneously measure the temperature during time of activation in the environment where she meditates. A buzzer will ring when the light turns off to signal to her when 10 minutes is up. She meditates next to her window, usually with the window open, so the temperature level will be collected in the particle cloud and she can refer to this data after she meditates to determine what she should wear that day.
Problem Statement
I am designing a meditation light and thermometer for my Mother who meditates near a window daily, but sometimes skips this practice because it doesn’t fit naturally into her routine. The light blinks blue when a button is pressed to initiate the pre-set meditation (10 minutes). The light is white for the remaining time and then blinks blue when a buzzer goes off signaling the end of the meditation period. When the button is pressed the temperature is read by a DHT sensor-- that data is sent to the cloud to be read. My Mother benefits from this because she doesn’t need to set up a manual timer, since this is preset, she can keep it next to the window (always) and it will help her efficiently get ready for her day by telling her the temperature without her needing to look it up on another device. I chose this person because, though she doesn’t live near me and I live alone, we both do this and if I extend upon this project I could create a light/timer that also sends push notifications between us to tell each other when we are meditating so we could potentially “meditate together”.
Goal
My aim is to create a solution that makes meditating fit more seamlessly into my Mother’s daily routine so that she doesn’t skip this practice in the mornings and so that it actually makes her day more efficient than it would otherwise.


Challenges & Mitigations
I experienced 2 main challenges and both were in the set up of the code.
Challenge 1: Setting up the time interval from for "isMeditating" to recognize when the button is pushed and to measure a certain amount of time from that point for my loop to occur. When that time period was reached, to turn everything off.
Mitigation 1: I searched online for open source code shared by others in their projects that were similar. I was able to make progress in organizing my code to work how I wanted to by pulling pieces from various code sources shared, but there was nothing exactly like what I created, so it required me to understand what I was trying to build more than I had previously anticipated. This was ultimately great, because now I know I could build this type of program from scratch and on my own in the future. Ultimately, I connected with my professor, Daragh Byrne, for guidance on how to set up the interval so that it not only shut down, but the buzzer output went off at the end of the interval. He recognized that I had not actually named my interval yet, which solved most of my issues in challenge one.
Challenge 2: Having the DHT22 sensor read by the program and then published that data to the cloud.
Mitigation 2: I consulted with my peer Xenia Kolesnikov who had a similar issue. She pointed out that I needed to actually save the external DHT22 library in the same folder as my program's file. I also met with Roberta Andaya, the class TA, to work on this because even after the library was saved, the DHT22 was not recognized. We worked together to figure out why and learned that there were files missing. We manually downloaded these from github and saved them in the correct location. Once we did this, we went through my code to locate & edit bugs in the code. I learned that collaborative learning is very effective for innovation in a space like this, where there's a lot of opportunity to create things that don't exist yet or are more personalized.
Steps:
Below is an outline of the steps I took to put together this circuit.
* Refer to the following steps for guidance on how to compile the code for this circuit. Compile in Particle Dev application.
* Refer to the completed circuit diagram in the Final Outcome section of this page for guidance on how to put together the physical components of the circuit.
1. Set up the physical components of the light circuit and the corresponding code to turn both lights on.
Components:
- 1 Breadboard
- 1 Particle Photon
- 2 1k Ohm Resistors
- 1 Standard 2V White LED
- 1 Standard 2V Blue LED
- Jumper wires
2. Set up the physical and digital components of the button and set up the isMeditating time interval of 10 minutes. Program so that when button is pressed it initiates the blue light to blink and then turn off. Program the white light to stay on for the full time interval "isMeditating". Otherwise, everything is off.
Components:
- 1 Push Button
- Jumper Wires
int ledPin1 = D2;
int ledPin2 = D0;
int buzzer = D3;
int buttonPin = D1;

bool isMediating = false;
long mediationStartTime = -1;


void setup()
{
  pinMode( buttonPin , INPUT_PULLUP); // sets pin as input
  pinMode( ledPin1 , OUTPUT ); // sets pin as output
  pinMode( ledPin2 , OUTPUT );
  digitalWrite( ledPin1, LOW);
  digitalWrite(ledPin2, LOW);

}

void loop()
{
// find out if the button is pushed or not by reading from it.
   int buttonState = digitalRead( buttonPin );

   // switch LED color to signify timer starting
  if( isMediating == false && buttonState == LOW )
  {
    // read temp of dht and display
    tempReading = analogRead(DHTPIN);
    // blink blue LED to signify starting timer
    digitalWrite(ledPin2, LOW);
    digitalWrite(ledPin1, HIGH);
    delay(500);
    digitalWrite(ledPin1, LOW);
    delay(500);
    digitalWrite(ledPin1,HIGH);
    delay(500);
    digitalWrite(ledPin1,LOW);

    // start the mediation cycle...
    isMediating = true;
    // keep a track of when we started meditating
    mediationStartTime = millis();
  }else{
    // otherwise turn white led on during meditation session
    digitalWrite( ledPin2, HIGH);

  }
    // update the start
    isMediating = false;
    mediationStartTime = -1;
  }
  // turn off both lights
  if ( isMediating == false ) {
    digitalWrite(ledPin1,LOW);
    digitalWrite(ledPin2, LOW);
  }
  // anything less than 10 minutes, white light is on
  else {
    digitalWrite(ledPin2, HIGH);
  }

}int ledPin1 = D2;
int ledPin2 = D0;
int buzzer = D3;
int buttonPin = D1;
bool isMediating = false;
long mediationStartTime = -1;
void setup()
{
interrupts(); // added to make recognize DHT library
pinMode( buttonPin , INPUT_PULLUP); // sets pin as input
pinMode( ledPin1 , OUTPUT ); // sets pin as output
pinMode( ledPin2 , OUTPUT );
pinMode(buzzer, OUTPUT);
digitalWrite( ledPin1, LOW);
digitalWrite(ledPin2, LOW);
//tone(buzzer, 1000, 500);
}
void loop()
{
// find out if the button is pushed or not by reading from it.
int buttonState = digitalRead( buttonPin );
// switch LED color to signify timer starting
if( isMediating == false && buttonState == LOW )
{
// read temp of dht and display
tempReading = analogRead(DHTPIN);
// blink blue LED to signify starting timer
digitalWrite(ledPin2, LOW);
digitalWrite(ledPin1, HIGH);
delay(500);
digitalWrite(ledPin1, LOW);
delay(500);
digitalWrite(ledPin1,HIGH);
delay(500);
digitalWrite(ledPin1,LOW);
// start the mediation cycle...
isMediating = true;
// keep a track of when we started meditating
mediationStartTime = millis();
}else{
// otherwise turn white led on during meditation session
digitalWrite( ledPin2, HIGH);
}
// signal buzzer and flash blue light to signify end of meditation session (10 minutes is up)
if( isMediating == true and mediationStartTime + 600000 < millis() ) {
tone(buzzer, 1000, 500);
digitalWrite(ledPin2, LOW);
digitalWrite(ledPin1, HIGH);
delay(500);
digitalWrite(ledPin1, LOW);
delay(500);
digitalWrite(ledPin1,HIGH);
delay(500);
digitalWrite(ledPin1,LOW);
// update the start
isMediating = false;
mediationStartTime = -1;
}
// turn off both lights
if ( isMediating == false ) {
digitalWrite(ledPin1,LOW);
digitalWrite(ledPin2, LOW);
}
// anything less than 10 minutes, white light is on
else {
digitalWrite(ledPin2, HIGH);
}
}4. Set up the physical and digital components for the DHT22 sensor and make sure that the data gathered for temperature is in celsius and sent to the cloud. Save libraries needed for set up PietteTech_DHT.cpp and PietteTech_CHT.h, which can be found in github (https://github.com/piettetech/PietteTech_DHT).
Components:
- 1 DHT22 Sensor
- 1 10k Ohm Resistor
- Jumper Wires
#include "PietteTech_DHT.h"  // Uncomment if building in IDE

// system defines
#define DHTTYPE DHT22              // Sensor type DHT11/21/22/AM2301/AM2302
#define DHTPIN D4         	    // Digital pin for communications
#define DHT_SAMPLE_INTERVAL 2000 // Sample every two seconds

int ledPin1 = D2;
int ledPin2 = D0;
int buzzer = D3;
int buttonPin = D1;

bool isMediating = false;
long mediationStartTime = -1;

double temperature;
double humidity;
int tempReading;

// globals
unsigned int DHTnextSampleTime;	    // Next time we want to start sample
bool bDHTstarted;		    // flag to indicate we started acquisition
int n;                              // counter

void dht_wrapper(); // must be declared before the lib initialization

PietteTech_DHT DHT(DHTPIN, DHTTYPE, dht_wrapper);

void dht_wrapper() {
  DHT.isrCallback();
}

void setup()
{
  interrupts(); // added to make recognize DHT library
  pinMode( buttonPin , INPUT_PULLUP); // sets pin as input
  pinMode( ledPin1 , OUTPUT ); // sets pin as output
  pinMode( ledPin2 , OUTPUT );
  pinMode(buzzer, OUTPUT);
  digitalWrite( ledPin1, LOW);
  digitalWrite(ledPin2, LOW);

  //tone(buzzer, 1000, 500);

  // temperature sensor setup
  WiFi.on();
  Particle.connect();
  // Variables Exposed to Cloud
  Particle.variable("temperature", temperature);
  Particle.publish("message: ", "I am meditating!");
  Serial.begin(9600);
  DHTnextSampleTime = 0;  // Start the first sample immediately

}

void loop()
{
// find out if the button is pushed or not by reading from it.
   int buttonState = digitalRead( buttonPin );

   // switch LED color to signify timer starting
  if( isMediating == false && buttonState == LOW )
  {
    // read temp of dht and display
    tempReading = analogRead(DHTPIN);
    // blink blue LED to signify starting timer
    digitalWrite(ledPin2, LOW);
    digitalWrite(ledPin1, HIGH);
    delay(500);
    digitalWrite(ledPin1, LOW);
    delay(500);
    digitalWrite(ledPin1,HIGH);
    delay(500);
    digitalWrite(ledPin1,LOW);
    // get temperature, publish temperature and I am meditating string
    Particle.variable("temperature", temperature);
    temperature = DHT.getCelsius();
    Serial.printlnf("Humidity\t: %.2f %%", humidity);
    Serial.printlnf("Temperature\t: %.2f °C", temperature);
    Particle.publish("Temperature", String(temperature) + " °C");

    // start the mediation cycle...
    isMediating = true;
    // keep a track of when we started meditating
    mediationStartTime = millis();
  }else{
    // otherwise turn white led on during meditation session
    digitalWrite( ledPin2, HIGH);

  }

// signal buzzer and flash blue light to signify end of meditation session (10 minutes is up)
  if( isMediating == true and mediationStartTime + 600000 < millis() ) {
    tone(buzzer, 1000, 500);
    digitalWrite(ledPin2, LOW);
    digitalWrite(ledPin1, HIGH);
    delay(500);
    digitalWrite(ledPin1, LOW);
    delay(500);
    digitalWrite(ledPin1,HIGH);
    delay(500);
    digitalWrite(ledPin1,LOW);

    // update the start
    isMediating = false;
    mediationStartTime = -1;
  }
  // turn off both lights
  if ( isMediating == false ) {
    digitalWrite(ledPin1,LOW);
    digitalWrite(ledPin2, LOW);
  }
  // anything less than 10 minutes, white light is on
  else {
    digitalWrite(ledPin2, HIGH);
  }

}#include "PietteTech_DHT.h" // Uncomment if building in IDE
// system defines
#define DHTTYPE DHT22 // Sensor type DHT11/21/22/AM2301/AM2302
#define DHTPIN D4 // Digital pin for communications
#define DHT_SAMPLE_INTERVAL 2000 // Sample every two seconds
int ledPin1 = D2;
int ledPin2 = D0;
int buzzer = D3;
int buttonPin = D1;
bool isMediating = false;
long mediationStartTime = -1;
double temperature;
double humidity;
int tempReading;
// globals
unsigned int DHTnextSampleTime; // Next time we want to start sample
bool bDHTstarted; // flag to indicate we started acquisition
int n; // counter
void dht_wrapper(); // must be declared before the lib initialization
PietteTech_DHT DHT(DHTPIN, DHTTYPE, dht_wrapper);
void dht_wrapper() {
DHT.isrCallback();
}
void setup()
{
interrupts(); // added to make recognize DHT library
pinMode( buttonPin , INPUT_PULLUP); // sets pin as input
pinMode( ledPin1 , OUTPUT ); // sets pin as output
pinMode( ledPin2 , OUTPUT );
pinMode(buzzer, OUTPUT);
digitalWrite( ledPin1, LOW);
digitalWrite(ledPin2, LOW);
//tone(buzzer, 1000, 500);
// temperature sensor setup
WiFi.on();
Particle.connect();
// Variables Exposed to Cloud
Particle.variable("temperature", temperature);
Particle.publish("message: ", "I am meditating!");
Serial.begin(9600);
DHTnextSampleTime = 0; // Start the first sample immediately
}
void loop()
{
// find out if the button is pushed or not by reading from it.
int buttonState = digitalRead( buttonPin );
// switch LED color to signify timer starting
if( isMediating == false && buttonState == LOW )
{
// read temp of dht and display
tempReading = analogRead(DHTPIN);
// blink blue LED to signify starting timer
digitalWrite(ledPin2, LOW);
digitalWrite(ledPin1, HIGH);
delay(500);
digitalWrite(ledPin1, LOW);
delay(500);
digitalWrite(ledPin1,HIGH);
delay(500);
digitalWrite(ledPin1,LOW);
// get temperature, publish temperature and I am meditating string
Particle.variable("temperature", temperature);
temperature = DHT.getCelsius();
Serial.printlnf("Humidity\t: %.2f %%", humidity);
Serial.printlnf("Temperature\t: %.2f °C", temperature);
Particle.publish("Temperature", String(temperature) + " °C");
Particle.publish("message: ", "I am meditating");
// start the mediation cycle...
isMediating = true;
// keep a track of when we started meditating
mediationStartTime = millis();
}else{
// otherwise turn white led on during meditation session
digitalWrite( ledPin2, HIGH);
}
// signal buzzer and flash blue light to signify end of meditation session (10 minutes is up)
if( isMediating == true and mediationStartTime + 600000 < millis() ) {
tone(buzzer, 1000, 500);
digitalWrite(ledPin2, LOW);
digitalWrite(ledPin1, HIGH);
delay(500);
digitalWrite(ledPin1, LOW);
delay(500);
digitalWrite(ledPin1,HIGH);
delay(500);
digitalWrite(ledPin1,LOW);
// update the start
isMediating = false;
mediationStartTime = -1;
}
// turn off both lights
if ( isMediating == false ) {
digitalWrite(ledPin1,LOW);
digitalWrite(ledPin2, LOW);
}
// anything less than 10 minutes, white light is on
else {
digitalWrite(ledPin2, HIGH);
}
}Reflections
I believe that if you want to create something, you can probably figure out how to create it online. To actually create that "something", you need to find and put in the time to do so. Putting in the time is the hardest part of creating, not the creating or learning process itself (that's the fun part!). This project was an experience that supports this belief of mine. I had never previously built an electrical circuit from scratch, but now I know that if I put in the time and use the many resources available to me to support me to do it, I can. It is also inspiring to know first hand that objects like this can be prototyped quickly for iterations and testing. I will certainly bring the knowledge I gained from this project (and I imagine will continue to gain in this course) into prototyping when I'm developing IoT products in my future classes and/or career.
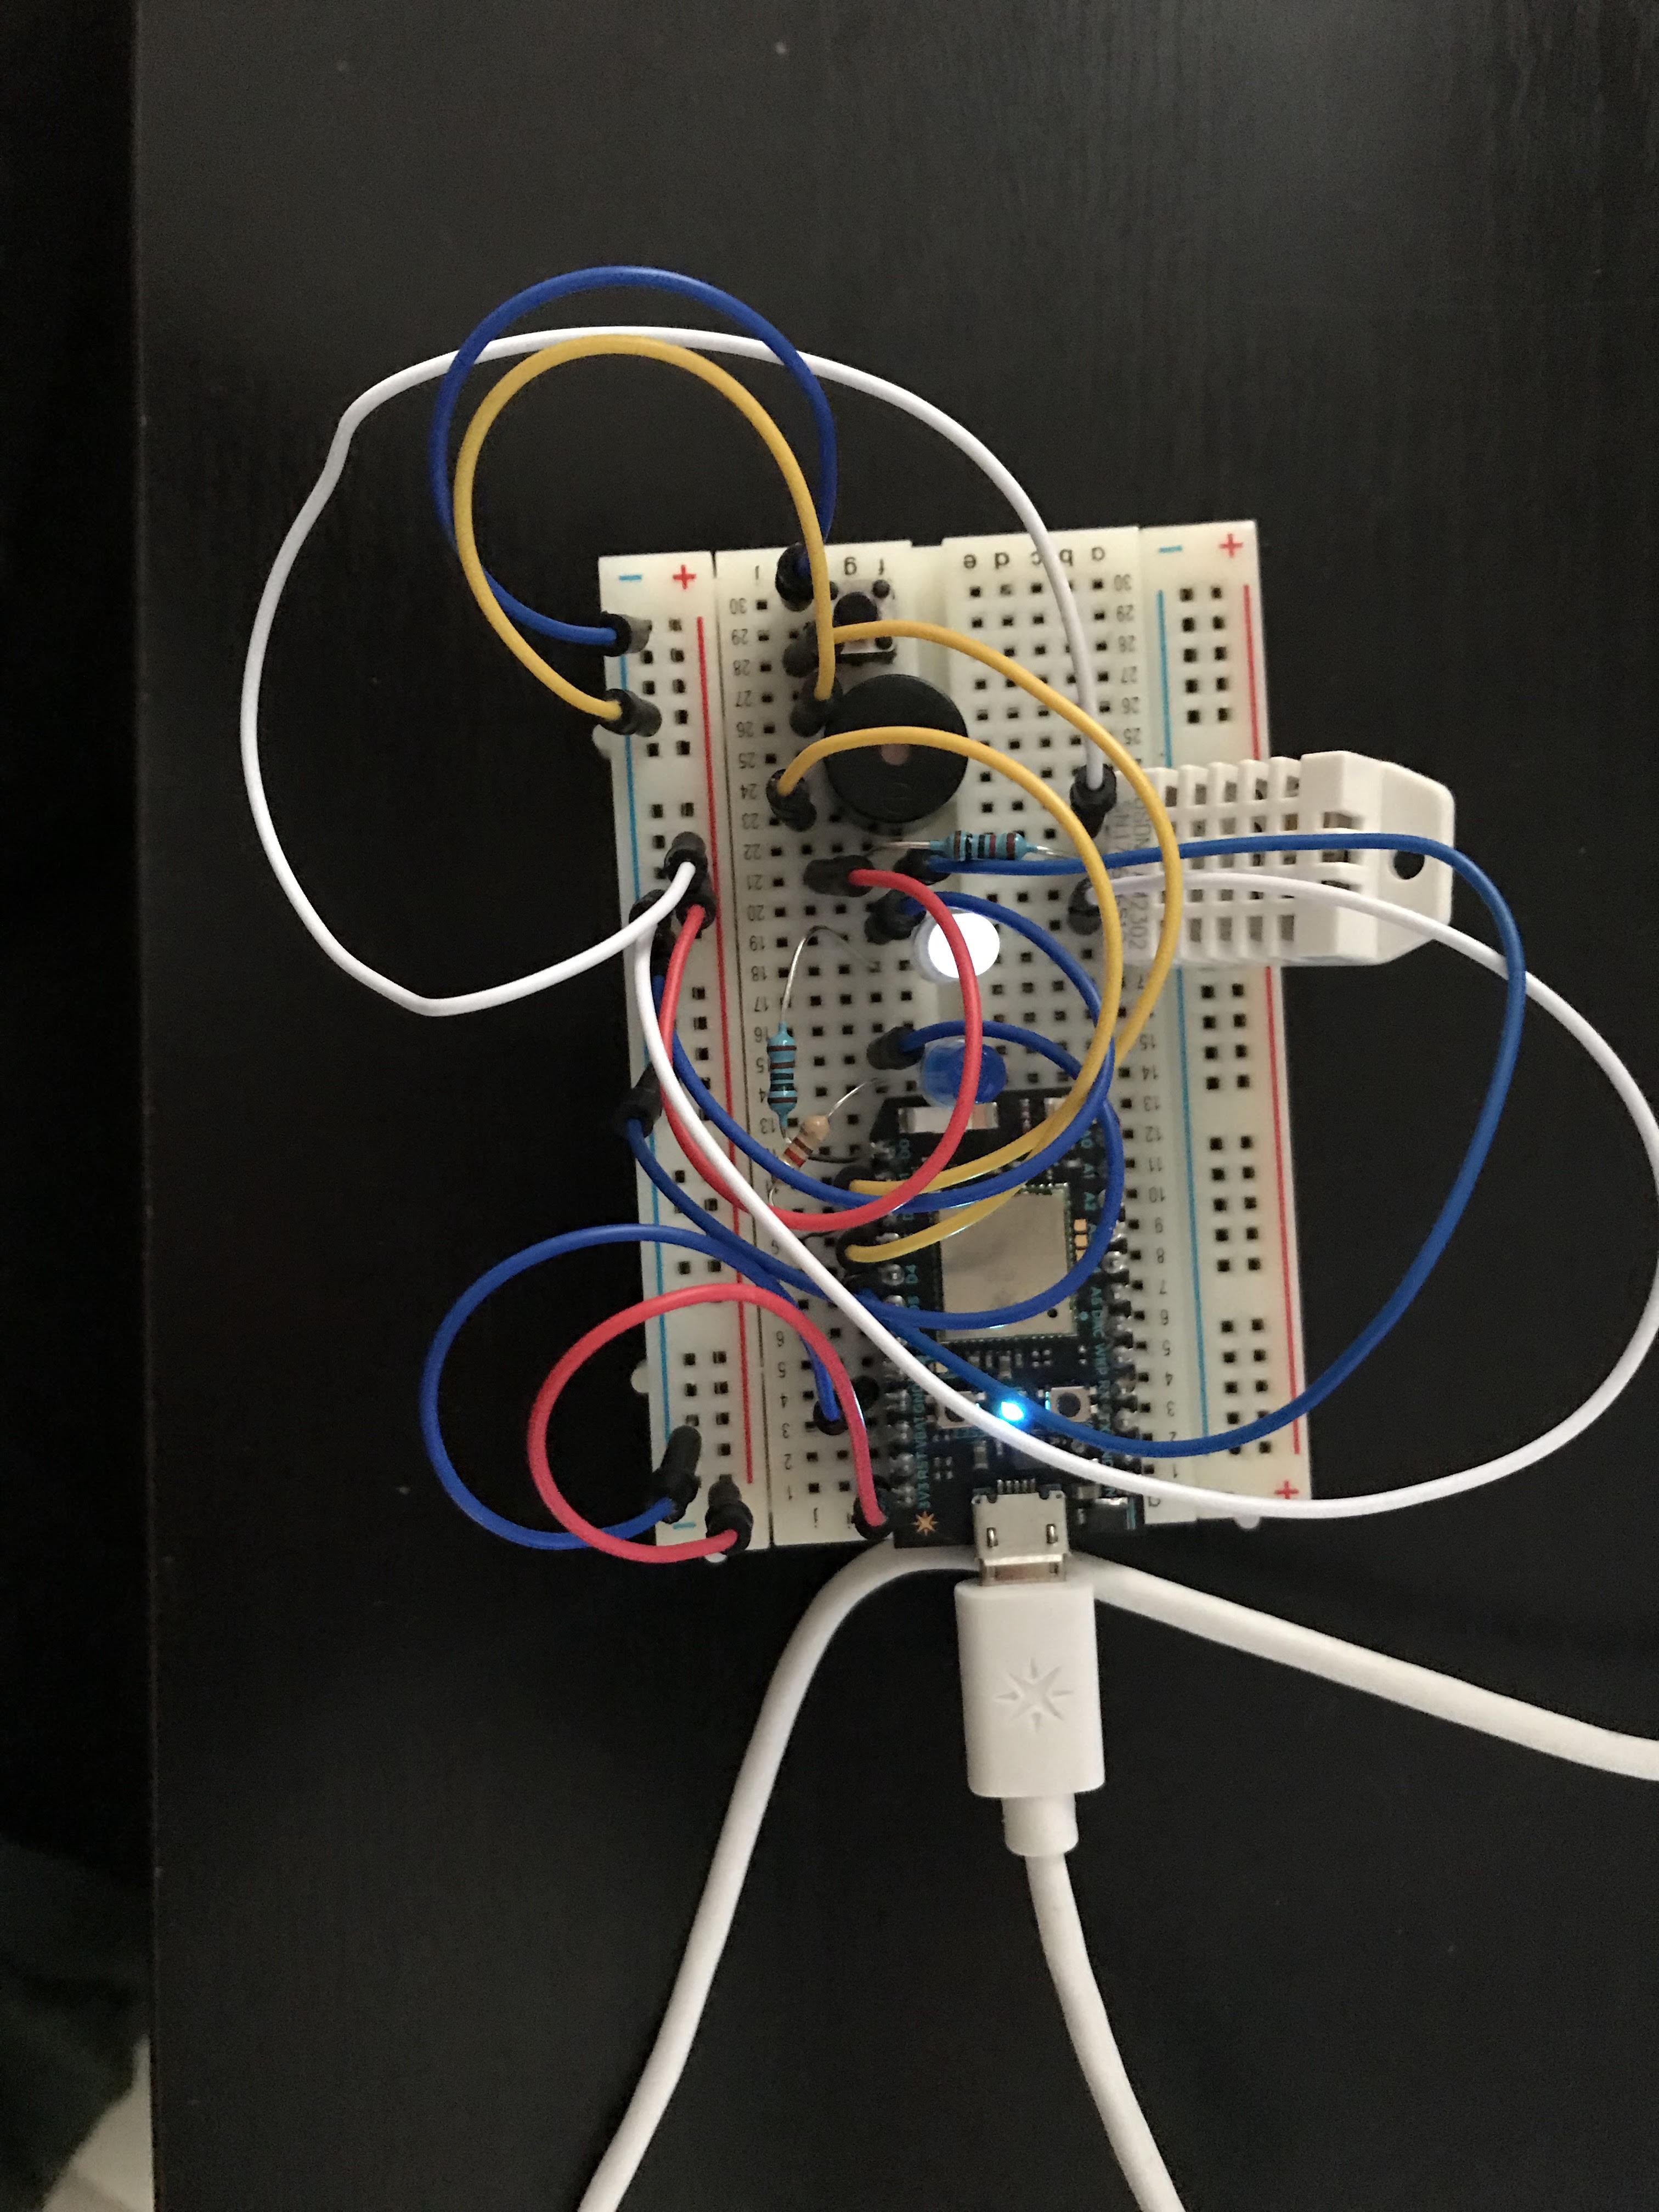
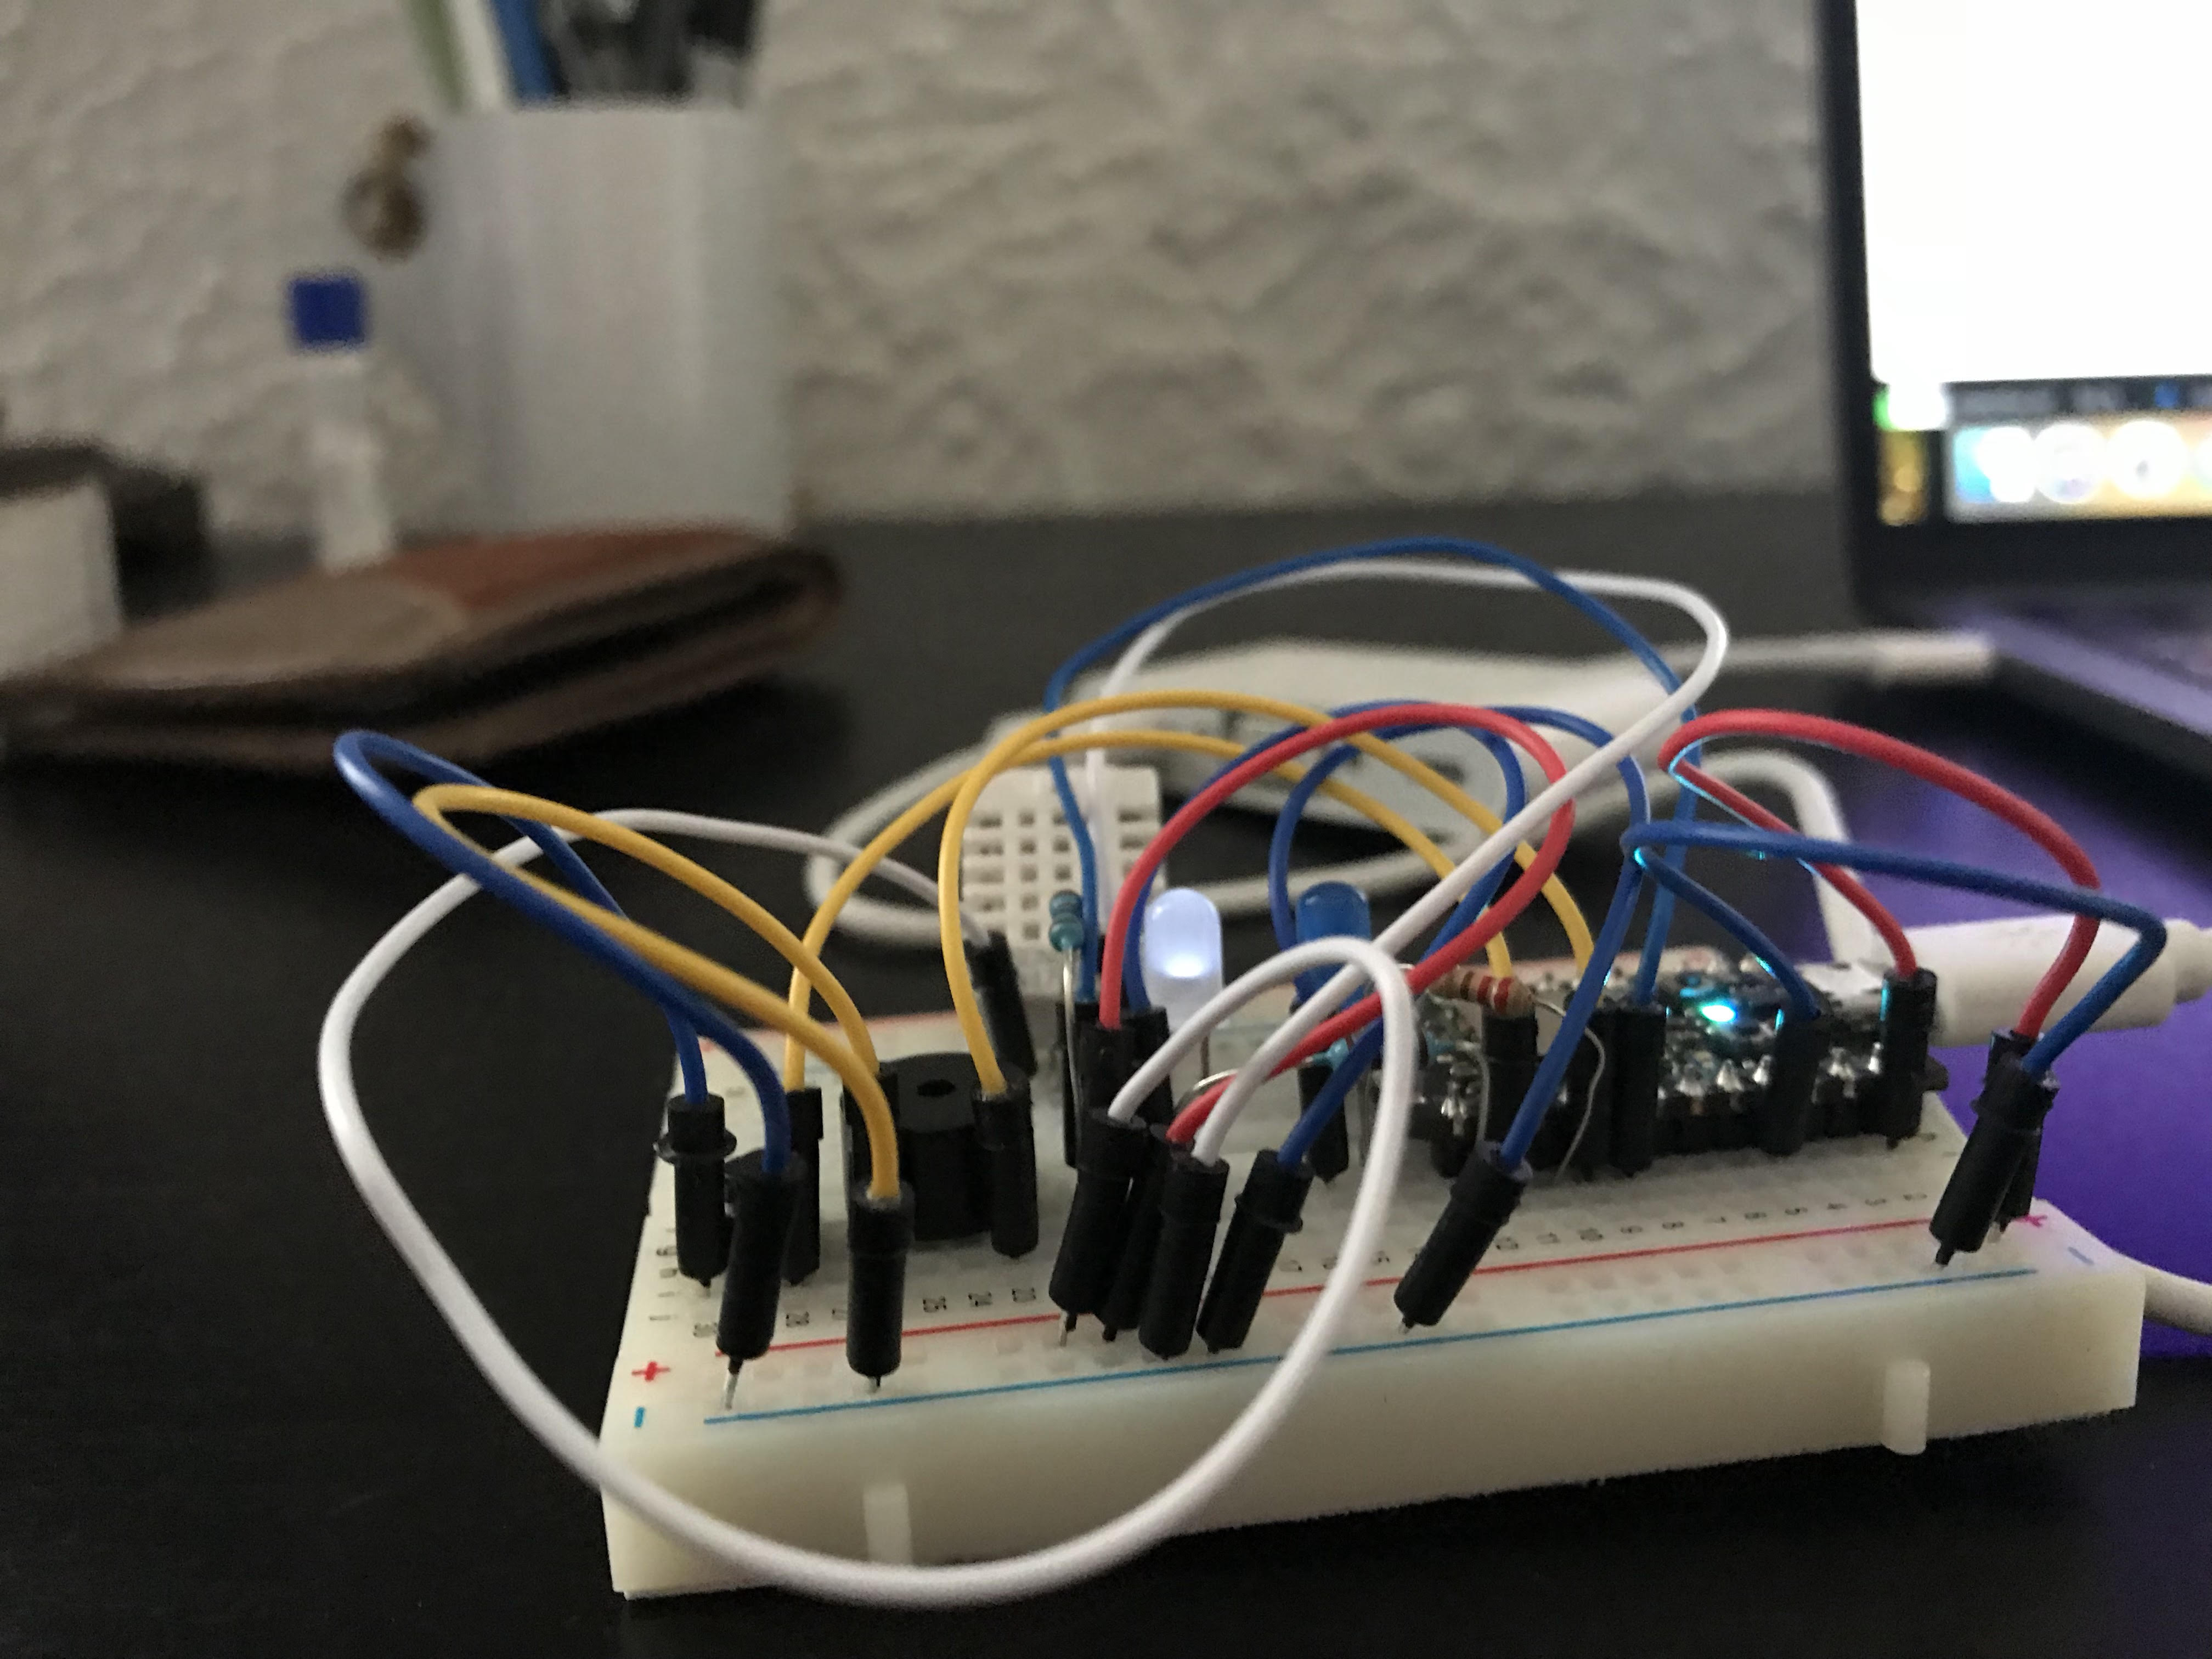
Looking back on the process I followed in this particular project, I would have taken more time on the front end to map out exactly how the circuit should be set up so that it is easy to look at and not just a "mess of wires" unless looked at closely. I had to reorganize my breadboard a few times to be able to see exactly what was happening on it. This would have been helpful to resolve some of the bug issues I encountered, which were not in the code, but in the initial set up of my breadboard.
I reached the point that I wanted to, but know that I can build upon this project to do more things that would increase engagement and interaction with the product, so that someone would actually want to use it. It is currently interactive, but not as engaging or easy to use as it could be. For example, the person needs to look online to see the temperature-- it would be great if I could set this up so that the temperature was sent as a push notification to the person's phone or even digitally displayed on a future version of the meditation light casing itself.
Final Outcome
Prototype Notes & Next Steps
The prototype is a working low fidelity mock up of the basic functionality this device should have. Next, I would change the noise the buzzer makes, so that it is a more soothing noise that doesn't intrusively disrupt the meditation. Next, I would install capability to send the message "I am meditating" to friends via SMS that also meditate, so that you could encourage them to meditate too. Lastly, I would figure out a way to have the blue light blink over the full 10 minute interval, but at a slower rate, so it seems like it is breathing with the meditator.
#include "PietteTech_DHT.h"  // Uncomment if building in IDE

// system defines
#define DHTTYPE DHT22              // Sensor type DHT11/21/22/AM2301/AM2302
#define DHTPIN D4         	    // Digital pin for communications
#define DHT_SAMPLE_INTERVAL 2000 // Sample every two seconds

int ledPin1 = D2;
int ledPin2 = D0;
int buzzer = D3;
int buttonPin = D1;

bool isMediating = false;
long mediationStartTime = -1;

double temperature;
double humidity;
int tempReading;

// globals
unsigned int DHTnextSampleTime;	    // Next time we want to start sample
bool bDHTstarted;		    // flag to indicate we started acquisition
int n;                              // counter

void dht_wrapper(); // must be declared before the lib initialization

PietteTech_DHT DHT(DHTPIN, DHTTYPE, dht_wrapper);

void dht_wrapper() {
  DHT.isrCallback();
}

void setup()
{
  interrupts(); // added to make recognize DHT library
  pinMode( buttonPin , INPUT_PULLUP); // sets pin as input
  pinMode( ledPin1 , OUTPUT ); // sets pin as output
  pinMode( ledPin2 , OUTPUT );
  pinMode(buzzer, OUTPUT);
  digitalWrite( ledPin1, LOW);
  digitalWrite(ledPin2, LOW);

  //tone(buzzer, 1000, 500);

  // temperature sensor setup
  WiFi.on();
  Particle.connect();
  // Variables Exposed to Cloud
  Particle.variable("temperature", temperature);
  Particle.publish("message: ", "I am meditating!");
  Serial.begin(9600);
  DHTnextSampleTime = 0;  // Start the first sample immediately

}

void loop()
{
// find out if the button is pushed or not by reading from it.
   int buttonState = digitalRead( buttonPin );

   // switch LED color to signify timer starting
  if( isMediating == false && buttonState == LOW )
  {
    // read temp of dht and display
    tempReading = analogRead(DHTPIN);
    // blink blue LED to signify starting timer
    digitalWrite(ledPin2, LOW);
    digitalWrite(ledPin1, HIGH);
    delay(500);
    digitalWrite(ledPin1, LOW);
    delay(500);
    digitalWrite(ledPin1,HIGH);
    delay(500);
    digitalWrite(ledPin1,LOW);
    // get temperature, publish temperature and I am meditating string
    Particle.variable("temperature", temperature);
    temperature = DHT.getCelsius();
    Serial.printlnf("Humidity\t: %.2f %%", humidity);
    Serial.printlnf("Temperature\t: %.2f °C", temperature);
    Particle.publish("Temperature", String(temperature) + " °C");
    Particle.publish("message: ", "I am meditating");

    // start the mediation cycle...
    isMediating = true;
    // keep a track of when we started meditating
    mediationStartTime = millis();
  }else{
    // otherwise turn white led on during meditation session
    digitalWrite( ledPin2, HIGH);

  }

// signal buzzer and flash blue light to signify end of meditation session (10 minutes is up)
  if( isMediating == true and mediationStartTime + 600000 < millis() ) {
    tone(buzzer, 1000, 500);
    digitalWrite(ledPin2, LOW);
    digitalWrite(ledPin1, HIGH);
    delay(500);
    digitalWrite(ledPin1, LOW);
    delay(500);
    digitalWrite(ledPin1,HIGH);
    delay(500);
    digitalWrite(ledPin1,LOW);

    // update the start
    isMediating = false;
    mediationStartTime = -1;
  }
  // turn off both lights
  if ( isMediating == false ) {
    digitalWrite(ledPin1,LOW);
    digitalWrite(ledPin2, LOW);
  }
  // anything less than 10 minutes, white light is on
  else {
    digitalWrite(ledPin2, HIGH);
  }

	}

Reference for photo: https://www.plusonline.nl/sites/plusonline/files/lofoten_1220.jpg
Reference for PietteTech_DHT Library: https://github.com/piettetech/PietteTech_DHT
And a special thank you to Daragh, Roberto and Xenia for your support and guidance!
Share this Project
Found In
Courses
49713 Designing for the Internet of Things
· 25 members
A hands-on introductory course exploring the Internet of Things and connected product experiences.
Focused on
About
A meditation light timer and temperature sensor that is personalized to an individual's needs in her home.
Created
January 24th, 2018