49713 Designing for the Internet of Things
· 25 members
A hands-on introductory course exploring the Internet of Things and connected product experiences.
The goal of this project is to encourage users to run everyday, but in an ambient manner so they don't feel the pressure if they really don't want to.
People need motivations to keep a healthy habit. On the current market, there are so many products that track user's fitness data to help them stay healthy. However, most products are intrusive and may annoy the user. They tend to send notifications, display exact numbers, and compare user's performance with other people. We wanted to create a device that changes user's behavior in a subtle way so that they don't feel any pressure but still getting the encouragement of going for a walk/run. Carrying this goal in our mind, we developed "Run Forest Run".
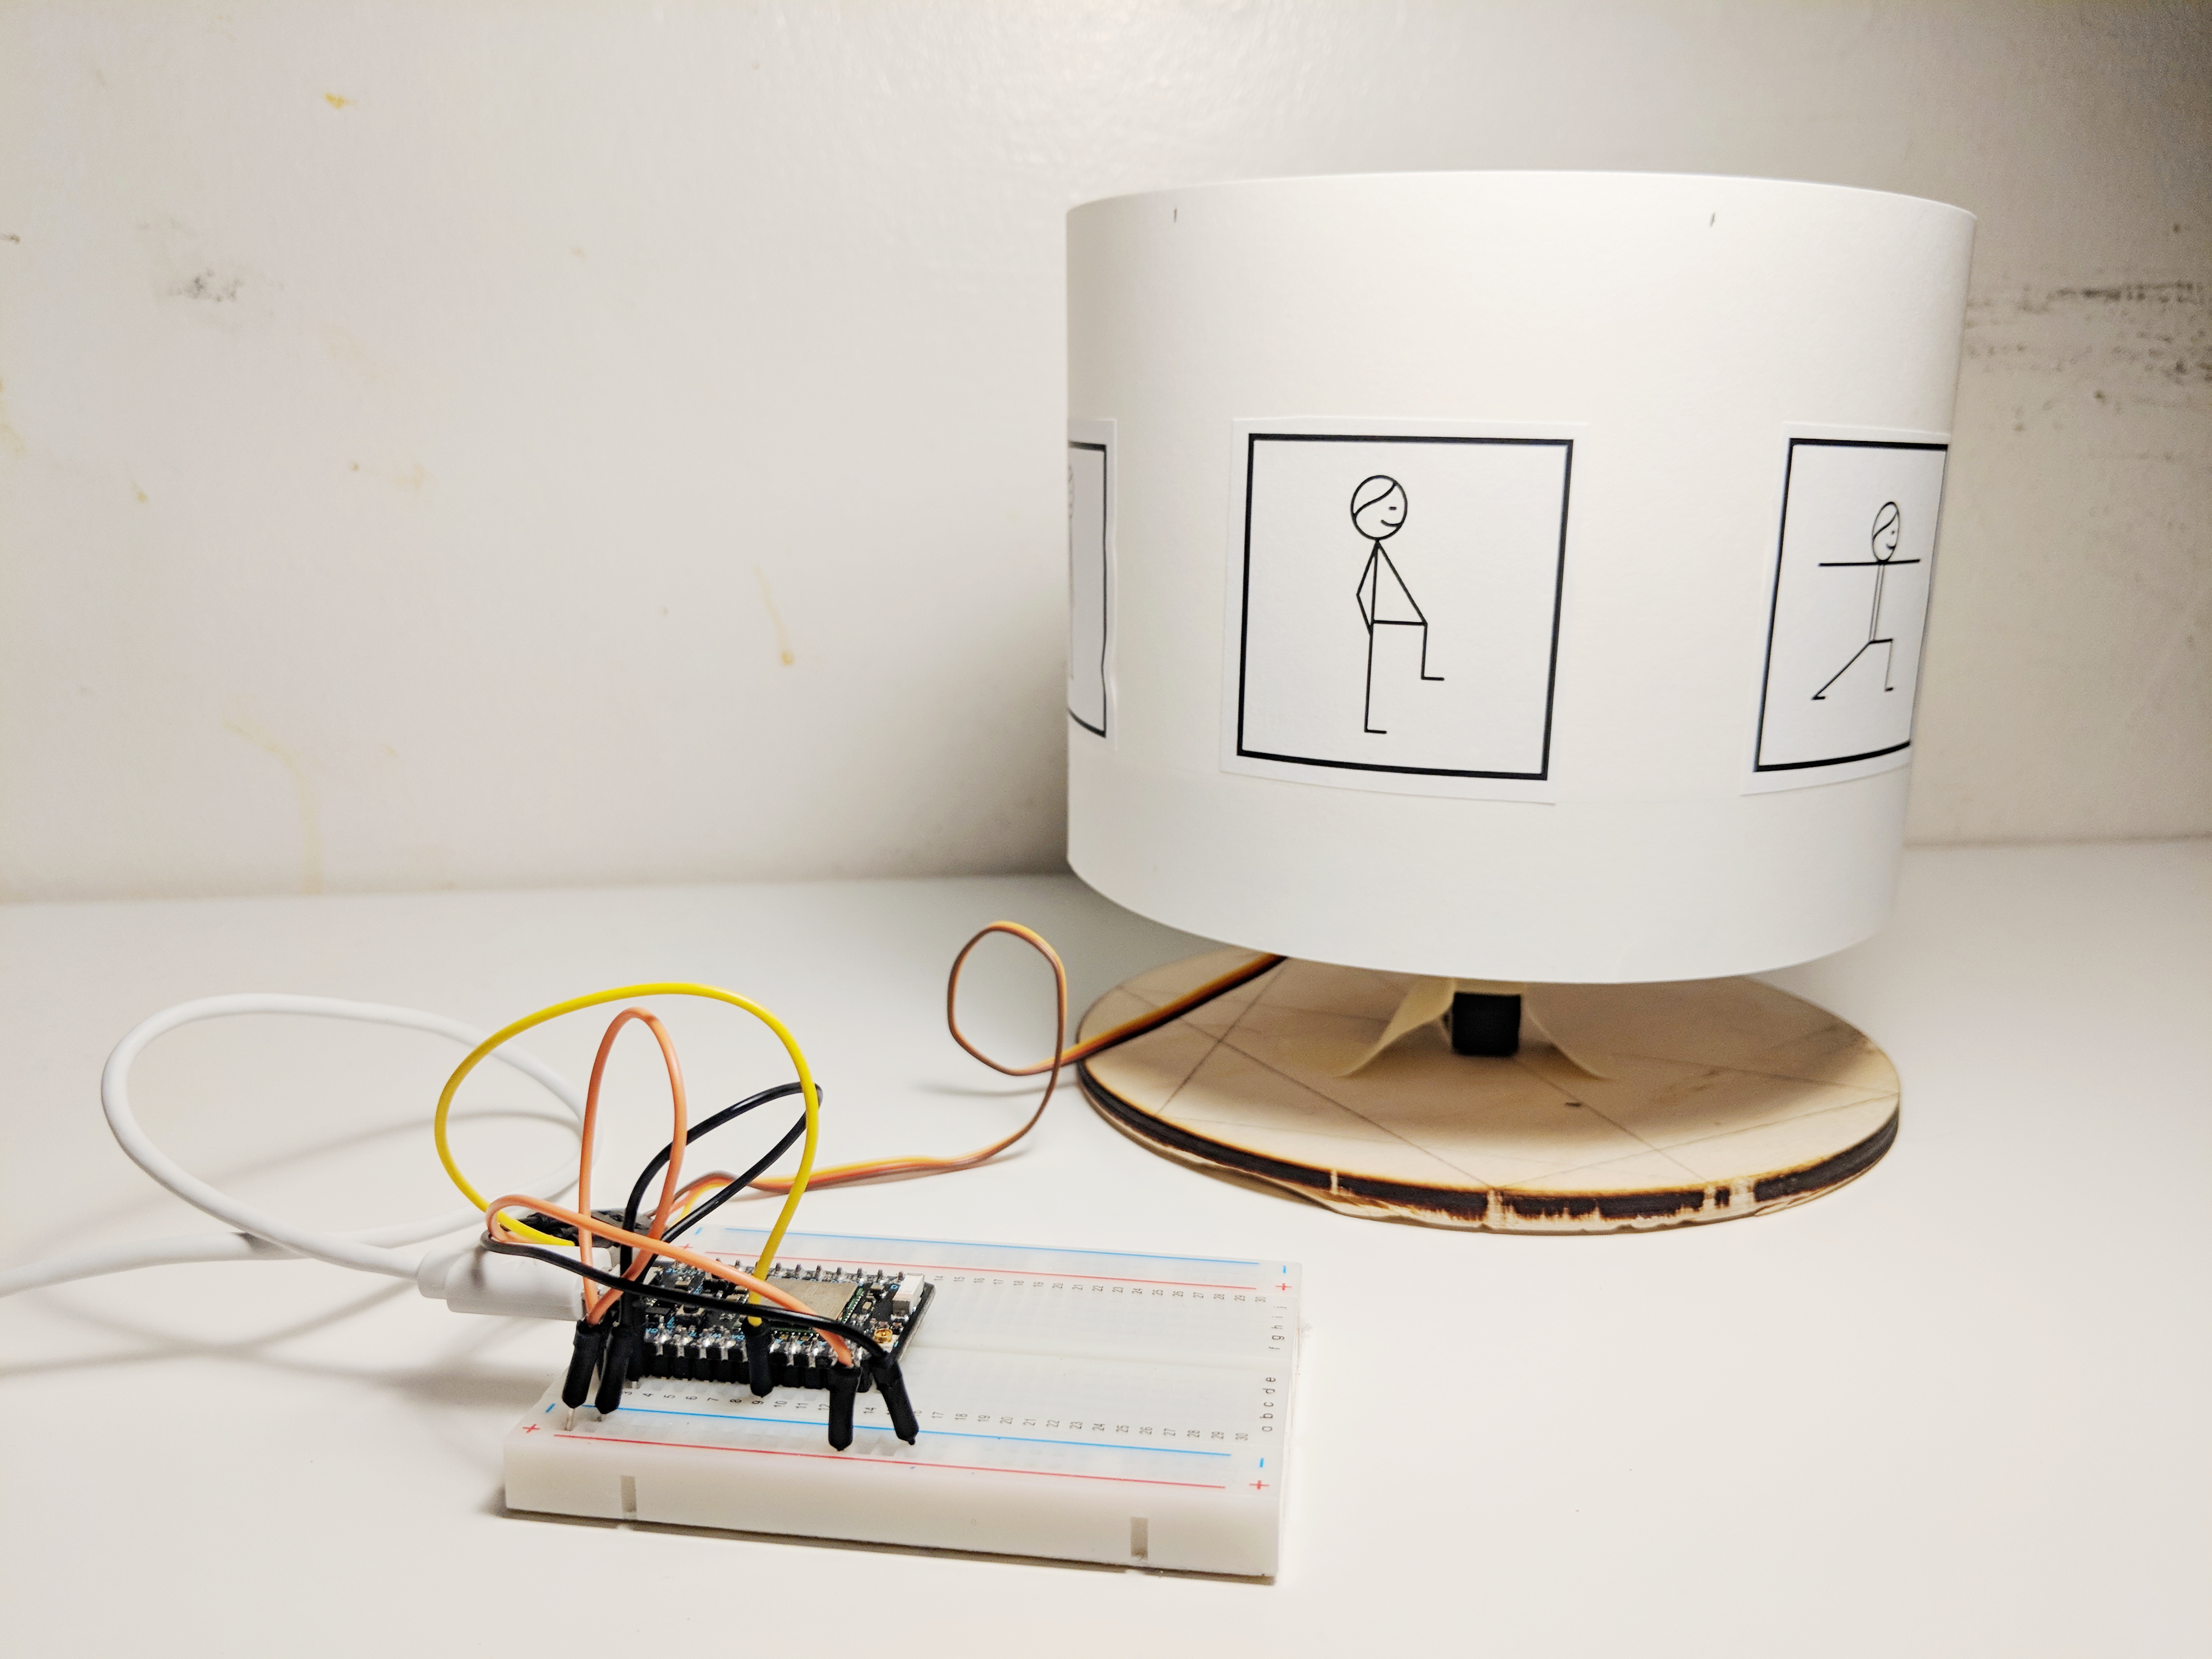
The goal of this project was to influence people to keep running/walking habits in a subtle manner. As a result, the product was designed to track the number of running/walking steps and display the progress on a rotating wheel. As opposed to sending notifications to users, this device would merge itself to the background and deliver the message in an ambient way.
1. Designing the circuits
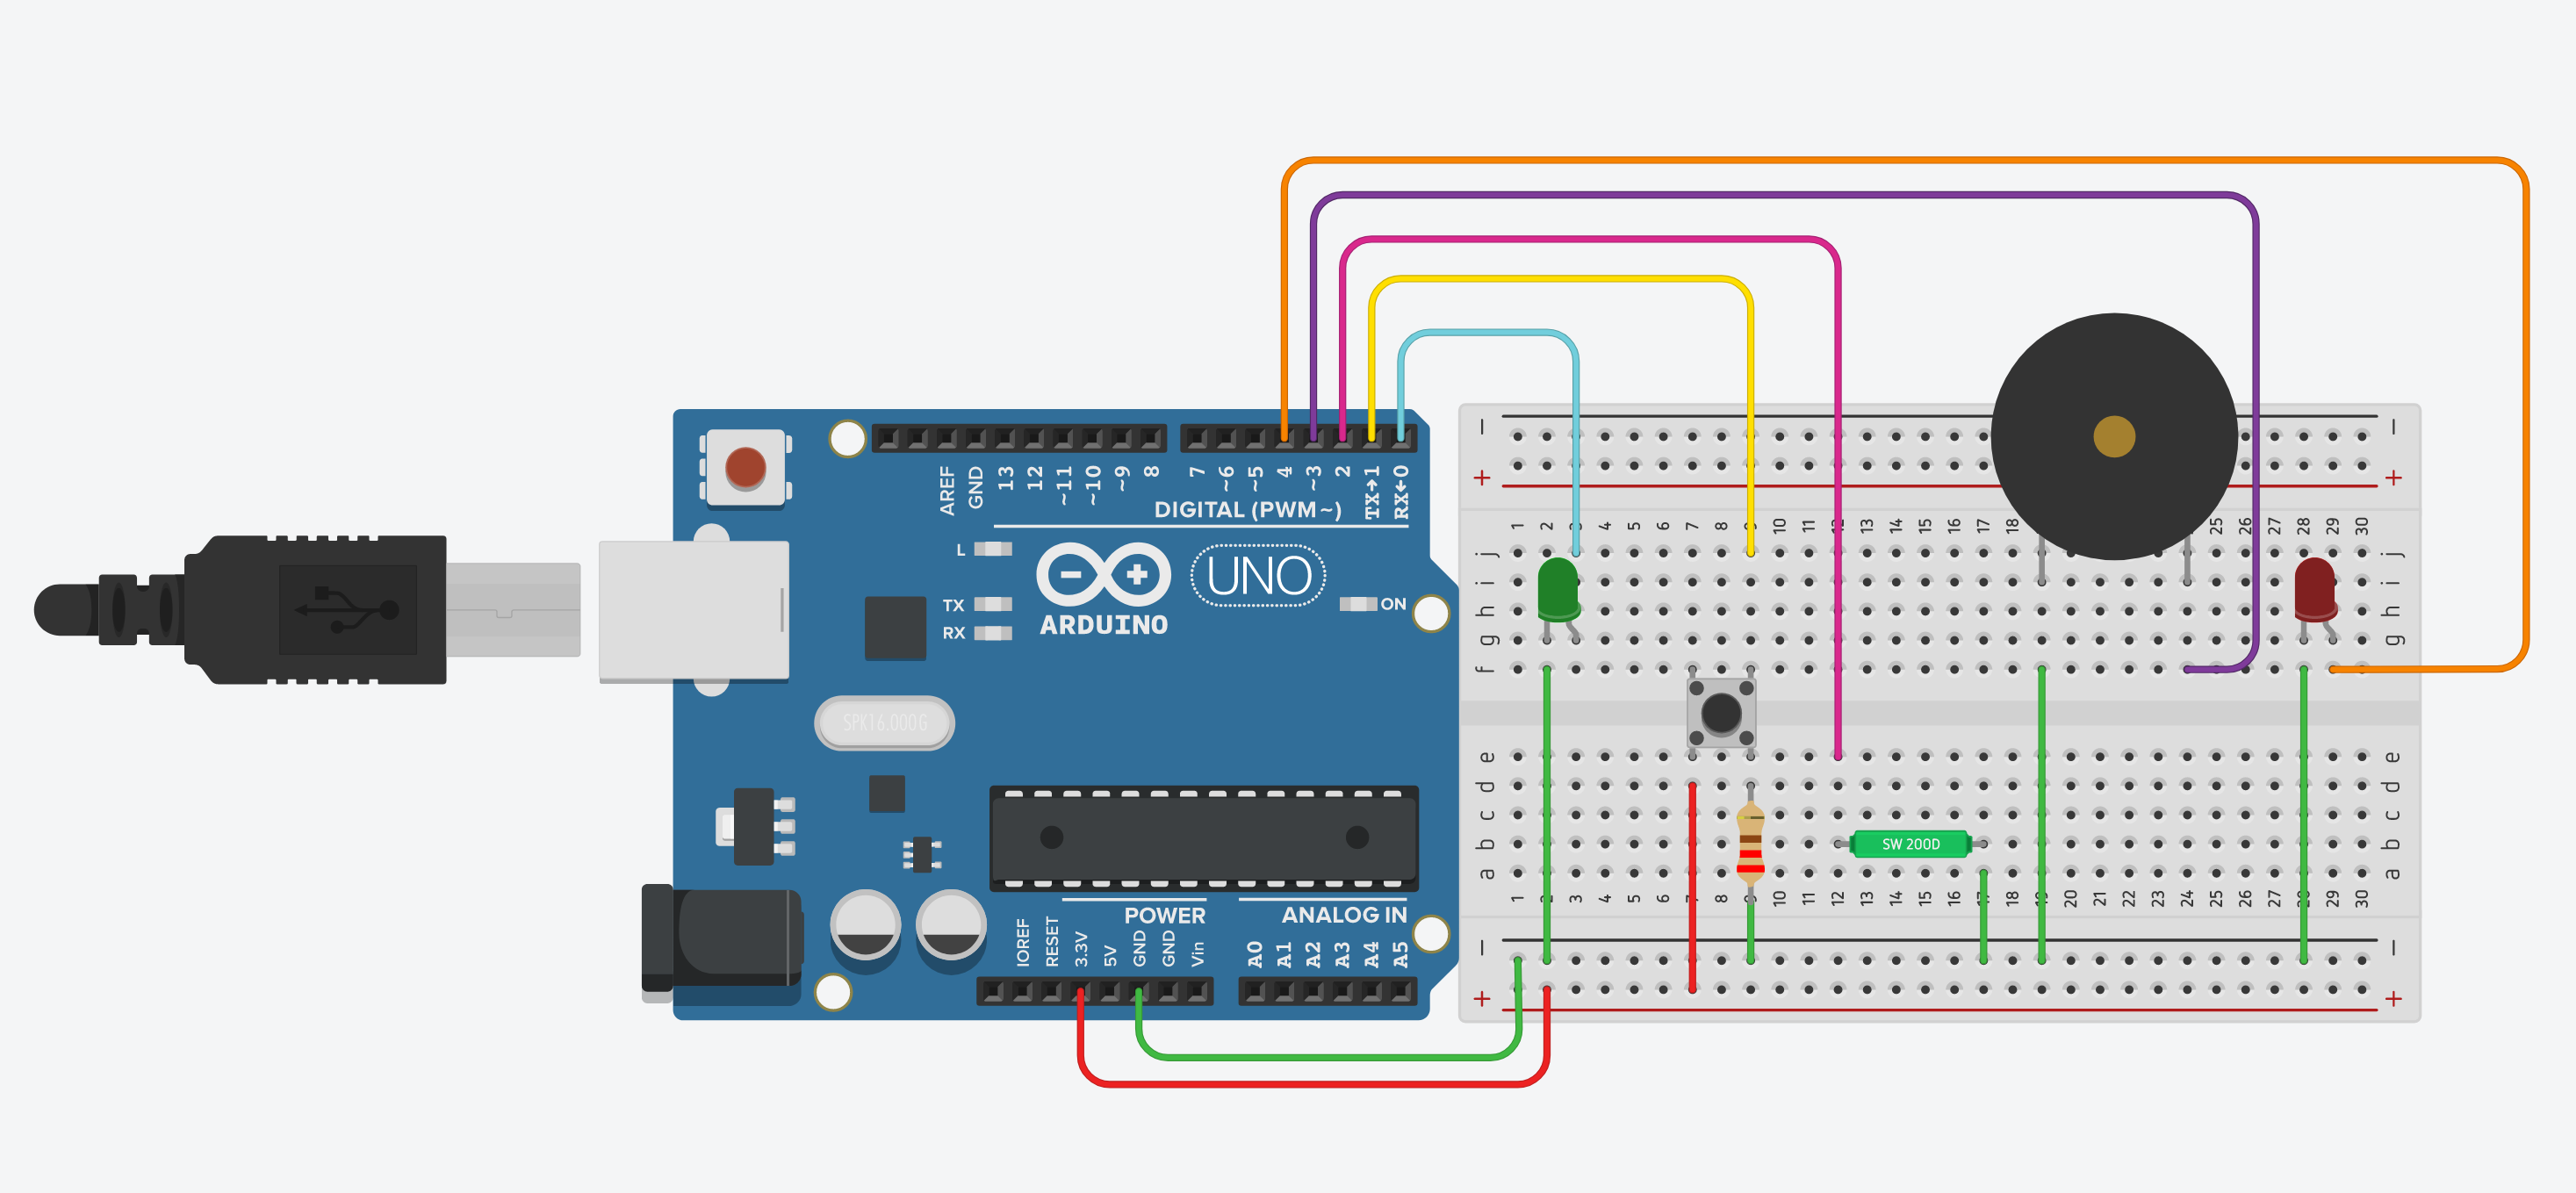
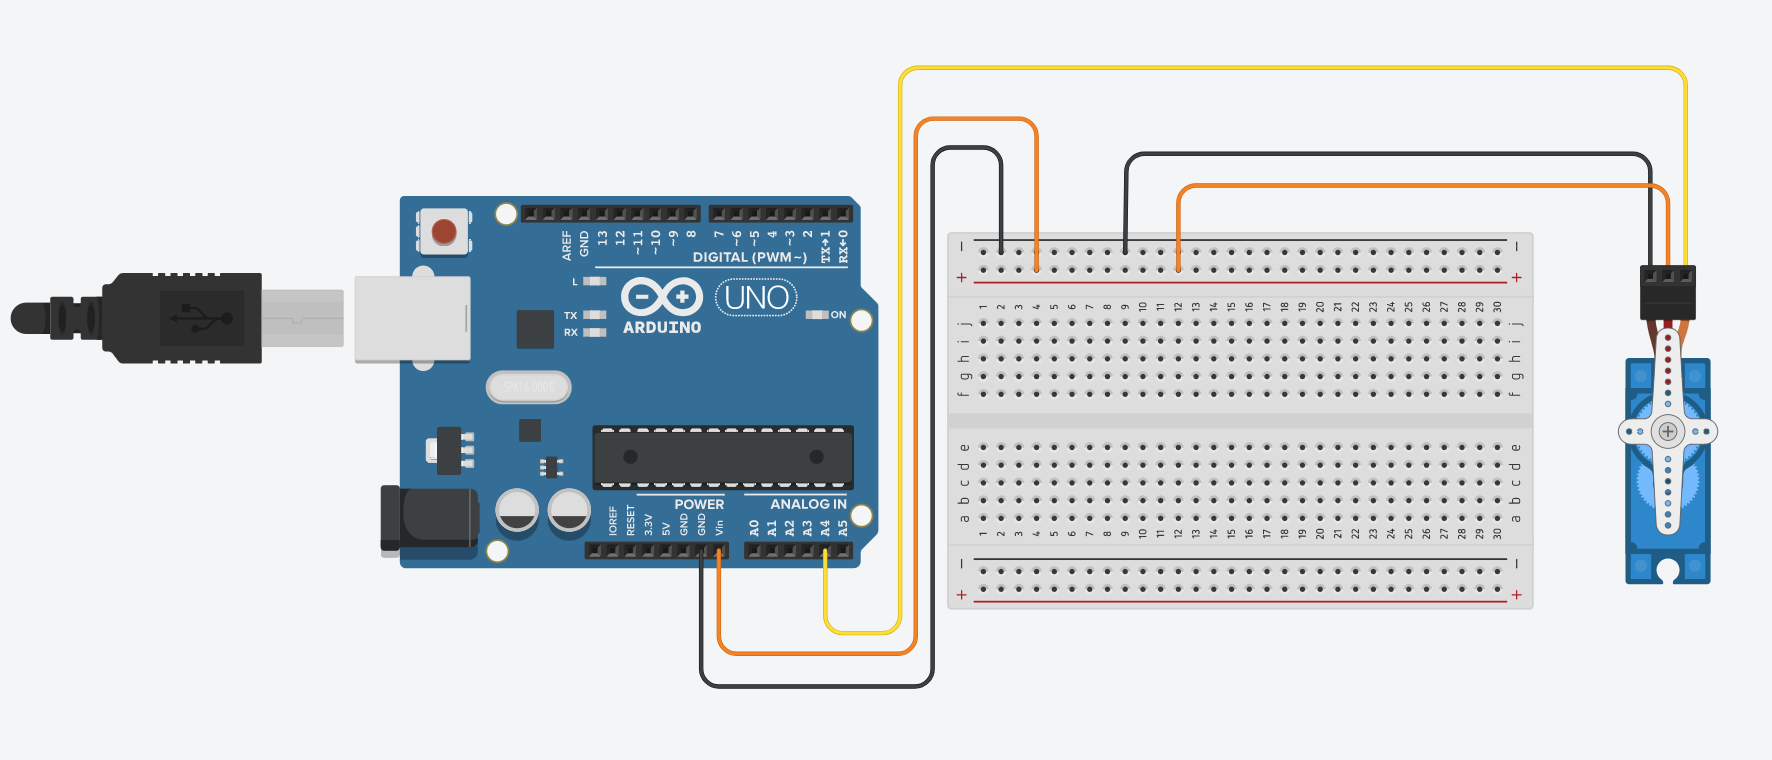
At the first step, we created two circuit diagrams on Autodesk Tinkercad. The first circuit is responsible for inputting step data to the cloud, and the other circuit is responsible for outputting servo motion to a rotatable plate to indicate user's current stage.
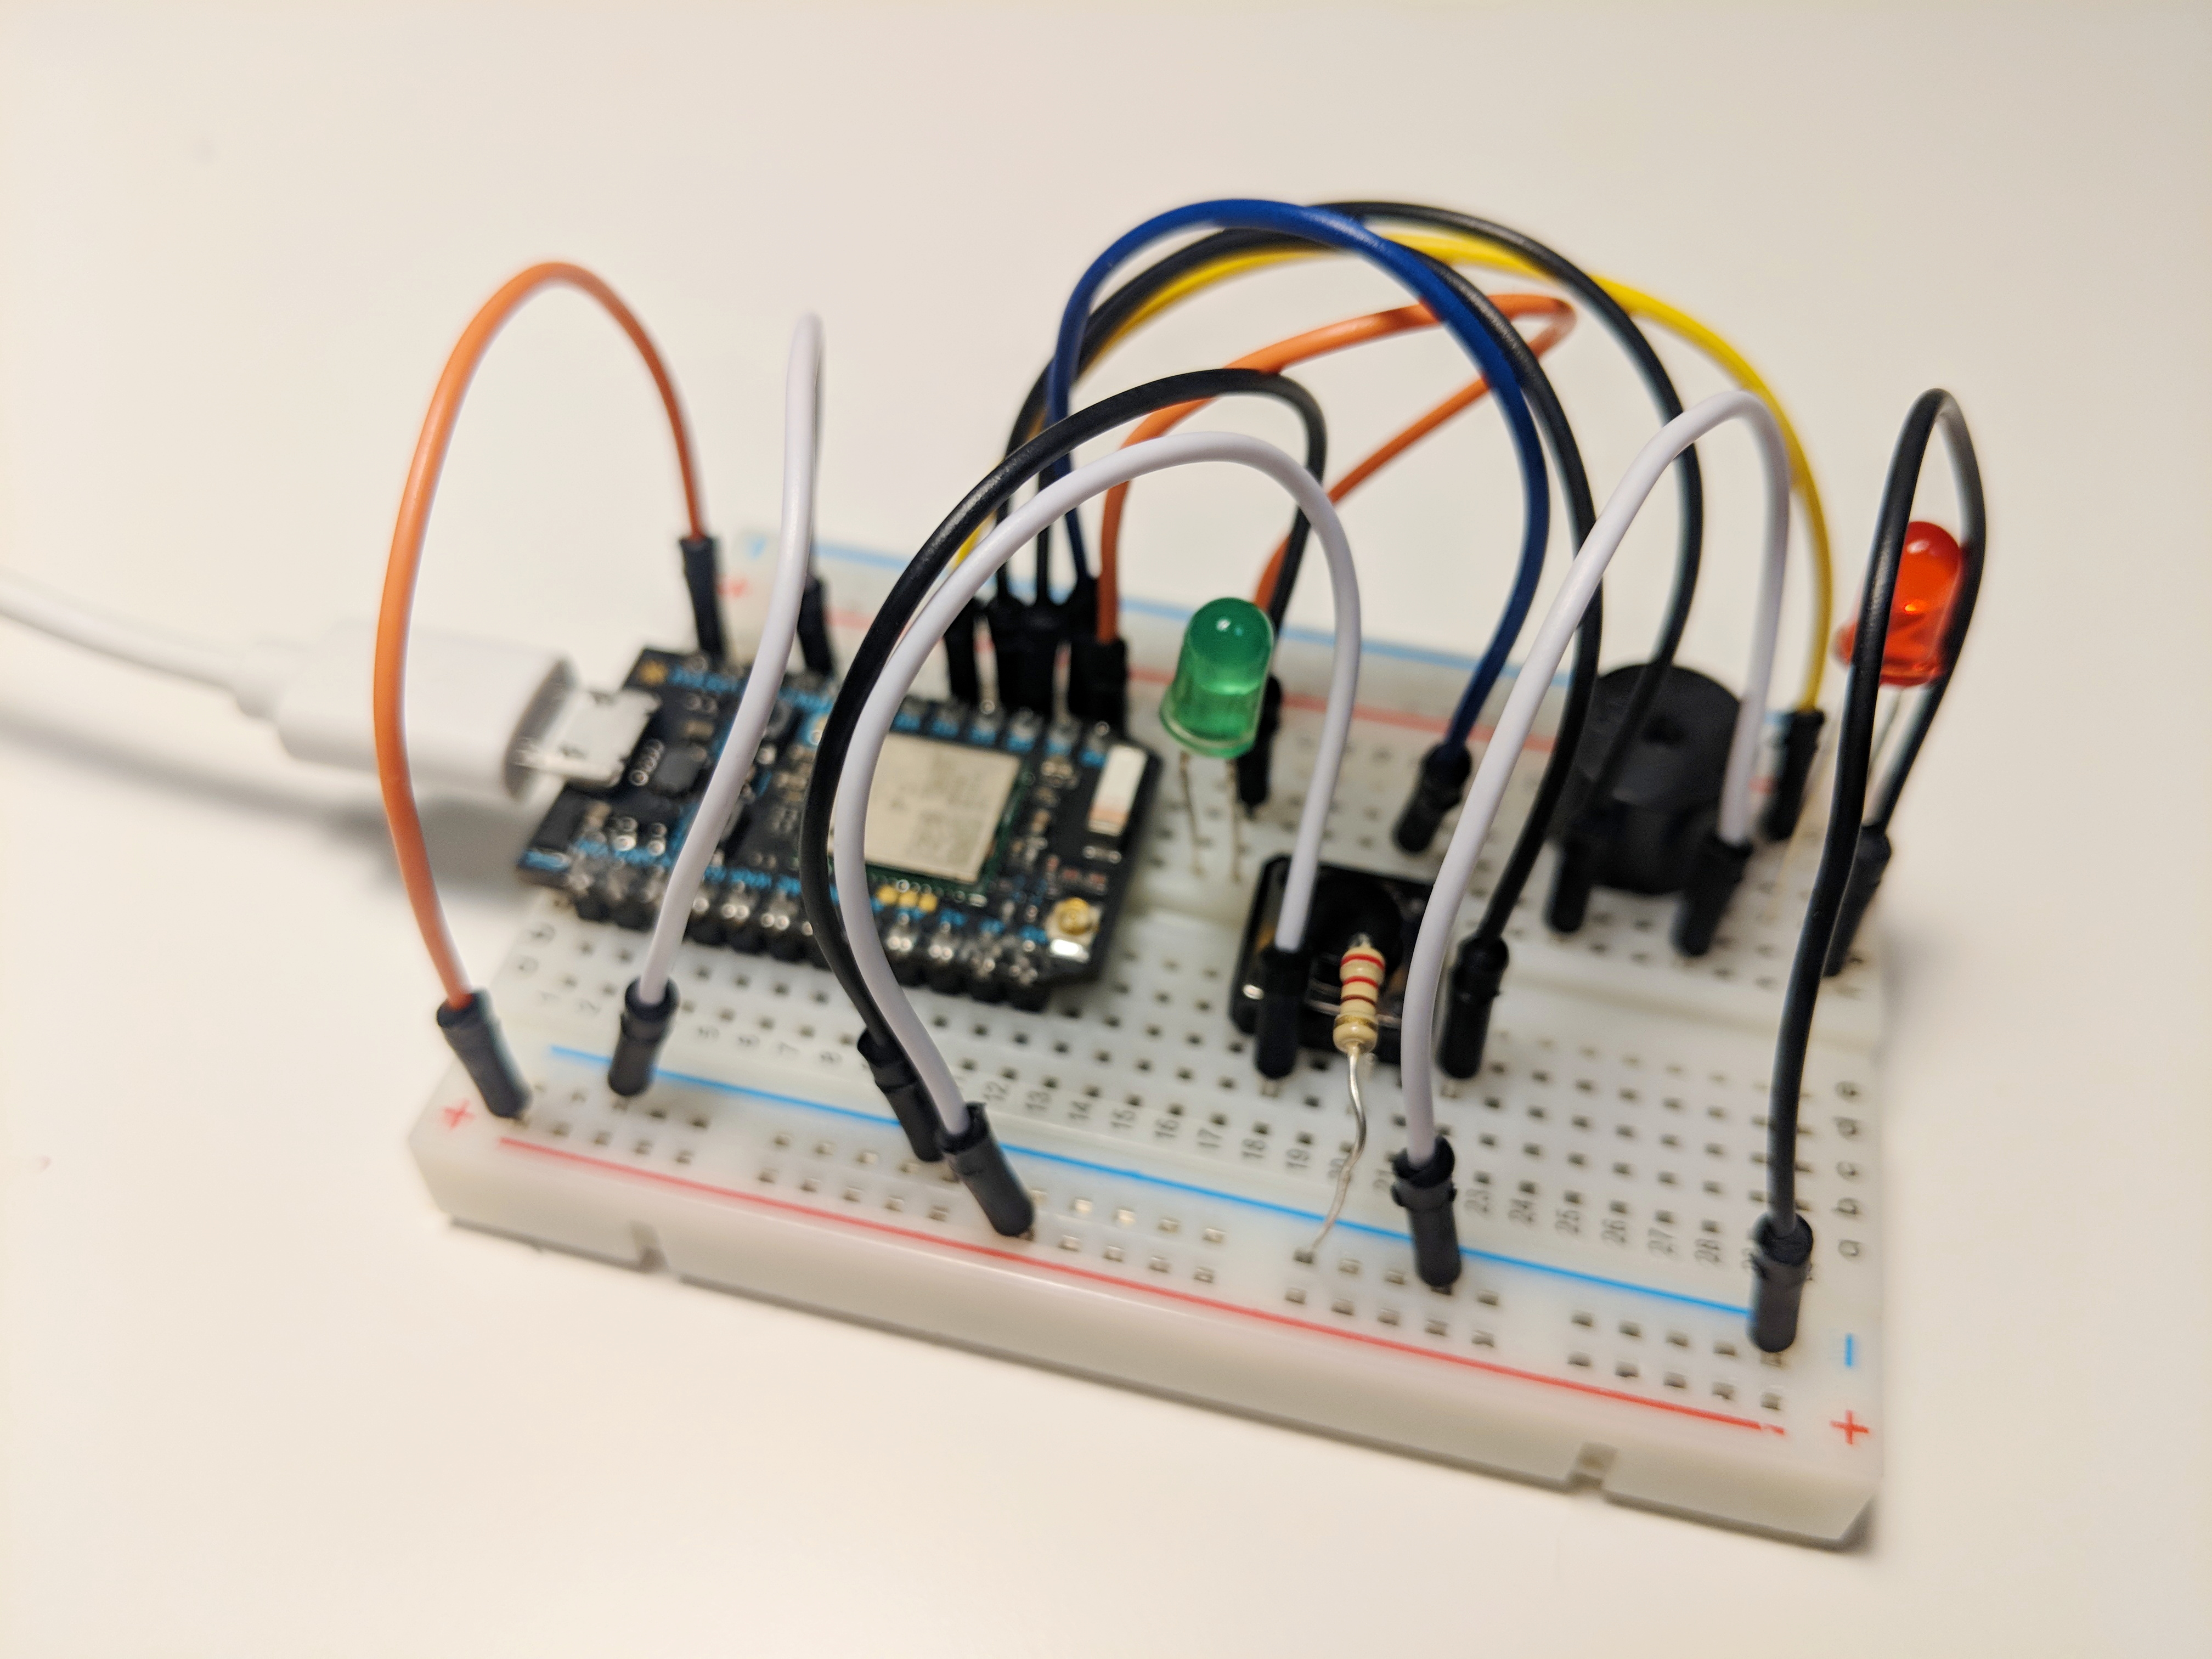
In the input diagram, red wires go to 3.3V, green wires go to ground, and other colored wires go to pins. The idea is that the tilt sensor simulates the step counter installed in any smartphone or wearable device. When the user takes a walk, the tilt sensor will register the motion and send a number to the particle cloud. The green LED serves as a power indicator. The system can be controlled on and off by a button or on the particle cloud function.
3. Coding the circuits
Step Counter
The step counter registers each step when the tilt sensor senses a shake. Then the Photon sends the current step number to the particle cloud. The initial thought was to send just a signal indicating a "step" and let the other Photon to do the counting. However, we decided to separate two Photon's responsibility so that the first Photon would take care of all the calculation and the second Photon would just execute the action.
Another feature for the step counter is the ability to let users control the system online. We created two cloud functions: system and reset. As a result, when users type "ON" or "OFF", they turn the system on or off. When they type "RESET", the step counter goes back to 0. In future implementations, we could let the Photon to automatically reset the counter in as daily basis, but for now we need users to manually set the counter.
/*
Step Tracker
*/
// variables that won't change
const int powerPin = 0;
const int buttonPin = 1;
const int tiltPin = 2;
const int ledPin = 4;
// variables that will change:
int buttonState = 0;
int tiltState = 0;
int systemOn = 0;
int currentTime = 0;
int peace = 0;
int step = 0;
int systemControl(String command);
void setup() {
  // establish serial monitor connection
  Serial.begin(9600);
  // set up all input and output
  pinMode(powerPin, OUTPUT);
  pinMode(buttonPin, INPUT);
  pinMode(tiltPin, INPUT);
  pinMode(alarmPin, OUTPUT);
  pinMode(ledPin, OUTPUT);
  // set up cloud variables and functions
  Particle.function("Knok", systemControl);
  Particle.variable("system", systemOn);
  Particle.function("Reset", resetStep);
  Particle.variable("step", step);
  //Particle.subscribe("Knok Knok", systemControl);
}
void loop() {
  // read the state of the pushbutton value:
  buttonState = digitalRead(buttonPin);
  // check if the pushbutton is pressed
  if (buttonState == HIGH) {
    changeSystemStatus();
  }
  // start the system if system is off and button is pressed
  if (systemOn == 1) {
    tiltSensorOn();
    digitalWrite(powerPin, HIGH);
  } else {
    digitalWrite(powerPin, LOW);
  }
  currentTime = millis();
  while(millis() < currentTime + 100){
    //wait 1 second
  }
}
// read sensor data and respond correspondingly
void tiltSensorOn() {
  // read the state of the tilt sensor value:
  tiltState = digitalRead(tiltPin);
  // alarm is tilt sensor give potisive feedback
  if (tiltState == HIGH) {
    // playAlarm();
    step = step + 1;
    if (peace == 1) {
      Serial.println(step);
      Particle.publish("Alert", String(step), PUBLIC);
    }
    peace = 0;
  } else {
    digitalWrite(ledPin, LOW);
    digitalWrite(alarmPin, LOW);
    if (peace == 0) {
      // Serial.println("It's a peaceful day");
      // Particle.publish("Status", "It's a peaceful day", PRIVATE);
    }
    peace = 1;
  }
}
// change on/off status
void changeSystemStatus() {
  if (systemOn == 0) {
    systemOn = 1;
    digitalWrite(powerPin, HIGH);
    // Serial.println();
    Serial.println("System: On");
    // Serial.println("Security Check: On");
    // Serial.println("Full Protection: On");
    Serial.println();
    Particle.publish("Status", "System: On", PRIVATE);
  } else {
    systemOn = 0;
    digitalWrite(powerPin, LOW);
    // Serial.println();
    Serial.println("System: Off");
    // Serial.println("Security Check: Off");
    // Serial.println("Full Protection: Off");
    Serial.println();
    Particle.publish("Status", "System: Off", PRIVATE);
  }
}
// control the system over the cloud
int systemControl(String command) {
   // find out the state of the system
   if (command == "ON") {
       systemOn = 1;
     return 1;
   } else if (command == "OFF") {
       systemOn = 0;
     return 1;
   } else {
     return -1;
   }
}
int resetStep(String command) {
  if (command == "RESET") {
    step = 0;
    return 1;
  } else {
    return 1;
  }
  return -1;
}Servo
To break it down, first we added Servo library Servo myservoName. The library created a new class or type of object that we can declare and use. This gave us access to all of the functions associated with the library on a particular pin. When we started using a Servo we added the following variable declaration.
Then we told servo which pins to use. We did this by adding the line of code servo.attach (pin number).
Finally, the servo spinning angle was determined after we passed the variable value int servoTarget = angle.toInt().
Although the second part of the code was a simple servo control code with a function to fetch data from the cloud, we faced a great difficulty trying to subscribe the first Photon and get the data from the particle cloud because we could not concatenate a string into an integer. Fortunately, we solved this problem by placing a temporary variable to catch the "pointer" to prevent system resetting the reference to the next value.
Another challenge we had occured due to our own mistake. We accidentally put the rotating wheel in the wrong order so the wheel spins from "healthy" person to "sleepy" person. We glued the rotating wheel so there was no way to change the physical component. Instead, we changed the code. The angle to spin was changed from "step" to "180 - step" so that the wheel could rotate from 180 degrees back to 0 degrees.
One more challenge was that the servo motor vibrates from time to time if the angle was too extreme. Our solution was to user constrain method to limit the angle from 5 degrees to 179 degrees, which was the range where we did not observe any issue.
/*
servo Spin
*/

int servoPin = A4;
int servoPosition = 0;// starting state
//int servoTarget = 0; //ending state
Servo servo;

void setup()
{
  Serial.begin( 9600 ); //open serial connection for debugging
  Particle.function( "SetPosition", setPosition );
  Particle.variable("Position", servoPosition);
  servo.attach(servoPin);
Particle.subscribe("Alert", StepCounter);
Particle.publish("P2_LOG","START");
}

void loop()
{

  delay(100);

}

int setPosition( String command ){
  int servoTarget = command.toInt();
  servoTarget = constrain(servoTarget, 5, 179);
  servo.write(servoTarget);

  servoPosition = 180 - servoTarget;
  return 1;

}

void StepCounter(const char *event, const char *data)
{
  String angle = String(data);
  Particle.publish("P2_LOG_1",angle);
  int servoTarget = angle.toInt();
  Particle.publish("P2_LOG_2",String(servoTarget));
  servoTarget = constrain(servoTarget, 5, 179);
  servo.write(servoTarget);
  servoPosition = 180 - servoTarget;
  Particle.publish("degree", String(servoPosition));
}Overall, the project was fun to work with and the result was successful, but there are also some places that can be improved
What goes well:
What needs improvement:
A hands-on introductory course exploring the Internet of Things and connected product experiences.
The goal of this project is to encourage users to run everyday, but in an ambient manner so they don't feel the pressure if they really don't want to.
February 7th, 2018