49713 Designing for the Internet of Things
· 25 members
A hands-on introductory course exploring the Internet of Things and connected product experiences.
Sunrise Light is going to imitate the sunrise in order to wake up the user in a peaceful manner. It will also imitate sunset, allowing the user to slowly prepare their minds for restful slumber.
This project was inspired by my friends who have seasonal affective disorder (SAD) who have purchased sunlamps to help regulate it. Many of these lights have functions that allow simulation of sunrises to allow the body to wake up naturally so that the user feels well rested.
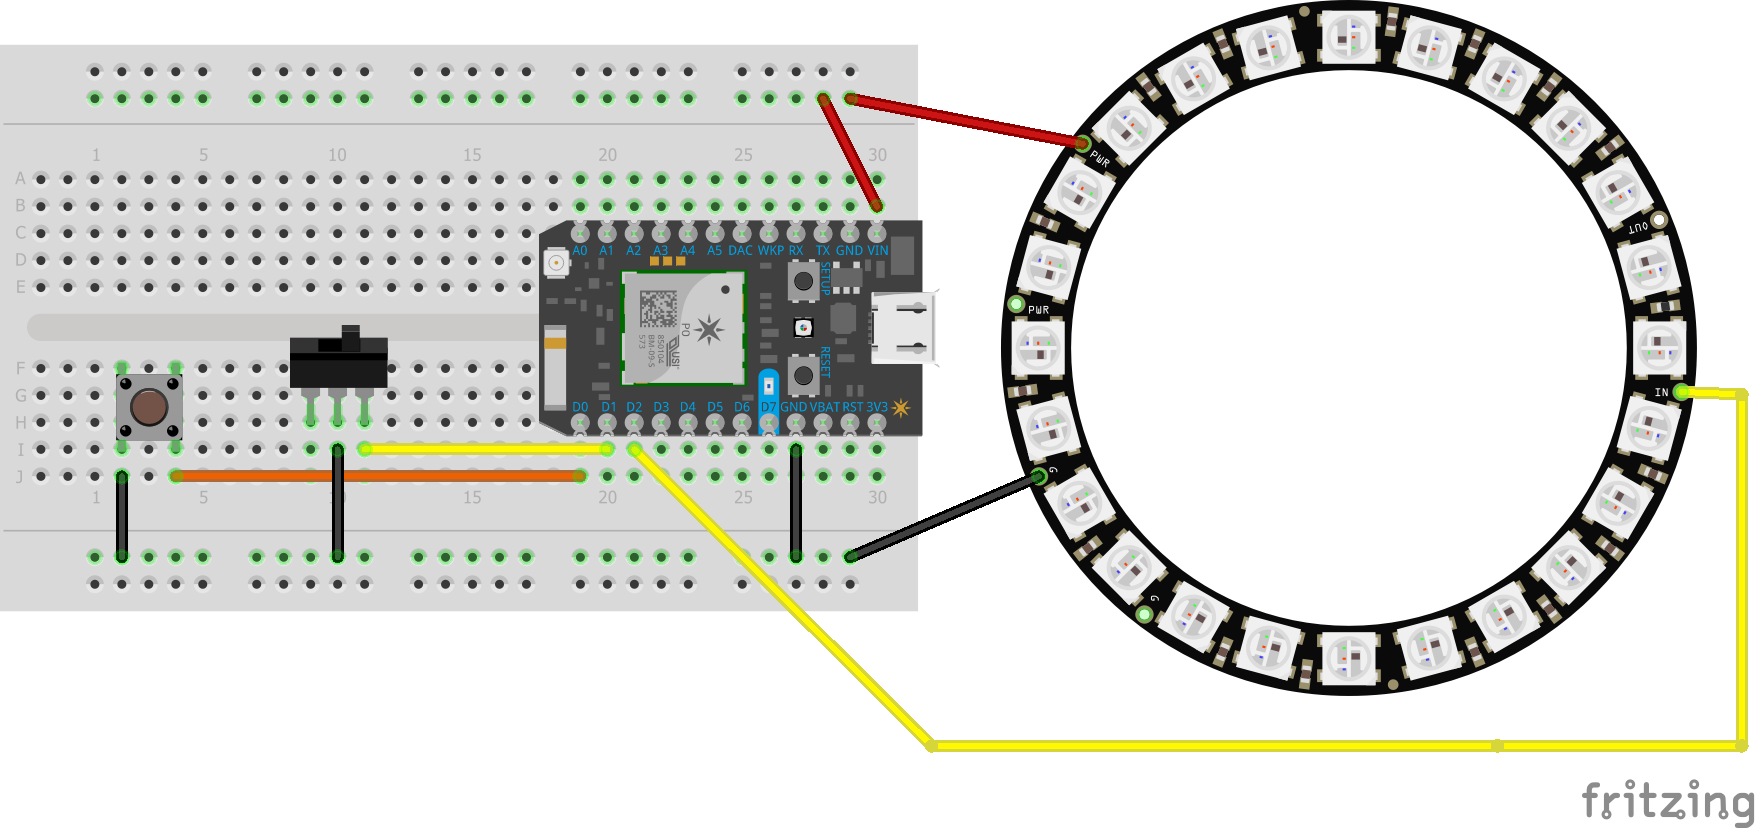
After, a switch was added so that the user could turn off the NeoPixel without having to unplug the Particle Photon. This was challenging because the way in which the NeoPixel sends information to each of its RGB LEDs. After the signal specifying the color reaches the LED, it will stay that color until otherwise specified. If the NeoPixel loses power, it will not turn back on until the circuit is closed and a signal is sent to the LEDs. To fix this. The switch is set as an input so that when the switch turns off, the Photon tells the LEDs to display no color. When it turns on, it the NeoPixel will glow a bright yellow.
Once the colors of the sunrise and sunset fading patterns were refined, I then implemented IFTTT to turn activate these functions. This was done by creating a push button on the phone that sends an event to the Particle cloud. The Photon uses a subscribe command to look for the event name and execute the function once it is received. The entirety of the code for the Sunrise Lamp, as well as the wiring diagram, can be found below.
#include "neopixel.h"
#include <math.h>

// IMPORTANT: Set pixel COUNT, PIN and TYPE
#define PIXEL_PIN D2
#define PIXEL_COUNT 24
#define PIXEL_TYPE WS2812

Adafruit_NeoPixel strip = Adafruit_NeoPixel(PIXEL_COUNT, PIXEL_PIN, PIXEL_TYPE);

int buttonPin = D0;    // RED pin of the LED to PWM pin **D0**
int toggle = 0;
int offPin = D1;
int offState = 1;
int isOn = TRUE;

int transitionTime = 5000; // Tranition Time in ms

void setup(){
  //Particle.variable("brightness", ledBrightness);
  strip.begin();
  strip.show(); // Initialize all pixels to 'off'

  pinMode( buttonPin , INPUT_PULLUP);
  pinMode( PIXEL_PIN, OUTPUT );
  pinMode( offPin , INPUT_PULLUP );

  Particle.subscribe("initiateSunrise", myHandlerSunrise);
  Particle.subscribe("initiateSunset", myHandlerSunset);
  Particle.subscribe("turnOff", myHandlerOff);
}

void loop(){

  int buttonState = digitalRead(buttonPin);
  int offPinState = digitalRead(offPin);

    if( buttonState == LOW )
    {
      if( toggle == 0){
        colorWipe(strip.Color(255, 210, 25), 40);
        toggle = 1;
        Particle.publish("sunrise complete");
      }else{
          colorWipe(strip.Color(30, 0, 0), 40);
          toggle = 0;
          Particle.publish("sunset complete");
        }
    }else{
  }
}


void myHandlerSunset(const char *event, const char *data){
  rainbow(300);
}

void myHandlerSunrise(const char *event, const char *data){
  reverseRainbow(300);
}

void myHandlerOff(const char *event, const char *data){
  colorWipe(strip.Color(0, 0, 0), 25);
}

void rainbow(int wait) {
  uint16_t i, j;

  for(j=50; j<85; j++) {
    for(i=0; i<strip.numPixels(); i++) {
      strip.setPixelColor(i, Wheel((j) & 255));
    }
    strip.show();
    delay(wait);
  }
  Particle.publish("sunset complete");
}

void reverseRainbow(int wait) {
  uint16_t i, j;

  for(j=85; j>50; j--) {
    for(i=0; i<strip.numPixels(); i++) {
      strip.setPixelColor(i, Wheel((j) & 255));
    }
    strip.show();
    delay(wait);
  }
  Particle.publish("sunrise complete");
}

void colorWipe(uint32_t c, int wait) {
  for(uint16_t i=0; i<strip.numPixels(); i++) {
    strip.setPixelColor(i, c);
    strip.show();
    delay(wait);
  }
}

void colorAll(uint32_t c, uint8_t wait) {
  uint16_t i;

  for(i=0; i<strip.numPixels(); i++) {
    strip.setPixelColor(i, c);
  }
  strip.show();
  delay(wait);
}

/**
 * Scale a value returned from a trig function to a byte value.
 * [-1, +1] -> [0, 254]
 * Note that we ignore the possible value of 255, for efficiency,
 * and because nobody will be able to differentiate between the
 * brightness levels of 254 and 255.
 */
byte trigScale(float val) {
  val += 1.0; // move range to [0.0, 2.0]
  val *= 127.0; // move range to [0.0, 254.0]

  return int(val) & 255;
}

/**
 * Map an integer so that [0, striplength] -> [0, 2PI]
 */
float map2PI(int i) {
  return M_PI*2.0*float(i) / float(strip.numPixels());
}

// Input a value 0 to 255 to get a color value.
// The colours are a transition r - g - b - back to r.
uint32_t Wheel(byte WheelPos) {
  if(WheelPos < 85) {
   return strip.Color(WheelPos * 3, 255 - WheelPos * 3, 0);
  } else if(WheelPos < 170) {
   WheelPos -= 85;
   return strip.Color(255 - WheelPos * 3, 0, WheelPos * 3);
  } else {
   WheelPos -= 170;
   return strip.Color(0, WheelPos * 3, 255 - WheelPos * 3);
  }
}

// Slightly different, this makes the rainbow equally distributed throughout, then wait (ms)
void rainbowCycle(uint8_t wait) {
  uint16_t i, j;

  for(j=0; j<256; j++) { // 1 cycle of all colors on wheel
    for(i=0; i< strip.numPixels(); i++) {
      strip.setPixelColor(i, Wheel(((i * 256 / strip.numPixels()) + j) & 255));
    }
    strip.show();
    delay(wait);
  }
}The culmination of this project resulted in successful integrating a smartphone with a Particle Photon in order to create a lamp that cycles between "Sunrise," "Sunset," and "off" in order to allow users to get into the proper mental state to start and end their day. For the purposes of this demo, the transition times are quick. Changing variables in the code could allow the transitions to fade over the course of several minutes.
Troubleshooting code can be incredibly frustrating. There was one point where I spent two hours attempting to run my code only to find out that I had missed a semi-colon to close a line. This error had been cascading down my code resulting in it failing to compile. A keen eye and good documentation of what needs to be done can help save time when you are prototyping and developing code. This first leap into the world of interconnected devices has gotten me excited for my next prototypes as I continue to grow comfortable with code and circuitry.
A hands-on introductory course exploring the Internet of Things and connected product experiences.
Sunrise Light is going to imitate the sunrise in order to wake up the user in a peaceful manner. It will also imitate sunset, allowing the user to slowly prepare their minds for restful slumber.
January 25th, 2018