49-713 Designing for the Internet of Things
· 26 members
A hands-on introductory course exploring the Internet of Things and connected product experiences.
Pointless Light Switch makes you hand free! It just knows when to spark!
Have you ever felt frustrated with finding the right switch to turn on the lights?
IoT will improve our life by making everyday objects be more intuitive.
Imagine Never need to find the light switch - Hands-Free Light is more convenient.
You come home say "Hi!" It automatically turns on to welcome you.
Or, the night light sparks directly when dark at night.
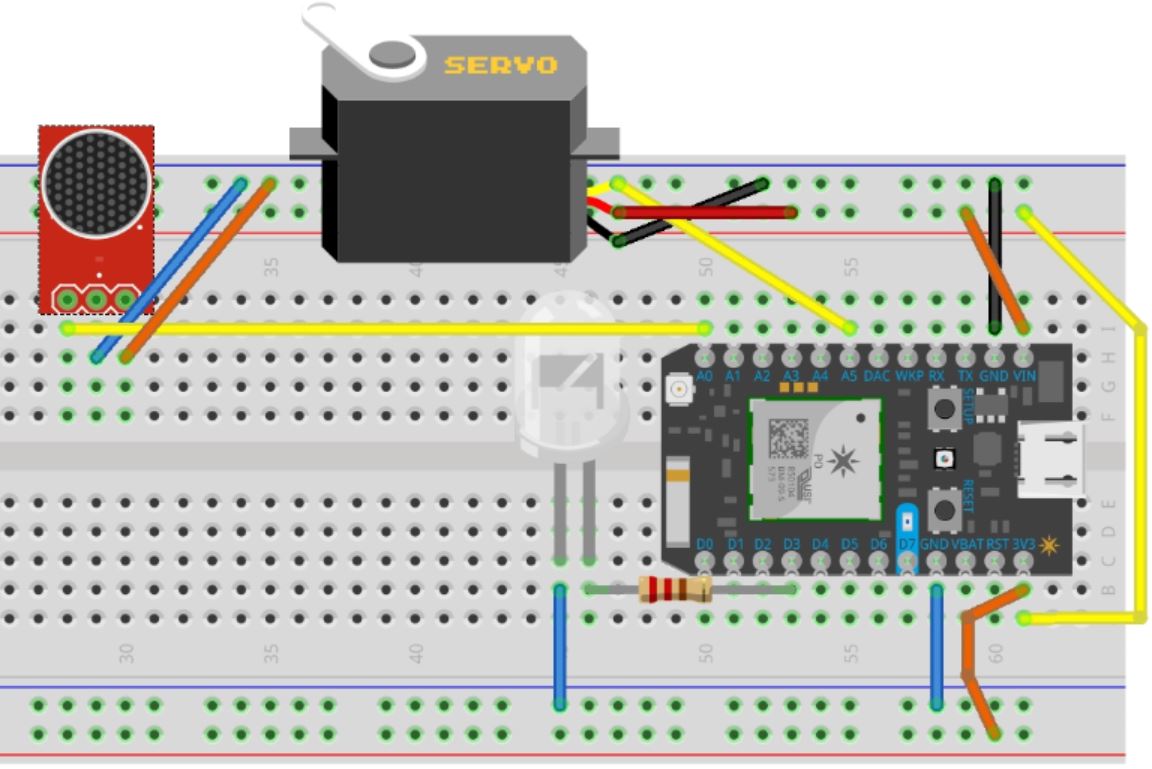
Use Photocell to sense light/darkness or Electret Mic to sense noise, triggering the RGB LED to light in different colors and Servos to move in order to spark just at the right time!
Every time I get home, I need to find the switch in the dark to turn on the light. Sometimes it takes a long time, and so do my roommate. We both want a device that can detect our voice when we come home. "Hi! I'm Home!" Like a family member or robot welcome you to turn on the light automatically for you!
When we are out but forget to turn off the light, we can also use SMS to remote control to turn off to save energy.
Pointless switch use two Particle Photons to detect the brightness then turn off the light by servo flipping. One is used to detect the light in the room with a photoresistor and the other is used to flip a light switch with a micro-servo motor.
Technical Precedents: Pointless Switch
Original one use two particles, I want to simplify to use one particle by putting all sensors and output together and soldering wire if needed to be longer distance .
I want the device to be voice-control. With Electret Mic, when noise level reach to certain level, it triggers the servo to flip the switch, sending SMS to inform family member people come back home.
First, I want only light or noise sensor with servo output.
Then, I try to add temperature sensor with servo output with IFTTT to receive SMS.
During the process, temperature sensor got problem in the beginning. I mistaken it as pull up resistor since the appearance looks exactly the same, and the wire is a bit complicated, so the monitor data is not working right at first. (though the issued solved later with downloading the package directly) Therefore, I switch to use noise sensor, LED & Servo output + IFTTT notification.
Later on, adding the fade function in Servo to create interaction while returning back while setting up IFTTT using particle.publish to receive SMS. (case sensitive first made the function not working)
Finally, add the function along with particle call a function to use SMS to remote control Servo.
Parts
Voice Sensor to activate Servo & LED to turn on the light switch to welcome you, while sending SMS message through IFTTT particle.publish events to tell me "Noise is loud, people come home."
Use SMS to remote control Servo to turn off the light when needed. No worries of forgetting turning off lights anymore!
int servoPin = A5;
int servoPos = 0;
Servo myServo;

int ledPin = D3;
int ledValue = 0;

int mic_pin = A0;
int noise_level;
const int sampleWindow = 50;

int servoControl(String command)
{
      // Convert
   int newPos = command.toInt();
   // Make sure it is in the right range
   // And set the position
   servoPos = constrain( newPos, 0 , 180);
   // Set the servo
   myServo.write( servoPos );
   // done
   return 1;
 }

void setup() {
  Serial.begin(9600);
  myServo.attach( A5 );
  myServo.write(0);

   //Register our Particle to control the servo
  Particle.function("servo", servoControl);
  // Keep a cloud variable for the current position
  Particle.variable(  "servoPos" , &servoPos , INT );
    pinMode(ledPin, OUTPUT);
  Particle.variable("brightness", &ledValue, INT);
  Particle.variable("noise_level", &noise_level, INT);
}

void loop() {

  noise_level = sampleNoise( );
  Serial.println( noise_level);
  displayNoiseOnServo();
  delay(200);
}

void displayNoiseOnServo(){
 int noise_threshold = 300;
   if( noise_level >= noise_threshold ){
      servoPos = 90;
   Particle.publish("Noise_Loud", "high" );
   }
   if( servoPos > 90 ){
     digitalWrite(ledPin, LOW);
   }else{
     digitalWrite(ledPin, HIGH);
   }
   if( servoPos < 180 )
   {
     // move from 90 towards 180
     servoPos++;
   }
   // min servo position = 180
   // max servo position = 90  i.e. loud sound detected
  myServo.write(servoPos);
 }

 int sampleNoise( )
 {
  unsigned long startMillis = millis(); // Start of sample window
  int highest_sample = 0;
  int lowest_sample = 1000;
  // collect data for 50 mS
  while (millis() - startMillis < sampleWindow)
  {
    int sample = analogRead( mic_pin );
    // invert the range, and convert it to a percent
    sample = map( sample, 0, 4095, 1000, 0 );
    // is there any difference from too low and too high and switch up?
    // now see if the sample is the lowest;
    if ( sample > highest_sample ){
    highest_sample = sample ;
    }
    if ( sample < lowest_sample ){
    lowest_sample = sample;
    }
  }
  int peakToPeak = highest_sample - lowest_sample;
  return peakToPeak;
}Hack IoT Design Concepts -
with basic electronics, circuits & coding skills, design & hack a home device that can improve our life. Apply sensor, input, and output into a product map is abstract at the beginning but interesting. Have a better sense of design IoT product after reviewing the Tech Precedents, and add own value on it.
Practical Circuits -
mistaken use pull up resistor as temperature sensor at first because the appearance look exactly the same, and the resistor became hot. Will definitely be more careful with all the numbers and details on the chip from this lesson. Besides, I gain logical sense of electronics by building the circuit diagram. In the future, I want to explore more advance sensor or output such as RGB LED and motion sensor.
Connect Physical object to Internet (App & SMS) -
with building chatbot using API experience, I would like to connect my electronics device to the App, especially interactive in two directions. Receiving message when device triggered and sending message to remote control the device is really intuitive for us now. Next step, I want to integrate Google API into my IoT device. Also, I want to understand the code structure better so that I can design more advanced IoT products by myself in the future.
A hands-on introductory course exploring the Internet of Things and connected product experiences.
Pointless Light Switch makes you hand free! It just knows when to spark!
January 25th, 2017